|
BASIC
ELECTRONICS COURSE
Page 23  INDEX
INDEX
So far we have showed how a
transistor responds to a signal delivered to it from an external
source. But the input signal can come from the transistor
itself. This is called FEEDBACK and there are two types
of feedback:
1. Positive feedback
2. Negative feedback.
Just as in the real world,
everybody likes "positive feedback," it makes them
feel bigger, better and more important. In electronic circuits
positive feedback INCREASES the amplitude of the waveform
being produced. Negative feedback REDUCES the amplitude
being processed. The different between positive and negative
feedback is the PHASE of the signal. If the phase of the signal (the feedback signal) is "out of
phase," the result is NEGATIVE FEEDBACK. If
the feedback signal is "in phase," the result
is POSITIVE FEEDBACK.
NEGATIVE
FEEDBACK
If the feedback signal is rising when the transistor
requires a falling signal, the output will decrease and this is
known as NEGATIVE FEEDBACK. In other words the feedback
signal is operating against the amplification of the stage.
There is a hidden advantage in this. If the stage produces
distortion, the output signal will have "bumps" and
"spikes" that are not present in the input waveform
and by passing the output back to the input, these
"spikes" will decrease the input waveform just at the
points where the spikes are appearing and the result is they
will be eliminated!
POSITIVE
FEEDBACK
If the feedback signal is rising at the same time when the
transistor requires a rising signal, the output will increase
and this is known as POSITIVE FEEDBACK. The phase of the
signal will be "in phase"
and the result is the circuit will oscillate.
For a transistor to operate as an oscillator it must be
provided with POSITIVE FEEDBACK. The problem is: How does the
circuit start to oscillate.
All transistors produce a small amount of noise within the
transistor and this will appear in the output. If this noise is
fed back to the input AT EXACTLY THE RIGHT INSTANT (as a positive
feedback), the output will be more noisy and this can increase
to a very high level to produce noise called "random
noise" or "white noise." Turning a
transistor ON also produces a "spike" in the output
and this can be used to start the oscillation.
If we add components from the output to the input we can control
the speed at which the transistor turns on and off. This creates
the FREQUENCY at which the circuit will oscillate.
In electronics, the "natural waveform" or the
"natural oscillation of a circuit" is the SINEWAVE.
We have already seen how a rising and falling voltage produces a
sinewave and this effect can be produced by a single transistor
plus a number of controlling components.
There are many ways of passing a signal from the output of
a transistor to the input and we will study two of these, then
get "hands-on" experience with some projects.
SINEWAVE
OSCILLATORS
We will study the PHASE-SHIFT OSCILLATOR and COLPITTS
OSCILLATOR.
THE
PHASE-SHIFT OSCILLATOR
This circuit is easy to recognise by the three equal-value
capacitors and two equal-value resistors connected to the base
of the transistor.
We have already mentioned the signal at the output of a
transistor connected in COMMON EMITTER mode is FALLING when the
signal at the input is RISING. This is called OUT OF PHASE
signals and you cannot connect the output directly to the input
to get the transistor to oscillate.
If you do, the rising output will be fed into the base to turn
the transistor ON and this will reduce the output. The signal has
to be delayed by a short period of time to allow the output
voltage to rise and then the transistor can be turned ON to
reduce the voltage on the output.
This delay is created by a set of capacitors and resistors on
the base. We have already mentioned the fact that a capacitor
takes a period of time to charge and this feature is utilized in
the PHASE-SHIFT OSCILLATOR circuit. The value of the
components create a time-delay and this sets the frequency at
which the circuit operates. But it's a bit more
complex than a single "time-delay" arrangement. Each
capacitor is doing something different at each part of the
cycle.
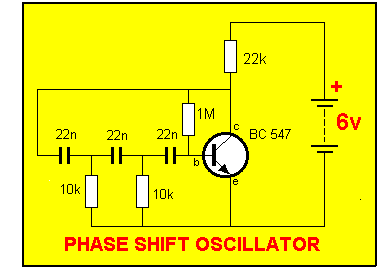
The interesting point to note is
the feedback signal only has to be about 1/50th of the collector
signal for the circuit to operate as the gain of the transistor
is about 50 to 100. This means there can be a lot of ATTENUATION
(reduction) in the signal and the circuit will still
operate.
There are two paths between the collector and the emitter. The
"1M path" and the "three 22n path."
The signal through the 1M finds it difficult to pull the base up
or down "quickly" because the 22n capacitor has a very
large "holding effect" on the signal.
The other path is via the three 22n capacitors and this can
operate on the base very easily.
We will start at the beginning. When power is applied, the
transistor is not turned on and the voltage on the collector is
RAIL VOLTAGE.
This voltage is passed to the three uncharged capacitors and
they pull the base up very quickly to turn the transistor ON.
The secret to the operation of the circuit is the voltage across
the second 10k resistor. During this time the voltage across it is 0.7v
and this reduces slightly as the first capacitor charges,
so that the "hard turn-on"
of the transistor is reduced.
The collector voltage is allowed
to gradually rise and as the charge on the first two
capacitors increases, the charging current reduces and this
means the voltage across the second 10k resistor reduces.
This reduction in voltage is passed to the base of the
transistor via the 3rd 22n capacitor and the transistor turns
off a little.
As the first 2 capacitors charge, the current through the 2nd
10k resistor reduces and this turns off the transistor MORE and
MORE.
Finally the two capacitors are charged and the voltage on
the 2nd 10k resistor does not alter.
The 1M base-bias resistor now comes into operation by turning
the transistor ON and the collector voltage falls. The
"falling effect" is passed directly to the base via
the three capacitors with the result that they turn the
transistor off slightly. The 1M takes over by charging the 22n
and this controls the rate at which the transistor turns
off.
The falling collector voltage discharges the first 22n via the
first 10k resistor and the 2nd 22n discharges via the
combination of both 10k's.
As you can see, the operation of the circuit is much more
complex than explained in any text book and its important to
know exactly what is happening so that when you look at the
waveform on a CRO, you understand how the waveforms are
produced.
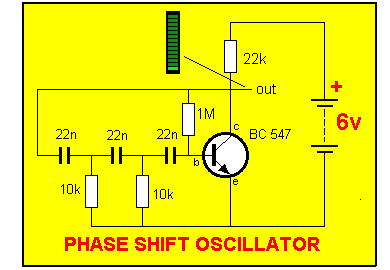
 The animation above
shows the output voltage of the Phase shift oscillator is
rising and falling. We have already seen a rising and falling
voltage produces a sinewave as shown in the diagram
opposite. This is how a rising and falling voltage
produces a sinewave.
The animation above
shows the output voltage of the Phase shift oscillator is
rising and falling. We have already seen a rising and falling
voltage produces a sinewave as shown in the diagram
opposite. This is how a rising and falling voltage
produces a sinewave.
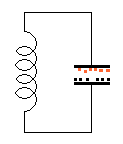
THE COLPITTS OSCILLATOR
Another circuit that
produces a sinewave is the Colpitts Oscillator. It is
recognised by a small capacitor tapping the TUNED CIRCUIT
to monitor the waveform.

THE
COLPITTS OSCILLATOR CIRCUIT
The colpitts oscillator consists of a tuned
circuit made up of inductor L1 and capacitor CT (sometimes
called the tuning capacitor) and a transistor in common-base
mode. At the frequency of operation for the circuit, the
capacitor C1 on the base of the transistor prevents the base
moving (rising and falling) and this puts it in the common-base
configuration.
Resistor Rb is the base bias resistor. It is designed to turn
the transistor on at the beginning of the cycle.
Re is the emitter resistor and keeps the emitter from the 0v
rail so the emitter can be injected via capacitor Cf (the
feedback capacitor) to keep the oscillator operating.
This circuit has two features we will cover in detail. They
are:
1. EMITTER FEEDBACK
2. The TUNED CIRCUIT
EMITTER
FEEDBACK
For a circuit to be self-oscillating
it must have positive feedback. This can come in a number of
forms. It can be intentional or due to poor design. If a circuit
is not designed correctly it can self-oscillate. This is an
undesirable situation as the frequency at which the circuit
oscillates is unknown and uncontrollable. We are
dealing with CONTROLLED FEEDBACK.
Using controlled feedback we can provide positive feedback to
either the base or emitter.
Up to now we have shown how delivering a waveform to the base of
a transistor will
allow it to amplify the signal but the same effect
can be gained by injecting the waveform into the emitter.
The base and emitter are effectively tied together and separated
by 0.7v. Any waveform delivered to the base can be delivered to the
emitter but if it is delivered to the emitter, it must be 100
times "more powerful" to produce the same voltage
shift.
THE TUNED CIRCUIT
The TUNED CIRCUIT also called the PARALLEL RESONANT CIRCUIT or
TANK CIRCUIT and the two components
that make up this arrangement called PASSIVE devices. In other words they are
not active (amplifying) devices such as transistors and each
component by itself cannot amplify, but when they are placed
together, they perform an amazing feat. They AMPLIFY a
signal (a pulse) delivered to them and turn the pulse into a
natural curvy waveform called a sinewave.
The two components we are talking about are: a coil and
a capacitor.
When they are placed in parallel, they produce a circuit that
has a natural frequency of oscillation.
Depending on where it is placed in a schematic (circuit
diagram), it can be called a RESONANT CIRCUIT or TANK CIRCUIT.
TANK CIRCUIT is reserved for its placement in the output of a
transmitter, where the effect of the circuit is to store energy
(like a tank of water) that has been delivered in short bursts
and deliver it over a long period of time.
Before we go into
the discussion it's best to see the coil and capacitor in
action. Watch the animation below and see the "charges
of electricity" moving
from the capacitor to the coil and back again. It's the
time take to charge the capacitor and then go to the coil to
produce magnetic flux, that creates the gradual rise and fall
(voltage rise and fall) across the combination.
THE
TUNED CIRCUIT
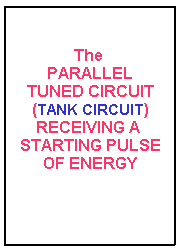
To start the circuit
into operation, a short burst of energy has to
be applied. This has
not been shown in the animation above, but
if you mouseover the frame opposite it will be pulsed with
a
burst of energy. The energy from the pulse goes into the
capacitor
because it is uncharged and readily accepts the pulse. The coil,
on the other hand, has a characteristic called IMPEDANCE and
this prevents it from accepting the initial burst of
energy.
It only likes to receive energy at an initial SLOW RATE and
that's why it accepts the energy LATER in the cycle, as shown above.
After a burst of energy
is pumped into the circuit,
the coil and capacitor respond by producing a sinewave.
This is an amazing effect for two seemingly simple components
and is one of the earliest phenomena to be discovered. Without it,
electronics would never have got off the ground; certainly not in
the radio field.
It is the basis of all transmitters as well as many other types of
radio circuits. The name "Tank Circuit" came from ham radio operators
who used a coil and capacitor in the output of their transmitters
to improve the output. The circuit stores bursts of energy from the
output stage like a tank and delivers it smoothly to the antenna.
The way it does this is the energy is firstly passes into the capacitor.
The energy (the voltage) is also presented to the coil and it is
converted to magnetic flux. This flux cuts the turns of the coil
and produces a voltage that is of opposite polarity and this has
the effect of pushing against
the incoming voltage. That's why the capacitor is first to
receive the energy.
As it charges, the coil gradually begins to accept a flow of
energy and since the coil has a very low resistance, it
eventually takes over to take the charge from the
capacitor.
The coil converts the energy into magnetic flux and this is
passed to the surrounding air or into the core material of the
coil. While the coil is receiving energy and producing magnetic
flux, the flux is called EXPANDING FLUX. But the capacitor soon
runs out of energy and the flux cannot be maintained.
The flux surrounding the coil COLLAPSES and produces COLLAPSING
FLUX and the magnetic flux lines cut the turns of the coil to
produce a voltage (and current) in the coil that IS OPPOSITE
POLARITY to the original voltage.
Refer to the animation above and see the energy coming out of
the coil is opposite to that entering it. This is one of the
amazing features of a coil and you can see the capacitor being
charged in the OPPOSITE DIRECTION by the coil.
When the magnetic lines fully collapse, the capacitor is fully
charged (but slightly less than before due to the losses in the
circuit) and the cycle repeats, this time with the voltage from
the capacitor in the OPPOSITE DIRECTION to the original
charge.
This action will repeat a number of times. Each time the
amplitude of the voltage will be slightly less (due to losses in
the circuit).
All it requires is the initial pulse to be presented to the
circuit AT THE CORRECT TIME and the circuit will repeat its
transfer of energy form coil to capacitor and back again.
This is done by a circuit monitoring the waveform and turning on at exactly the correct
instant so that the losses are replaced and the
full amplitude is maintained.
The result is a sinewave that can have an amplitude greater than the
applied voltage. This is amazing and is due to the collapsing
magnetic flux producing a voltage that is higher than the
delivering voltage. The voltage mainly depends on the speed at which the
field collapses. If this voltage is double the applied, the
quality factor or "Q" factor is 2. If the
voltage is 10 times, the Q factor is 10.
Some parallel resonant circuits can have a Q factor of 20, 50, 100,
500 or more. It all depends on the coil and the percentage of energy
tapped off for monitoring etc.
The tuned circuit is very important. Even though it appears to be
very simple, it takes a lot of skill to design for the correct Q.
The physical size of the coil and capacitor must be worked out as
well as the correct value and placement of the parts as the current
that circulate between the two can be higher than the current entering
the circuit!
A high Q arrangement is required in a receiver to obtain good selectivity
- so that adjacent stations can be separated from one another. A
low Q will cause them to come through in a jumble.
A tank circuit in the output of a transmitter will have a low Q as
most the energy will be transferred to the antenna during each cycle
and its main function it to match the output stage to the antenna,
rather than provide a high Q factor.
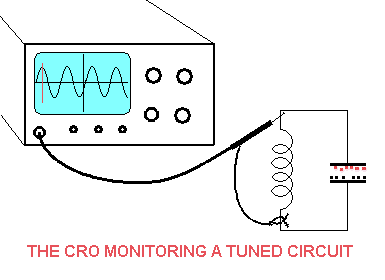
The animation below shows the voltage across the combination is
changing direction very quickly to produce a SINEWAVE. This is
shown on the CRO (Cathode Ray Oscilloscope). The waveform on the
CRO will be stationary when it is set-up correctly. The red mark
on the screen indicates the peak, zero and minimum values of the
waveform and these correspond to the voltage on the capacitor at
different points in the cycle.
Once the Tuned
Circuit is given a pulse, the energy will flow back and forth
between the two components an infinite number of times, except
the fact that the voltage decreases on each cycle due to the
losses (mainly in the coil) when the energy is converted into
magnetic flux then back into "electricity."
Our next project,
METAL DETECTOR-1 is based on a Colpitts Oscillator. This is a
very simple but effective project using a single transistor to
generate magnetic flux in a 12cm (5inch) diameter coil. An AM
radio is placed near the coil and tuned until a tone of the
lowest frequency is heard.
The Metal Detector project becomes a RADIO STATION and transmits
to the AM radio. When
the radio is "tuned in" the tone from the speaker is a
very low frequency.
When a piece of metal is brought near the coil, the
Metal Detector changes frequency and this is picked up by
the radio and a whistle is heard. The coil is very sensitive
and a small coin can be detected at a range of 10cm. You can use
this project to hunt for coins at the beach. On the next
page we cover
METAL DETECTOR-1.
Question 102: Name the two types
of feedback.
Ans: Positive and Negative
Question: 103 Name the type of
feedback that increases the gain of the stage.
Ans: Positive.
Question 104: Name the two
sinewave oscillator circuits we have studied:
Ans: Phase Shift, Colpitts
Question 105: How do you
recognise a Phase Shift Oscillator?
Ans: The two equal-value resistors and
three capacitors on the base.
Question 106:
Name the timing components in the Colpitts Oscillator:
Ans: The capacitor and
coil in the tuned circuit.
Question 107: In
the Colpitts oscillators, is the tuned circuit a parallel tuned
circuit or series tuned circuit?
Ans: Parallel tuned
circuit
Question 108:
What are two other names for the PARALLEL TUNED CIRCUIT:
Ans: Tank Circuit,
resonant circuit.
Question 109:
What is the "quality factor" of a tuned circuit known
as:
Ans: The "Q
Factor."
Question 110:
When a coil collapses, is the direction of the collapsing
voltage produced by the coil the same as the voltage energising
the coil?
Ans: No. The
collapsing voltage is REVERSE to the supplying voltage.
Question 111:
Name the output pin of the transistor for the output of the
Phase Shift Oscillator and Colpitts Oscillator:
Ans: Collector.
NEXT
| 