|
| |||||||||||||||||||||||||||||||||||||||||||||||||||||||||||||||||||||||||||||||||||||||||||||||||||||||||||||||||||||||||||||||||||||||||||||||||||||||||||||||||||||||||||||||||
|
|
PROGRAMMING
This chapter should be read AFTER you have done the experiments in the 5x7
Display project. It covers some of the things we have discussed already but
it is worth going over them again. Our approach to writing a program is very linear. Many writers produce very
small sub-routines with GOTO’s from one sub-routine to another that produce
“jumps all over the place.”
3. The Hex file at the back of this book, 4. Some or all of the following development tools: 18 Pin to 8 Pin adapter Type A 18 Pin to 8 Pin adapter Type B 5x7 Display for programming F84 chips Pseudo 508A Module for developing a ‘508A program Experimenter Board MkIII PIC12c508A 6v Express Module PIC16F84 Express Module 5. Any project with an 8-pin socket for a ‘508A chip. WHERE DO I START? "What Do I Need?" THE ‘508A
HEX NOTATION All the values in our programs are written in Hex. This makes writing a program more complex but understanding hex gets you one step closer to seeing how the program operates and allows you to work out the values to make the individual port lines input or output. The program values are loaded into a register called the working register (the W register). These values are called LITERALS. A Literal is simply another name for Value or Number. The Hex code has a base of sixteen numbers and these are: 0, 1, 2, 3, 4, 5, 6, 7, 8, 9, A = ten, B = eleven, C = twelve, D = thirteen, E = fourteen, F = fifteen. For instance, twelve is 0C and fifteen is 0F. It's easy to see 3E is a hex value (equal to sixty-two), but to make it easy to recognise hex values such as 23 or 41 or 82, a small "h" is placed after the value thus: 23h, 41h, 82h. A file is capable of holding a value from 00 to FF and this represents a value from zero to two hundred and fifty-five in decimal or ordinary numbers. See the page of Hex values from 00 to 1FF and look through them to see how Hex notation is structured. It will take time to understand hex but while we are here, there is another concept you must understand. It is: BINARY-TO-HEX. The binary code consists of only two values "0" and "1." All the files in the '508A and F84 are made up of 8 "cells" in which a "zero" or "one" is placed in each cell. The 8 cells are separated into a group of 4 upper cells and 4 lower cells. The 4 upper cells are called the HIGH nibble and the 4 lower cells are called the LOW nibble. To read the complete (or total or full) Hex value in a file, the HIGH nibble and LOW nibble are combined. Each GP line (A GP line is a General Purpose input/output line) corresponds to a bit in file 06. Line GP0 corresponds to the Least Significant Bit (LSB) and GP1 corresponds to the next bit (bit1). Now, here comes the hard bit to understand, but it's logical. To make GP0 an output line, the LSB in file 06 must be 0. "0" stands for Output. To make GP0 an input line, the LSB in file 06 must be 1. "1" stands for Input. Suppose you want to make GP0, GP1 and GP2 input. The three low bits must be "1." This makes the file = 0000 0111 = 07. Suppose you want to make GP3 input. The file value will be = 0000 1000 = 08. Suppose you want to make GP3 and GP5 input. The file value will be 0010 1000 = 28h. Any combination of lines can be input or output and it's essential to understand hex notation to create the value to load into file 06. File 06 has only six functional bits but all the other files contain 8 bits. You need to know hex when loading a file because you may need to know: (a) when a certain bit is SET in a file being incremented, or (b) the maximum a file can hold for a table, or (c) the output pattern when a counter has been "clocked." Binary values are involved in all stages of program writing and hex is simply a short-form of showing the binary value, using 2-digits. Hex is easy to see and easy to read. In addition, you can mentally convert binary-to-hex and hex-to-binary very quickly. THE FILES The '508A contains thirty-two files or registers of which the first seven (00h to 06h) are called Special Function Registers (SFR's) and the next twenty-five (07h to 1Fh) are General Purpose Registers or Files (GPR's). The F84 has twelve Special Function Register (SFR’s) (00h to 0Bh) and the next sixty-eight (0Ch to 4Fh) are called “Files.” Twenty files are common to both the ’508A and F84. They are: 0C, 0D, 0E, 0F, 10h, 11h, 12h, 13h, 14h, 15h, 16h, 17h, 18h, 19h, 1A, 1B, 1C, 1D, 1E, 1F. These are the files we will be using. Each file has 8 bits which can be made "0" or "1." When all the bits are zero (0000 0000), the file has a value of zero. When the LSB is "1," the file has a value of 1. We have already shown how the low nibble in the file increments to F (see Hex Notation at beginning of article). The next increment after 0F produces 0001 0000 = 10h, followed by 0001 0001 = 11h. The file increments to 1111 1111 = FF then "rolls over" to 0000 0000. Before leaving hex, there's one more skill you will need. It's converting binary to hex so you can SET bits in a file. Setting single bits is easy. Here is the table: To set TWO or MORE BITS in the high or low
nibble, read on. Remember, the lowest bit is called bit0 and the highest is
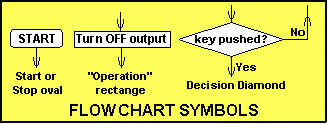
bit7. THE WORKING REGISTER (W) The Working register is the most important (most busy) register in the chip. It operates like a basket in a super-market, picking up a value from the program, such as a Literal, or a data byte from a table, a value from any of the files or data bits from the input port and delivering it/them to another file, or the output port. The output port is file 06 and any value delivered to this file via W, is available for outputting. It also works in reverse. Any value presented to this file from the outside world is delivered to file 06 and from file 06 it can be passed to the working register. The working register can be cleared (zeroed) or loaded with a number (called a literal). Bits in the working register cannot be tested, cleared or set, or the nibbles swapped. It cannot be incremented, decremented or the bits rotated. These operations have to be done on a value in a file. The Working register is merely the "carrier" or "helper" in the system. It does not have an address location, it is merely called "W" in an instruction. THE DESIGNATOR There are features in the PIC instruction set that make it "very powerful." By this we mean a single instruction incorporates two or three things. In the early microprocessors, an instruction did only one thing. That's why you needed a lot of instructions in the instruction-set. One of the clever features of the PIC instruction-set is the designator. It's the number 1 or 0 added to the instruction to tell the micro where to put the result of the operation. If we take the instruction ANDWF 0C,1 the result is placed in file 0C. If we use the instruction ANDWF 0C,0 the result is placed in the W register. There is an obvious importance in selecting the correct instruction as the first instruction changes the contents of file 0C while the second instruction does not change 0C and we may not want 0C changed. With some instructions it is more difficult to see the purpose of the designator. For instance, MOVF 0C,1 merely moves the contents of file 0C in and out of 0C and alters the flags. It DOES NOT put the contents in W. To put the contents in W, the instruction MOVF 0C,0 must be used. When writing a program it is important to include the designator. If you forget, the compiler (MPASM) will add a default designator and report the condition. You must check this as the fault designator may not produce the required result. For instance: MOVF 0C,1 does not put the contents of 0C in W - it merely moves the contents in and out of 0C. WRITING A PROGRAM The program for a '508A starts at address 000 and extends to 1FF. This is a hexadecimal number and corresponds to 512 locations (512 lines of code). We can only use up to 511 address locations as the top location is used by the micro as a calibration value. (OSCCAL). For the applications are will be talking about (such as games, displays, timers, counters, etc.), 511 lines of code is a good-size program especially when you consider the chip is capable of taking the place of 5 or more standard chips in a project. Before writing a program, you should look through the projects we have included in this book as well as the Library of Terms and Routines to get some idea of what the micro can do. This will also give you an idea of how the instructions are written and the type of instruction required for a particular operation. The easiest way to learn is by example and spending time with the projects and looking through the routines in the Library will get you to the "starting blocks." Most of the thinking that goes into writing a program cannot be seen in the final version of the project so let's find out what the programmer is thinking when he produces a routine. Firstly he has to work out what he wants the project to do. He doesn't worry about the program or the micro for the moment. He just thinks about what he wants to SEE the project do. All the timing, pin numbers, LED colours and types of sounds will come later. Firstly produce an overall description in the form of an essay, set of notes or a flow diagram. FLOW CHARTS AND FLOW DIAGRAMS Some schools of thought think a flow chart is essential for successful programming. If you are not up with flow-chart symbols or how to produce such a chart, don't worry. Other schools consider them to be absolutely un-necessary! For those who are keen, there are only three flowchart symbols you need to know. They are the start and stop ovals, the rectangle in which an operation is performed and the decision diamond where a "yes" or "no," "on" or "off," decision is made. These shapes are connected with lines and the arrows indicate the direction of flow of the program.
A flowchart helps others to understand what the
program is doing and gives an idea of its complexity. THE SIMPLEST PROGRAM The simplest program will load the working register with the value "1" and output it to GP0. If a LED (in series with a 470R to 2k2 resistor) is connected to GP0, it will illuminate when this instruction is executed.
But before we can run this very simple program,
we have to "set-up" the port so that GP0 is an output.
GP0 is one of the input/output lines of the
chip. Before a program can output a value on this line,
GP0 is now an output line. It will deliver a HIGH to the outside world when "1" is loaded into bit0 of file 06. The instructions for this are:
The GP0 line will produce a HIGH and a LED
connected to this line will illuminate when the above two instructions plus the
set-up instructions are executed. IN ENGLISH!
The binary value 0011 1110 shows bits 6 and 7
are not needed as the '508A has only 6 port lines and all the other lines will
be input lines (as shown by the value "1") except the lowest bit,
which will be an output. In other words we only have to make bit0 a zero!
tells the micro to go to the label Out0 at line 3 and the micro executes a loop of lines 3, 4 and 5. This is called an ENDLESS loop as the micro will continue to execute these three instructions until the power is removed.
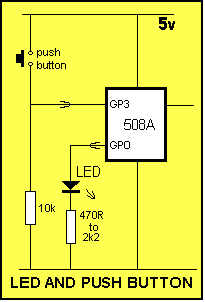
.ASM In other words it is written for an assembler. The assembler we use is called MPASM and it will locate all the tags and labels and convert them to an address and convert the instructions to Machine Code. The result is a file with the extension .hex THE NEXT SIMPLEST PROGRAM To add to our simplest program, we can include a push button. The button has been added to the circuit so that when it is pressed, GP3 sees a HIGH. This is called POSITIVE LOGIC. The program is now required to "turn on a LED when a button is pressed." This statement must be converted into a set of instructions that can be executed by the '508A.
The program needs to be in the form of a loop so the button can be detected when pressed and the LED turned on. When the button is released, the LED must turn off.
All programs from now on consist of a LOOP. The
simplest program above is the only program using a "dead-end" loop.
The instruction above tests bit 3 of file 06
(the port file). The micro "reads" the port and tests bit 3 to see if
it is SET (HIGH). The next two instructions are:
We have created two branches in the program. The
Released branch (for not pressed) and the Pushed branch (for switch pressed).
If the bit is Clear, it will be LOW and thus the switch will not be pressed. We now need to produce one or more instructions for the mini-routine "Clear." The instructions for "Clear" will clear bit0 of the port so that line GP0 is LOW and the LED will turn off.
The micro must now be sent back to test the port again to see the condition of the switch. The instruction is:
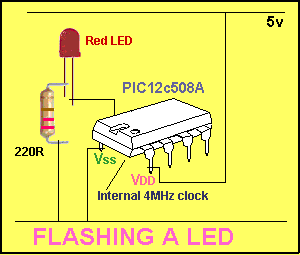
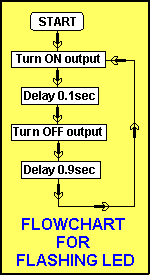
The program is constantly looping (polling) the instruction to look at the switch and turn the LED on or off. FLASHING A LED If you want to make the LED turn on and off automatically, a different set of instructions are needed. Firstly you need instructions to turn the LED on, then a routine to keep it on for a period of time (this is called a DELAY routine), then instructions to turn the LED off and finally a delay routine.
The program must then loop back to where the LED is turned on. The result is a flashing LED.
A flow chart can be produced for this sequence
using the symbols shown previously.
| ||||||||||||||||||||||||||||||||||||||||||||||||||||||||||||||||||||||||||||||||||||||||||||||||||||||||||||||||||||||||||||||||||||||||||||||||||||||||||||||||||||||||||||||||