|

|
OVERVIEW
The things you
need to get started

Page 2
INDEX
This course contains all the information you need to get a project “off
the ground.” But before you start on the “road to development,”
there are few preliminary things that need covering:
The Microcontroller
A microcontroller is a “computer-in-a-chip.” The two microcontrollers we have
chosen for this course are the smallest in the range and provide the starting point for anyone wishing to
design a “computer-based” project.
They are the PIC12C508A and PIC16F84. The
initials “PIC” are generally assumed to mean Programmable Interface
Controller. PIC chips have become known as the Programmers Dream. They
are easy to work with and all the technical information needed to
understand their operation has been made available FREE on the web and
backed by groups of PIC enthusiasts, all over the world. But the
information is very
scattered and disjointed and some of it is hard to access. We have brought
a lot of the information together and
presented in a way that can be understood by a beginning hobbyist.
Basically a microcontroller is capable of storing and running a
program. It takes instructions or data from the program, and/or external
sources, and outputs it to devices to create a result. It can effectively
take the place of one or even hundreds of simple integrated circuits and
components.
This makes a microcontroller project much simpler in appearance than the
project it is replacing. The program can even be designed to perform
mathematical or analytical calculations and come up with a fast answer and
in this way it can appear to have “intelligence.”
The simplest microcontroller in the PIC range is the PIC12C508A. It is an
8-pin device with 5 input/output lines plus one input-only line. The other
two pins are for the positive rail (+5v) and 0v rail (also called the
negative rail or ground).
The diagram below shows the pin
assignments.
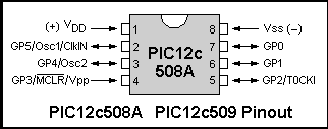
The output lines are called GP (for
General Purpose) and are identified as GP0, GP1, GP2, GP3, GP4, and GP5. The
diagram below shows how the chip is connected to the supply.
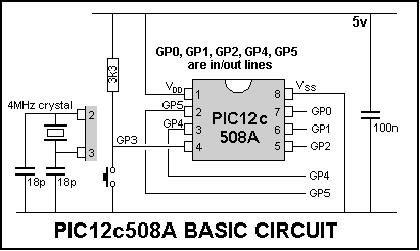
Connecting a PIC12C508A to the
power rails
The PIC12C508A has an
inbuilt oscillator and so no other components are required to get it
operational. The internal oscillator is not absolutely accurate and if you want
precise timing, you can add a crystal as shown above. This reduces the
capability of the chip by two in/out lines.
The circuit above has a press-button connected to GP3. Since this is an input
only line, this is the best place to connect the switch. The switch can have any
function at all. It depends on the program. It can be designed to be: reset, start, increment,
decrement, panic, increase brightness, change a tune, etc etc.
The chip will perform amazing feats, it all depends on your program. The
program on the previous page has 5 lines, the chip can store about 511 lines of
program and a program of this size is really a "performer!" That's
more than 10 exercise pages of program! But the main thing that
limits its use is the number of outputs. It has only 5 outputs.
That’s why we have included the next chip in the range, the PIC16F84.
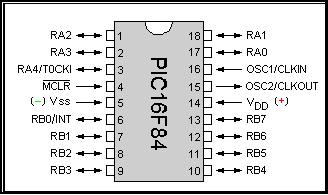
The PIC16F84 has 13 lines and will take
over for your more-advanced projects. You can also use a PIC16C84. Both chips
are almost identical except the PIC16C84 has files 0C to 2F while the F84 has
files up to 4F. The basic circuit for a PIC16F84 connected to the
power rails is shown below:
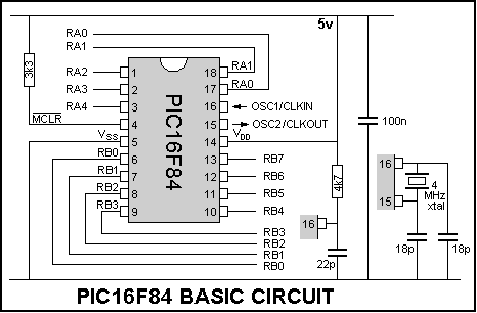
Connecting a PIC16F84 to the power
rails
The chip requires "timing components"
connected to the "Clock In" line to complete the oscillator
circuit. These components allow the chip to produce a frequency (called a
clock pulse) on the “clock-in” line and the micro will carry out the
instructions in the program. By choosing a 4k7 and 22p
capacitor, the chip will run at 4MHz. The chip can be operated at any frequency,
right down to 0Hz! (This is called single-stepping).
This course is all about
producing the program and burning it into the chip to perform a task. The “burning”
operation is also called “programming” and to perform this task we have
provided two programming projects. One is a stand-alone programmer, the Multi-Chip
Programmer, and the other is an ‘In-Circuit” programmer, the 5x7
Display.
One of the advantages of the PIC16F84 (and PIC16C84) is the capability of
“in-circuit" programming.
The project must be designed for in-circuit programming and by including a
4-pin programming socket, the chip can be up-dated without being removed from the
board. The socket allows 4 lines to be taken to the serial
port of a computer for "In-Circuit" programming.
The advantages of this are many. A basic product can be designed for a number of
different clients or operations, using surface-mount technology, and programmed
at the last stage of assembly. The appropriate program can then be installed.
Since the products are assembled “empty,” the latest software can be
installed, and updates can be added without any re-designing or removal of the
chip. The product can also be updated at any time by connecting to a
programmer.
Building the Projects
The projects in this course can be constructed from your own source of
components, commonly called “junk-box” parts or from a kit supplied by
simply clicking on the "Buy Me" button at the side of the
article.
You can build the projects from your own supplies but the biggest problem
is the PC board. It's the one item that makes the project look professional and all boards
supplied in the kits are fibre-glass. They all have an overlay (called a
legend) and a solder-mask. The lands (solder lands) are all pre-tinned for easy soldering
and the edges of the board are either routed or guillotine-cut.
Some of these features cannot be provided when you make your own board and
although I must confess I made a few boards in my early days, as soon as I
got a panel made by a PC board manufacturer, I never went back to “home-brew.”
For the small cost of a board, the project looks 1,000% better.
In essence, I recommend you use a pre-made PC board in preference to matrix or
bread-board. The chance of a circuit mistake is eliminated and you can see
exactly where every component is placed. All boards are available
separately, so there’s no excuse for not producing the best project
possible.
Now we come to the components.
All the components used in the projects are “standard” and can be
purchased from any electronics components store. There is only one
problem. The parts used in the kits are the smallest available and the
hole spacing has been designed accordingly.
If you are going to use “older-style” components, they are not going
to fit and will be sitting “above-the-board.” This is especially the
case with the switches, plugs,
IC sockets and electrolytics.
Be forewarned, the kits supplied for the courses are not “junk kits” they don’t contain
surplus or unmarked items. Many kits are bought by hobbyists in lots of 10
or 20, assembled and marketed by them as a business.
We have many customers whose business revolves exclusively around our
products and that’s one of the aims of this course.
As we said in the introduction, the projects show you how to create a
microcontroller project at the lowest possible cost, while keeping
everything “in-house.” All you have to do is keep your eyes open for
an application. A simple timer or controller, especially in the medical
field, or something to assist a person solve a problem. It may be a
vibrator as a doorbell for a deaf person, an alcohol detector interface to
prevent driving a car with a reading over 0.03% or 0.08%, a
pill-timer, a detector-loop to keep someone from wandering away. The best
projects hit you when you least expect it and if you have done your
homework in microcontroller-design, you will be able to put the idea into
effect.
The Things you need:
The only item you need to buy to get started is the 5x7 Display
project (and the serial cable). This kit is available for US$30.00 plus US$2.50 pack and post (Serial Cable $2.70).
The 5x7 Display has “in-circuit” programming facilities for the
PIC16F84 (and PIC16C84) and more than 30 experiments to show how
to write a program.

The software need to program the chip “in-circuit” is provided by a
program called ICPROG. This program is also available for downloading in a .zip file
from this website. You will also need a text editor such as
NotePad or TextPad on which you write your program. You need to save it as
a .asm
file.
Next:
After building the 5x7 Display
project, and carrying out the experiments, you will be ready for the next
stage.
It can be any project requiring a PICF84 chip, such as the Logic Probe
(F84 version).
The next step is to be able to “program” (burn) PIC12c508A chips.
This will give you the capability of producing the smallest and cheapest
product for your design. You will need to purchase the Multi-Chip
Programmer (minus the Serial Cable). This programmer will allow you to
burn PIC12C508A chips and you can build the other projects in this
e-magazine.
Once you have worked with both these chips, you are ready to design
something yourself.
And further . . .
One of the shortest chapters in the
course is the most important. It’s “Developing A Project.” This
chapter contains the development tools we have created to help you get a
project off the ground. It has modules to help you design a project via
“bread-boarding” and when you are happy with the operation of the
circuit, you can transfer the components to a matrix board and join up the
parts with short lengths of tinned copper wire. Once you have the
layout working, it is a simple matter to design a printed circuit board -
simply follow the same layout and the project is guaranteed to work.
As a very clever professor said, one day: “What’s the difference
between yourself and a brain surgeon?”
His reply: “Two Weeks.”
You can learn anything in a very short space of time if you apply
yourself and have the right tools and equipment. This course has the
information you need and all you have to do is “drink it in.” I am
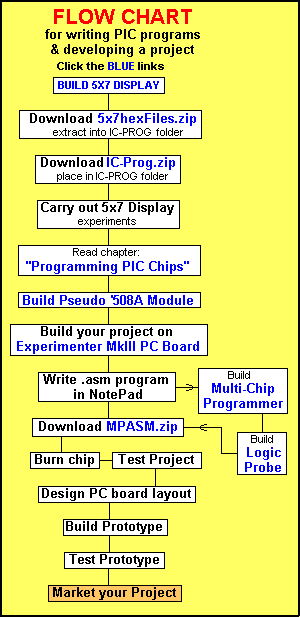
sure you will agree. Below is a flowchart of the features we have covered.
Click the blue links and you will be taken to
the associated page:
NEXT
|
