|
Page
13:

SOLDERING

THE ART OF SOLDERING
The art of soldering takes months, if not years, to master and every time you build a project your skills improve.
If you have experience with soldering, you will have no trouble putting together the projects in this
e-book. But if you are new at electronics,
you will need a lot of help. This chapter covers the points to look for in a good soldering iron and how to make a perfect solder-joint.
Read it carefully as we have presented some information and hints that have never been covered before.
The first hint: The best way to prevent damaging a component when soldering is to hold it in your fingers, while
holding and pushing it onto
the printed circuit board.
If you have to let go, the component is getting too hot. This applies especially to transistors and LEDs as they are semiconductor devices
and must not be allowed to get too hot as they can be easily damaged - more about this later.
BUYING A SOLDERING IRON
There are lots of soldering irons on the market and they cost from a tiny $5 to a massive $1,000!
What's the difference between them and which one is best for a beginner?
This is a complex question and difficult to answer without seeing
the range of irons. But one thing I can say is the expensive irons are very nice to work with and have a variable temperature control that makes your soldering very neat and professional.
If you intend to make electronics your hobby and eventually your profession, I suggest you invest in a temperature controlled soldering STATION
and you will have the best from the start.
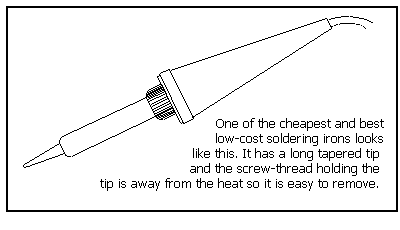
If you are not able to spend a lot of money at this stage, any of the low-cost soldering irons with a rating of 15 to 30 watts will
be suitable. Don't buy a plumbers-type soldering iron with a rating of 60 watts or greater or an instant-heat soldering iron or
a soldering gun as they require a lot of skill to get the correct temperature
and you can easily damage delicate components.
All the low-cost irons require a lot skill to use. Most of them get too hot and you have to be very fast at soldering to prevent damaging
components. It takes a lot of skill to make a fast connection and that's why it is easier to use a temperature-controlled soldering station. Apart from the correct temperature of the iron the size and
shape of the tip is a very important consideration.
THE SIZE OF THE TIP
Sometimes a very fine tip is what you need to make a delicate joint and sometimes a small flat on the end of the tip is handy for adding
solder to a larger connection.
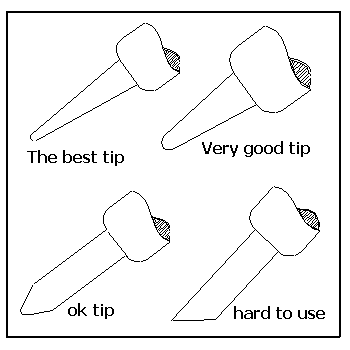
The actual shape does not matter but as you get more experienced you will find the screwdriver-type tips as shown in diagram 4 are not
very nice to work with and a tapered tip with a fine point as shown in figure 1 or medium point as shown in figure 2 is professional-looking
and good for all types of connections.
Anything larger than this, as shown in figure 3 and 4 will not allow you to get into tight areas - especially when soldering surface-mount
components (we will have a surface-mount project later).
In theory you could use a rusty nail to make a perfect solder joint, provided the nail was properly tinned before starting the job. But
before we discuss the art of tinning the tip, we must mention another important item - the solder.
SOLDER
You may think solder is an insignificant part of soldering but it is actually a highly technical item and some of the factors associated
with solder help you create better joints.
There are three points we will be covering: They are:
1. How does solder work?
2. What are the melting points for solder? and
3. How does flux work?
Solder is normally a tin-lead alloy, although other elements such as Copper, Silver, Bismuth, Indium, Antimony and Cadmium can be added
to obtain certain characteristics.
Solder has three distinct
states:
SOLID, PLASTIC and LIQUID
The solid and liquid states are easy to understand but the plastic region needs a little explanation. This is when the solder is beginning
to change from a liquid to a solid. You can see this occurring on a joint when the shiny surface gradually becomes dull. When solder is cooling through this region, the joint must not be moved otherwise
the wire or lead forming part of the joint will be very weak when the solder has cooled down. In fact if you wiggle or pull the lead
it will easily come away from the joint.
This is basically how dry joints occur. If a component such as a transistor, regulator or resistor gets hot enough to pass heat down its lead and
the lead melts the solder joint, the result will eventually be a dry joint, even though the original joint may have been perfect. The other
condition that has to occur is the component must not be moved (such as vibration) while this solder is cooling. The result will be a fracture
in the solder.
Lead melts at 327°C/621°F and tin melts at 232°C/450°F. But most of the tin/lead alloys
change from solid to plastic state at 183°C/361°F.
The plastic region occurs between these two states and its width varies
according to the tin/lead ratio.
At the 63%tin/37%lead ratio, the alloy passes from solid to liquid with no plastic region. This is termed a Eutectic alloy and the temperature
at which this occurs is called the Eutectic point (183°C).
63/37 solder is not normally used in electronics as it is very susceptible to fracture at the instant of solidification due to any slight movement
of the solder joint.
60/40 solder is the most commonly used as it has a very small plastic region of 5ºC (183ºC to 188ºC) and with a little care,
a good solder joint is easy to make.
Solders with less than 60% tin do not wet the base metal as good as higher tin solders. They are more brittle and more likely to fracture
under stress.
50/50 solder has a relatively large plastic range of 29°C, therefore more care must be taken not to disturb the joint when cooling.
When soldering, a certain amount of the base metal is absorbed into the solder. Usually this is not a problem, but if it is, special solder
alloys can be used to reduce the effect.
For instance 50/48.5/1.5 (Sn/Pb/Cu) (Tin/Lead/Copper) solder will reduce the absorption of copper from unclad soldering iron tips but
since most soldering iron tips are triple plated, this should not
be necessary. As soon as the tip gets a hole through the plating it should be replaced with a new one.
FLUX
The diagram above shows a solder land on a PC board.
This land can be bare copper or pre-tinned with solder or nickel plated (nickel plated lands are very hard to solder). The lead of a resistor
is usually plated mild steel. They are not, as you would expect, made of copper as this is very expensive and to reduce the cost of components
they are a ferrous metal with a plating of nickel or tin.
All these metals form an oxide layer when exposed to air and quite often they get oil and grease from fingers and the surroundings.
This oxide layer is a barrier and prevents the solder sticking to the metal. The problem becomes worse when the metal is heated as the
heating accelerates the formation of the oxide layer.
This is where flux comes in. Rosin cored solder has flux in the centre of the solder. It may be a single core of flux or 5 very fine cores.
Five-core solder is the best as it allows the soldering iron to heat up the flux before the solder has reached the liquid state, causing
it to flow out of the solder and clean the surface ahead of the molten solder. Single core flux is more messy and comes out in spurts and
bubbles. Avoid this type of solder if possible.
Rosin flux is obtained from the gum of pine trees and although it is not extremely harmful, you should never breathe the fumes. (When
taking the enamel off winding wire the fumes are extremely dangerous in the gaseous state and must NEVER be inhaled. The best is to stop
breathing when removing the enamel.)
The diagram below shows the advancing hot solder with the flux covering the copper and removing the oxide film.
A good solder joint will finish up bright and shiny with almost all the flux being evaporated during the soldering process.
If you have a lot of flux left over, either the solder is not of good-quality (such as single core solder), the iron is not hot enough or a lot
of dirt is present.
It is very difficult to explain on paper how to tell if a soldering iron is too hot or too cold. But if I was next to you I could tell
exactly the temperature by simply watching how fast the iron melts
the solder and how fast the flux creates fumes. You will generate this skill too, after a lot of soldering.
There's one final point while on the topic of flux. The life of rosin cored solder is about 5 seconds! As soon as the flux has evaporated
from the solder, the remaining solder is ABSOLUTELY useless.
This means you must have the solder next to the joint so that the flux does its work IMMEDIATELY. It is useless melting the solder on
the iron and then taking the iron 30cm to the joint. The solder is
already DEAD and cannot possibly make a good connection.
The other thing you must not do is dab, dab, dab the solder on the joint. The can leave the solder in the plastic region and can easily
create a faulty connection as discussed above.
Tinning the iron is the most important part of soldering, so let's look at what we mean.
Here are the 2 simple steps to creating a good joint:
Step 1:
Tin The Iron
The size and shape of the tip does not matter, provided it is bright and shiny. The way to do this is to add fresh solder so that the resin
(in the centre of the solder) does its job.
No matter what the size and shape, the first thing to do is TIN THE TIP by feeding one centimetre (1/2") of fine solder onto it and letting
the resin in the centre of the solder clean the tip.
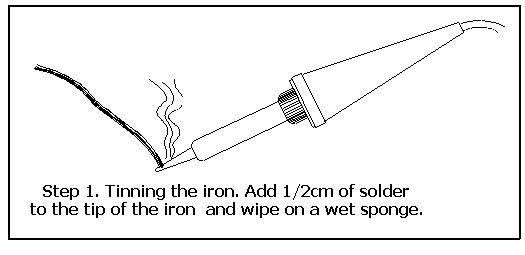
This solder is then wiped onto a wet sponge so that no excess solder
remains on the tip.
This may seem like a waste of solder but it is actually the resin (or rosin) in the centre of the solder that is required. We don't
want any solder that has been sitting on the iron and that's why it is wiped off.
Do not use any type of plumbers soldering flux or solder paste or plumbers solder or any form of thick solder that comes without
rosin in the centre.
The only two types of solder for electronic work are:
Fine: .71mm and
Standard: 1mm.
This tinning procedure is done every time the iron has not been used for 15 minutes or so.
This is the secret to good soldering and unless the tip is absolutely clean (by carrying out the above process) you are simply wasting your
time.
When a soldering iron is left in a hot state for 15 minutes or more, the solder on the tip oxidises and some of the resin is left behind
and is burnt to a carbon compound. This solder becomes very dirty and if you try to use it to make the next connection, it will not "stick" to the lead of the component or to the track on the PC board.
It will sit on the lead or the pad on the board and create a dirty joint. Later, this will become a prime possibility for a dry joint.
Step 2:
Heat the solder-land
The iron is then taken to the solder-land where the joint is to be made. The land and the lead is then heated for about 1 second and
1/2cm of fine solder is added to the land on the other side to the iron.
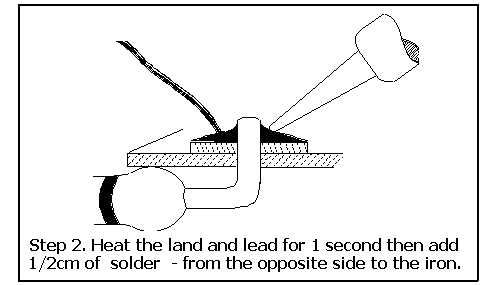
A good connection will have the solder licking up the side of
the lead and will spread out over the solder-land as shown in the diagram below.
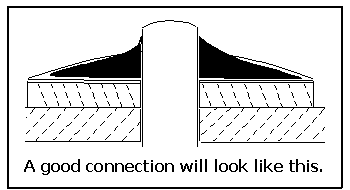
If you have not done everything correctly, the solder will not "stick"
to the lead and will look like the diagram below:
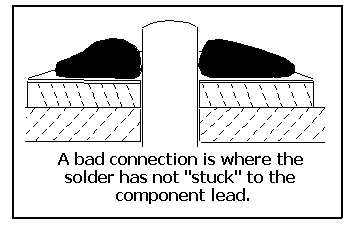
THE DRY JOINT
A dry joint is the worst thing that can occur because it looks like a good connection but when the component is wiggled, the lead becomes
loose and can be pulled away.
Dry joints look to be ok but they don't make a perfect electrical connection. They make a connection that is intermittent.
This is the one thing we try to avoid and that's why you have to become expert at soldering.
Dry joints can occur AFTER a product has passed inspection. If a component gets extremely hot during use, such as a regulator or output transistor,
heat passes down the leads of the component and enters the joint. The solder heats up and partially melts. When the joint cools the solder does not adhere properly to the lead and a faulty connection is produced.
The only way to eliminate this is to keep hot components on long leads or
heat-sink the body so that the temperature does not rise more than "touch hot."
If any joint is constantly heated and cooled, and the lead is moved when the joint is passing through the plastic region, the solder
will fracture very easily. The end result will be a "dry joint."
THE SOLDERING IRON STAND
One last item to cover is the soldering iron stand. It is important, not only to prevent the iron falling off the bench, but for two other
reasons. The base of the stand holds a sponge that must be wetted with water every time you begin soldering. You must wipe the tip of the iron before every connection to remove dirt and contamination
if you want to make a perfect connection..
The base of the stand also has a tray to hold excess solder that has been tapped off the tip. Every time you make a connection, the excess
solder must be tapped off so that new solder can be used for the next joint. You must ONLY use NEW solder for every connection.
If you cannot buy a low-cost stand from your local electronics store, a glass ashtray will do the job. It's not perfect substitute but will
prevent the iron falling off the bench and hold a damp sponge. It is better than nothing.
If you follow the simple rules we have outlined, the quality of your soldering will improve and as you gain more experience with timing
and manual dexterity, you will be able to handle finer and finer work.
Later in this book we will be introducing surface mount components. These components are intended for robot soldering as they are really
too small to he handled manually. But with a lot of care and experience you will be able to master the art of soldering them and eventually come to accept them just like a standard component.
Soldering has come a long way in the past 20 years and if the electronics industry was still using soldering skills of 20 years ago, every computer
would break down every month! That's the measure of the advancement in soldering.
Soldering has made electronics the "Science of Reliability."
|


