BEEPER BUG
A great project for "Fox Hunt"
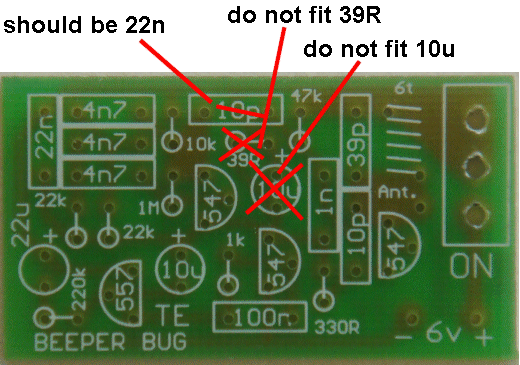
All the parts, PC
board and 3 button cells $8.75
You will also need an FM radio to pick up the
"beeps."
See also:
Mini Tracker
Tracking Transmitter
![]()
This bug can be attached to
anything from a glider to a pot plant and you can track it with a
radio.
Why track a pot plant?
The Beeper is the result of many requests for a mini tracking device
and introduces a new world of tracking.
The circuit is very compact and consumes very little power. It is small
enough to be hidden in anything you suspect will be lost or
stolen.
By using a mercury switch or "grasshopper" the bug can be
"primed" for the time when it is moved and you can track it with an FM radio.
A grasshopper is a switch that is ready to go off at any time. A piece
of plastic is placed between the two switch contacts to keep them apart
and connected to a length of cotton thread that is fixed to the floor.
When the object is moved, the cotton thread pulls the plastic out of
the switch and the bug is turned ON. A bug like this would make
an ideal detector to track down anything going astray. By attaching it
to the product under surveillance, you can follow its path an maybe
turn up a few surprises!
Why a pot plant? Because one of our customers wanted to track the
person taking her pot-plants from her front perch. The result? It was
one of her neighbours!
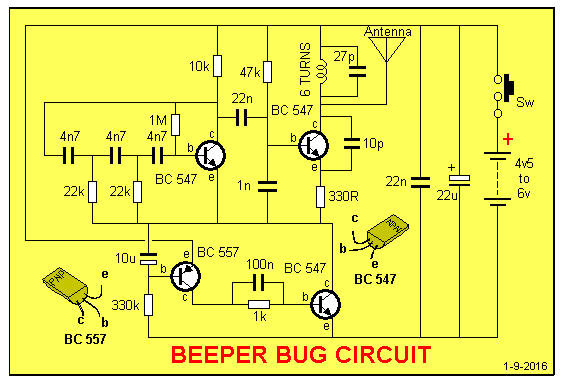
HOW THE CIRCUIT WORKS
The circuit consists of three blocks. The first is the Phase-Shift
Oscillator. It produces a sinewave and is turned on for a very
short period of time by a two-transistor pulse generator made up of the
two lower transistors.
At the same time, the 88MHz carrier oscillator is turned on and the
tone is superimposed on the carrier to get a brief BEEP.
The two stages are coupled via a 22n capacitor. The frequency of the RF
oscillator is determined by a number of things but mainly the value of
the capacitor and inductor in the parallel tuned circuit.
The final building block is the pulse circuit made up of a feedback
amplifier using a BC 557 and BC 547.
The circuit starts its cycle by charging the 10u via the 330k resistor.
If you can't see how this occurs, remember a capacitor and resistor in
series form a DELAY CIRCUIT and it does not matter if the resistor is
the top component or the lower component.
As the capacitor charges, it brings the base of the BC 557 towards the
negative (0v) rail and this turns the transistor ON.
This effect is passed directly to the BC 547 via the 100n (and 1k
resistor) and the BC 547 turns ON.
The voltage on the collector of the BC 547 falls very quickly and
brings the 10u down with it.
The small voltage across the 10u forces the base of the BC 557 lower
and turns the transistor ON even HARDER.
Both transistors become turned on fully and the energy in the 10u feeds
the BC 557 until it is used up.
The 330k can no longer keep the BC 557 turned on and it turns
off slightly. This effect is passed to the BC 547 where the
collector voltage rises slightly and the rise is transferred directly
to the BC 557 via the 10u and the circuit starts to move in the other
direction.
Both transistors become fully turned off and the 10u begins to charge
again via the 330k.
The circuit takes almost no current between beeps and the duty-cycle of
the tone is about 10%. This makes the circuit very economical on
batteries and you should get many hours of operation from a set of
cells.
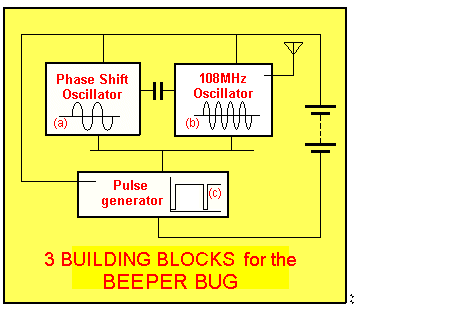
The block diagram above shows the 3 building blocks for the Beeper Bug. The widely differing frequencies produced by each of the blocks makes it difficult to show a combined output waveform. The diagram below shows how the Pulse generator block turns on the Phase Shift Oscillator and 108MHz Oscillator sections to produce short beeps.
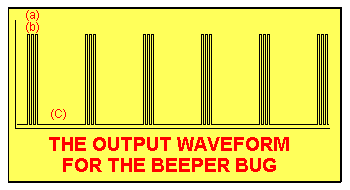
Building blocks (a) and (b) combine to create the signal (the beep) shown in the diagram as amplitude lines. Signal (a) modulates signal (b) to produce a tone of approx 1kHz on the 108MHz carrier. Building block (c) turns the beep on and off. All this is shown on the diagram above but due to the enormous difference in the frequencies of the three waveforms, the figure above is not to scale.

The diagram above
shows three things:
1. When the pulse generator is off, all the blocks are off and
the circuit consumes almost NO current.
When the pulse generator turns on (it turns on for a very short
period of time) the voltage across it is very small and it effectively
puts the top two building blocks across the power rails. This is how
they are turned on.
2. The phase shift oscillator produces about 10 cycles during this
period of time.
3. For each cycle of the phase-shift oscillator, the 108MHz oscillator
produces about 100,000 cycles!
During the production of the 100,000 cycles, the waveform from the
phase-shift oscillator causes the 108MHz oscillator to increase
frequency very slightly then decrease frequency slightly so that the
end result is a tone from the receiving radio.
When the circuit turns off, the radio picks up background
"hiss" and so the result is a beep with background hiss
between the beeps.
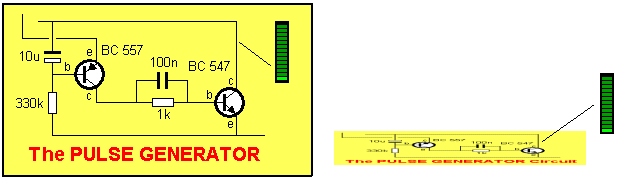
THE
PULSE GENERATOR
The animation below shows another way of
"seeing" the pulse generator in operation. Study the
animation carefully and you will see the bar-graphs indicating the
voltage on the collector of the output transistor.
When the circuit is NOT TURNED ON, the voltage on the collector
is HIGH. When the circuit is TURNED ON,
the voltage on the collector of the output transistor is LOW.
This is normal with all circuits like this. The voltage on the output
of the circuit must be low so that most of the voltage will be across
the LOAD. In this case the LOAD is the two oscillator blocks and
when the pulse generator is TURNED ON, the two oscillators will see RAIL
VOLTAGE.