BREAKDOWN
BEACON
Breakdown Beacon kit is available from
This is a very simple
automotive project you can keep in the boot of the car for those unfortunate occasions when you break down.
Talking Electronics for $5.50 plus $4.50 postage.
Click
HERE to buy kit. ![]()
I hope this will not be very often but the chances of a
breakdown are always greatest on a cold and windy night - just when you need
some sort of warning to say you are laid-up at the side of the road.
|
Complete Breakdown
Beacon |
|
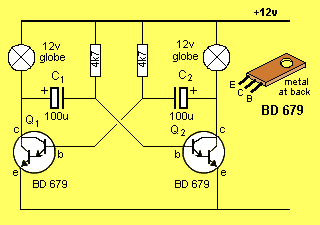
Breakdown Beacon circuit |
HOW THE CIRCUIT WORKS
The circuit is basically a free-running (called astable - pronounced (h)ay stable) multivibrator. The most common name for this is simply, FLIP FLOP as it comes from the flip flop family and is the first type of flip-flop we think of.
This type of circuit is very easy to design and is almost guaranteed to work with any type of transistor. It will also accept a wide range of values for the capacitors and resistors. It is also self-starting and uses very few components. In other words, it works superbly.
A number of other flip flop circuits have been invented but they have been a flop. Some required close tolerance resistors and high gain transistors to make sure the circuit self-started and others were very complex in operation. Some of the circuits looked completely different to our “symmetrical” design and it was almost impossible to see how they worked. When they were constructed they did not work!
It was a very clever designer who thought of our extremely simple, reliable design. The only trick to getting it to work is to provide high gain transistors, capable of handling high currents - because we are driving fairly high-current globes.
To find a standard transistor with both these characteristics is almost impossible as the two features do not go together.
|
FEATURES: |
You can get lots of high gain transistors but they do not have high current handling capabilities and you can get lots of high current devices but they do not have high gain.
The solution to this is to put two transistors in the one package, so that the device looks like a single transistor but it is really two transistors. One transistor has the high gain and the other has high current capability.
This is exactly what the BD 679 is. It is two transistors in one package and yet it can be treated as a single transistor as far as the circuit is concerned.
This device is called a Darlington transistor, named after the inventor. The only major difference between a single transistor and a Darlington is the turn-on voltage. For a normal transistor the turn on voltage is about .65v, while the turn on voltage for a Darlington transistor is 1.3v.
In our circuit this turn-on voltage does not worry us as the circuit provides plenty of voltage for the base. The only thing we are concerned about is the turn-on CURRENT and when a Darlington transistor is used, the circuit provides sufficient base current.
This is the secret behind getting this type of circuit to work and is quite often over-looked by designers.
When any type of incandescent lamp is used in a circuit, the current required to GET IT TO GLOW is much greater than when it is at full brightness.
This is because the resistance of a cold filament is only one sixth of its operating resistance.
To start a lamp glowing requires about six times more current and this must be delivered by the transistor.
If you try to replace the BD 679 with an ordinary transistor, the chances of the circuit working are slim.
We will do a few calculations to show why: If the globe is a 12v 18watt type, the operating current is 1.5amp. But, as we have said, the start-up current can be up to 6 times this, or about 9 amps.
If we use an ordinary transistor with a gain of 50, the current required by the base will be 9/50 or 180mA. This current must be provided by the base resistor and the 100u electrolytic. This is a very high expectation, as you will see.
The advantage of using a Darlington is the enormous gain it provides. When a high-gain transistor is used, the base current is very low. In other words the collector current can be AMPS and the current required by the base will be only a few milliamps.
The gain of a BD 679 (in its HIGH CURRENT MODE) is about 750 and this means for each milliamp of base current, the collector will deliver 750 milliamps. If we need 9 amps to turn on a lamp, a base current of 13 milliamps will give us 10 amps collector current and this will guarantee the lamp will turn on.
This heavy current is only needed for a very short period of time, until the filament reaches operating temperature. This base current is provided by the electrolytic. Yes, the electrolytic provides the base current to start the lamp glowing.
The circuit starts by both transistors turning on together. You would think the 4k7 resistors turn the transistors on but the 100u electrolytics have a much greater effect. Since they are in an uncharged condition, they become a very low impedance (resistance) path between the base and positive rail, (via the globes).
Both electrolytics will begin to charge and their initial rate of charge is very high. This puts a very high turn-on current into both transistors and current begins to flow between collector and emitter terminals.
This causes the collector voltage to fall (as current begins to flow through the lamps). We will assume transistor Q1 has the greater current flow in the collector circuit.
The voltage on the collector of Q1 will fall and transfer this effect to the base of Q2 (via electrolytic C1) and prevent it from turning on any further. Thus only transistor Q1 will turn on. It will continue to turn on fully and this action will happen very quickly as the charging current of C2 is very high.
Now we come to the second part of the operation of the circuit.
What makes it change state? How does it "flop" over?
As electrolytic C2 charges, the voltage across it rises and this causes the charging current to reduce. This means the very strong "turn-on" effect is gradually reduced and Q1 starts to turn off a small amount.
This makes the collector voltage of Q1 rise and begin to turn transistor Q2 ON via electrolytic C1. Q2 is also being assisted to a small extent by the 4k7 on its base and a point is reached when it turns on sufficiently to cause its collector voltage to fall. The charging current through C2 falls to zero and when this happens, Q1 gets turned off completely.
The voltage on the base of Q1 falls to a MINUS value and Q2 turns on fully.
|
This project can also be used on your model |
The amazing point here is the negative voltage on the base of Q1. Where does it come from?
C2 will have a voltage across it of 10.7 volts when the charging current reduces to a point when the transistors begin to change state as the positive end will be at rail potential and the negative end will be at 1.3v.
When the change occurs, the positive end will be pulled down about 9 volts by the action of Q2 turning on fully and this means the negative end of C2 will also be pulled down 9v. It was previously at +1.3v so that it will now be at -7.7v.
The 4k7 on the negative end of the electrolytic will begin to discharge the capacitor and gradually a positive voltage will appear on the base of Q1. This will cause Q1 to start to turn on and the whole cycle will repeat.
The electrolytic(s) have two functions. Firstly they provide a very heavy in-rush of current so that the transistor can supply a heavy current to turn the lamp ON and secondly they turn off the other transistor.
The circuit is symmetrical so it does not matter which transistor turns on first.
|
The Breakdown Beacon Kit |
|
PARTS LIST |
|
2 - 4k7 2 - 100u 16v electrolytics 2 - BD 679 Darlington transistors 1 - BEACON PC BOARD |
|
EXTRAS: |
|
8 metres of figure-8 wire 2 - tail lamps with amber reflector 2 - wooden stands plastic box to house PC board cigarette lighter plug |
Breakdown Beacon kit
$5.50 plus $4.50 postage.
Click
HERE to buy kit.
CONSTRUCTION
All the components fit on a small PC board as shown. The electrolytics and transistors must be placed around the
correct way, otherwise the circuit will not work and they may be damaged.
The positive lead of each 100u electrolytic is marked on
the overlay on the PC board with a small '+' and these holes are near the
centre of the board. On the electrolytic itself, the negative lead is always
marked with a stripe down the side of the case. Make sure it is positioned
correctly otherwise it will see reverse voltage and this will damage the
"forming" process that produces the capacitance.
The two transistors are placed near the edge of the board
with the metal face of the left-hand transistor facing the edge while the other
is around the opposite way.
The resistors lay flat on the board and have the colour
bands yellow-purplered-gold. They can be placed around either way as they are
not a polarised component.
Cut two lengths of twin figure-8 wire, one about 2 metres
long, and the other 6 metres long. You will also need a short piece of twin
flex. Solder the short length of
flex to the left hand lamp holes on the PC board and the 2 metre length to the
other set of holes.
Connect the other ends to the lamps. Make sure the wire
is secure where it enters the base of the lamp so that it cannot be pulled out.
These lamps are readily available from car accessories shops in the form of
tail lamps with reflective orange or amber lens. They come with mounting screws
and rubber grommet to make them fairly weatherproof.
The 6 metres of twin figure-8 flex is the power lead and
is terminated with a cigarette lighter plug so that it can be plugged in to the
cigarette lighter socket of the car.
When you have done all this, go over the board once
again, making sure all the components have been fitted correctly and the leads
are connected properly.
Before fitting the lamps to the stands, the circuit can
be tested by plugging in the cigarette lighter plug. The lamps should flash at
a regular rate.
HOUSING
The lamps should be screwed to a piece of wood with a
foot-plate so that they can be
placed on the road with the lamps facing the direction of the traffic. The 2
metres of wire between the lamps will allow them to be placed a short distance
apart.
The 6 metres of flex will allow the lamps to be placed at
the back of the car or beside it, where they will be seen.
The PC board should be mounted in a small plastic box and
screwed to one of the stands, making sure the wires are anchored so they cannot
be pulled out. You can also provide a holder for winding up the cord to keep
it neat and tidy when not in use.
IF IT DOESN'T WORK
If the circuit doesn't work, the first thing you should
do is check the wiring to the lamps and the connections to the cigarette
lighter plug.
The circuit will also work by using alligator clips
connected directly to the battery.
However it will not work on dry-cells or from some small
rechargeable batteries as the internal impedance of these is too high to allow
the circuit to self-start.
You must make certain any battery you use is fully
charged as a lower supply than 12v will produce the same effect as a small
capacity battery (as we are already losing 2v across the transistors and any
further reduction in voltage will be noticed in the brightness of the lamps).
This is quite critical and is the first thing to look for when the flashing
effect is not as expected.
You must also use fairly thick leads, similar to the
wiring in a car as ordinary hook-up flex as used in electronic kits is too
thin and will create a voltage drop. It will also get warm during use.
The circuit is very simple and yet a dozen faults can be
introduced if you don't follow our simple guide-lines.
Faults like placing the transistors or electrolytics
around the wrong way, or using the wrong value resistors, are very common. Get
someone else to check your work as it is very difficult to check it yourself.
Don't forget the possibility of a bridge between two of
the tracks or even forgetting to solder one of the leads or one of the parts.
Make sure all the leads are connected to the right places
on the board, otherwise you could get an instant vaporisation of the tracks.
The cigarette lighter socket will deliver enough current
to completely "burn out" any of the tracks on the board if there is a wiring
mistake so check the connections thoroughly.
Make sure fine strands from the leads do not touch other
components OR TRACKS on the PC board as this can cause a short-circuit.
When the circuit is working correctly, both transistors
will get warm to the touch. If they are getting extremely hot or starting to
smell, the lamps in the output may be too high a wattage. Do not use lamps with
a wattage higher than 18 watts.
FLASH RATE
The flash rate can be altered by changing the resistors
or the electrolytics. You can also produce an uneven flash rate by changing
only one set of components.
If the base-bias resistors are increased, the flash rate
will decrease. Or alternatively, if the electrolytics are increased in value,
the flash rate will decrease.
There are limits to this and to be on the safe side, you
should not go past doubling the resistance on the base, or halving it, with
reference to the value given in the circuit diagram.
The electrolytics can also be doubled or halved without
causing the circuit to fail. If they are increased or reduced beyond these
limits, the circuit may fail to start or flash at such a slow rate that the
transistors don’t turn on.