ELECTROLUMINESCENCE THEORY
Making
your own
3v INVERTER
![]()
Making
your own inverter revolves around the transformer as this is the
main component in the circuit and is the centre of focus in this
article as it is quite a complicated component to understand.
Before we start on the circuit and its operation, there are 4 "secrets" behind how a transformer works.
The first "secret" is well-known. When a rising or falling
voltage is applied to one winding, an exact replica is produced on any
other winding. This is the basis of "transformer action". The
amplitude of the voltage coming out of the transformer will depend on the
turns ratio. i.e. the number of turns on the primary and the number of
turns on the secondary.
The second "secret" is the output waveform can be exactly
the same as the input waveform or "reverse." By simply reversing
the connections of your detecting device (such as a CRO) , it will appear
that the output voltage is falling when the input is rising and vice
versa.
The third "secret" is very important. We know that a
transformer only passes an alternating waveform. In other words, a DC
voltage connected to a transformer (such as from a battery) will not be
transferred to the other winding. But the extension of this must also
be noted. Take for example, the first half of a waveform. This is the same
as applying a DC voltage to the winding. As the voltage is rising, the
secondary is producing an increasing waveform, but when the input voltage
rises to its maximum, the transformer does not see a CHANGE IN VOLTAGE and
the voltage on the secondary winding immediately stops. At this point we
have maximum voltage applied to the primary and no output from the
secondary. In other words, we are delivering maximum current into the
transformer and getting nothing out the secondary.
The fourth "secret" is also very important. When the
supply is turned off, the voltage produced in each of the windings
can be considerably higher than the applied voltage. This is due to the
collapsing magnetic flux cutting the turns of the windings. This
voltage can be 10x, 100x or even 1,000 times greater than the applied
voltage. This is called "flyback" voltage and always occurs when
power is removed.
These are the four secrets behind how the inverter circuit works.
HOW
THE CIRCUIT WORKS
The circuit has two modes of operation. When the double-pole switch is in
the down position, the electroluminescent panel (or EL wire) is ON
continuously. When the switch is in the up-position, the EL material blinks. The
centre-position is off.
You will notice the transistor is not taken out of circuit in the
off-state. The collector and emitter terminals are still connected to the
supply rails. The switch merely removes the bias from the base and this causes the
circuit to draw almost no current. The only current is through the
transistor and is called leakage current. With modern transistors this is
much less than a microamp and will not reduce the life of the
battery.
The circuit operates at approx 500Hz and this is determined by the
inductance of the transformer and the load placed on the circuit by the
size of the electroluminescence panel. The circuit is
shown below:
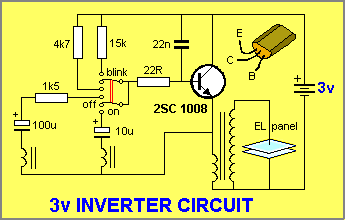
When it is first switched ON, the base bias resistor (4k7) charges
the 10u electrolytic to approx 0.65v, and the
transistor conducts. The 4k7 (and the 10u) is not required for continued oscillation and
we will show how the cycles continues to repeat in a moment. The first part
consists of the cycle we will call the beginning cycle. This is shown in the animation
below:
Mouseover for the first
cycle
THE
FIRST CYCLE
When
the switch is turned on, a small amount of current is delivered to the base
via the 4k7 resistor. This causes current to flow in the feedback
winding to turn the transistor on harder. This current is due to the flux
in the core and at the moment this flux is called EXPANDING FLUX. The
transistor is turned on more and more until the core is saturated. At this
point the feedback winding immediately ceases to produce a current and the transistor
is turned off. The current through the primary winding stops flowing and the magnetic flux
stops being produced.
This causes the flux in the core to collapse and produce a reverse voltage
in all the windings that is opposite to the previous polarity. This voltage
is also much higher than the previous voltage and the voltage in the
secondary winding (also called the tertiary winding or over-winding) is high enough to energise the electroluminescent
particles in a panel and cause them to fluoresce.
This circuit is not a push-pull arrangement and the EL only fluoresces
during the time-period when the transistor is turned off. During this time
the transformer produces the high-voltage flyback
pulse.
AFTER
THE FIRST CYCLE
After the first cycle, to
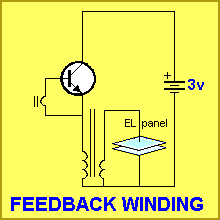
understand how the circuit continues to oscillate we can reduce it to two components - the
transistor and transformer. One point to note: this circuit will not
self-start. It needs a voltage on the base of approx 0.65v to start the
circuit operating and that's the purpose of the base-bias resistor and
capacitor (electrolytic). They allow the base to rise to 0.65v to start the
circuit operating. But once it has started, it will
keep oscillating.

From the
animation above we can see the feedback winding turns on the transistor
until the core is saturated. The voltage (and current) to the base ceases
and the transistor turns off. The magnetic flux collapses and create a voltage
of opposite polarity in each of the windings. This voltage is higher
than the supply voltage and energises the panel into emitting light. The
collapsing magnetic flux is converted into electrical energy and reduces the
high negative pulse towards zero and then the voltage on the winding becomes
positive again. When the voltage is +0.65v, the transistor begins to turn on
to start the next cycle.
There is one other way to see how the circuit operates. The animation below
shows how the forward and reverse voltage on the feedback winding turns the
transistor on and off.
The secondary winding actually produces a negative voltage to the EL panel
but since the panel is not polarity sensitive, the polarity of the voltage does
not matter. Also, the voltage on the primary winding reverses direction
during the operation of the circuit but this too, does not have any effect
on the oscillations.
To keep the animation simple, we have only shown how the feedback voltage
changes.
THE 10u ELECTROLYTIC
One point to note is the voltage on the 10u capacitor rises to 0.65v at the
beginning of the first cycle but when the feedback winding takes over, it is charged
very slightly in the reverse direction during the action of the
feedback winding delivering its voltage to the base and discharged via the
base-bias resistor during the second half of the cycle. Thus we don't see
any overall charge on the capacitor. But it is important to know the
capacitor charges and discharges.
It works like this:
The 10u and 100u electrolytics are actually around the wrong way in the circuit as
they get charged in the opposite direction to the markings on the diagram. I don't think the circuit designer
took the effort to check the actual operation of the circuit with a CRO -
otherwise he would have placed the electro the other way around.
Electrolytic
can be charged slightly in the reverse direction without damage and this is
what happens in this circuit.
To understand how the 10u gets charged, connect the negative end of the electrolytic to
the positive rail. This will turn the transistor on (due to the electrolytic
being uncharged). In the process of
delivering energy to the base, the electrolytic will charge and in this
case it will get charged in reverse. If you can't see it getting charged,
remove the transistor and place the negative to the top rail and the
positive to the bottom rail. Now, it gets charged in reverse!
This is what happens. During each cycle is only gets charged (negatively) a
very small amount and when the feedback winding turns the transistor off,
the electro gets changed in the forward direction by the base-bias resistor
and the voltage across it
is removed. This knowledge is needed to understand the flash
mode.
FLASH
MODE
The power switch has two positions. The UP-position
produces the FLASH or Blink mode and the lower position produces the ON
mode. You will notice the circuit in the flash mode
is almost identical to the ON mode. In fact the only extra component is
the 1k5 resistor. This resistor allows the 100u electrolytic to charge
during the ON part of the cycle, as you will see.
The cycle starts in the normal way by the base resistor (15k) turning the
transistor on slightly. The operation has been described above, but this time there are some very
slight differences in the feedback section. The base bias resistor is a
higher value so that it does not fully discharge the electrolytic during each
part of the cycle and the 1k5 resistor allows the electrolytic to charge a
small amount during each cycle. This is all designed to create the long on and off times for
the flash.
During each cycle only a very small increase in voltage appears across the electrolytic
and this voltage opposes the positive voltage produced by the feedback
winding. The amplitude of the feedback winding in flash-mode is 15v, and
eventually the voltage across the electrolytic prevents the
feedback winding turning the transistor ON. At this point the circuit stops
operating. The negative voltage across the electrolytic is removed by
the 15k base-bias resistor and it begins to charge in the forward direction
until 0.65v is across it. At this point the circuit begins to turn on again
and the flash cycle repeats.
USING
DIFFERENT TRANSISTORS
The circuit looks simple enough to use almost any type of NPN transistor.
The problem is the circuit is more complex than first meets the eye. The
instantaneous current when the transistor is turned on is very high and
some small-signal transistors will not deliver the required current.
Ideally you should be able to compare a substitute with the original to see
how much difference is produced.
If you want to try substitutes and check the pin-outs of other types, go to
our discussion on
transistor pin-outs.

| Our circuit has been taken from the 3v inverter shown above. It will drive up to 1 metre of Space Light in "ON" or "Flash" mode. |
THE
TRANSFORMER
Although the transformer looks like 4 simple windings, a lot of
experimentation has gone into the number of turns for each winding. The turns on the feedback winding for the continuously ON mode actually
determine the amount of current delivered to the base and thus how
hard the transistor turns ON. In our case the amplitude of this voltage is
7v. Obviously the base does not need 7v, but this is the amplitude needed
to deliver the required current to turn the transistor on. The reason is the
winding is only capable of delivering a very small current and this is due
to how hard the transformer is being turned on, and when "X"
number of turns are provided, the circuit works.
The same reasoning applies to the flash mode and the amplitude was measured
at 17v. These have all been arrived at through experimentation, and are
also dependent on the values of the surrounding components.
TURNS RATIO
After the
experimentation is finished and the circuit works perfectly, we find the
primary will have about 5 turns and the secondary about 1,200 turns. The
feedback windings will have about 11 and 26 turns. The ratio of the number
of turns on the primary to the number of turns on the secondary is called
the TURNS RATIO. This can be any number such as
2:1, 5:1, 20:1, 100:1, 1:20, 1:50, 1:100, or any value. When the first
number is larger than the second, the transformer is a STEP-DOWN transformer. This means the output voltage will be lower than the input
voltage. For a turns ratio of 2:1, the primary winding will have twice the
number of turns of the secondary. For a turns ratio of 20:1, this is read as: 20 turns on the
primary for every turn on the secondary.
If the second number in the turns-ratio is
larger than the first, such as 1:2, 1:5, 1:20, the transformer is a STEP-UP
device. For a step-up transformer, the output voltage is HIGHER than the
input voltage. In other words the secondary voltage is higher than the primary
voltage. For a turns ratio of 1:2, the
secondary voltage will be double. For a turns-ratio of 1:20, the output voltage
will be 20 times the primary voltage.
But this theory only applies when a smooth sinewave is delivered to a
transformer. In our case the transistor turns off and the transformer
operates in flyback mode. The output voltage of the circuit above was
measured at 800v p-p when no load was connected to the output. Thus we
cannot apply the turns-ratio formula, however we can state the transformer
is a step-up device.
TURNS PER VOLT
If a transformer has 5 turns on the primary and the primary voltage is 3v, the turns per volt = 5/3
= 1.7. Again, this theory can only be used when the transformer
is receiving a sinewave voltage as this turns-per-volt value does not
reflect in any of the voltages you will get on the other windings as the
"fly-back" voltage will over-ride your calculations.
THE CORE
The core is the material in the centre of the winding. It can be AIR or a
MAGNETIC MATERIAL. Cores made of a magnetic material can be made from iron laminations or a solid ferrite
material.
An air core has a value of 1. Metal cores can have a value as high as 1,000. If a
ferrite core has a value of 1000, it is 1000 times better at collecting,
absorbing, retaining, delivering and returning magnetic flux than air.
Air has a fixed value of 1 and does not alter. The value of a magnetic material core varies
according to the frequency of operation. As the frequency increases, the
"value" of the core decreases. It can fall to "1" and even
below 1. This is why high frequency transformers often have an air core. A ferrite
core may only improve the performance of the transformer by a factor of 2 or 5 or 10
and if it is as low as 2, an air core may be quite suitable.
If a 10 turn coil on a ferrite core (with a value of 2) has an inductance of
10uH, it will have an inductance of 5uH if the ferrite core is removed.
Alternatively the coil will require 20 turns on an air core - or the diameter of
the coil will have to be increased to achieve the same inductance.
Thus a coil wound on a magnetic core is physically smaller than an air coil -
that's the main advantage of a magnetic material.
TRANSFORMER SIZE
The size of a transformer depends on the amount of energy required to be
transferred. A certain amount of energy is transferred during each cycle and
if the frequency is increased, the energy transfer will also increase.
A typical example is a power transformer. At 50 or 60 Hertz (cycles per
second - this is the normal frequency of the "mains" - the power
entering a property) a 100 watt power transformer may weigh about 2kgm. At
50kHz, it may only weigh 200gm.
The normal operating frequency for electroluminescent displays is about
500Hz. This is one of the factors that governs the size of the
transformer.
Electroluminescent material (displays, sheets, Space Light etc) will operate
at frequencies as low as 50 - 60Hz but the light output is not at a maximum.
In addition, the colour of the emission will change slightly from the
expected colour (more deviation in some cases). Some displays are sold with
a "power-plug" transformer. This "power plug" may be one
of three different versions:
1. It may consist of capacitors connecting the EL material to the mains. No
isolating transformer is present and the panel operates at "mains"
frequency (50 - 60 Hz).
2. It may consist of an isolating transformer. The display operates at mains
frequency and the output is approx 120v AC.
3. It may consist of an inverter to convert the frequency from 50Hz to 500Hz
(500 - 750Hz, depending on the load). This is the best (and most expensive)
supply for EL as it operates the material at the optimum frequency.
Questions:
| 1: Name the component that starts the inverter circuit into operation. |
| 2: Name the three windings of the transformer: |
| 3: How does electrical energy get from the primary winding of the transformer to the secondary winding? |
| 4: How is the high voltage produced? |
| 5: Is the output of the transformer AC or DC? |
| 6: How does the transistor turn off? |
|
7: Draw
the oscillator circuit: Click HERE for circuit |