|
|

INDUCTANCE METER
One of the most difficult items to measure
is an inductor.
This is mainly due to few multimeters having an inductance feature
and the size, shape and number of turns does not give any indication of
the value of the component. Of course you can tell if it is micro-Henry or
milli-Henry, but that's about all.
This also applies to almost all components. A 100n capacitor for a
hearing aid is smaller than the head of a pin.
But, no matter what component we are dealing with, it is important to
know the value.
This project is a
simple design. It is capable of measuring inductance from 1microhenry to more
than 200millihenry.
One of the first things to understand is the decade values of
inductance.
By this we mean "nano," "micro," and milli."
The smallest inductor we will be dealing with is 1μH
(one micro Henry). A 3mm coil with 15 turns has an inductance of 1μH
when the core is air. Three turns on a 3mm ferrite core is about 1μH.
A 97turn coil, 2mm dia ferrite core, has an inductance of 47μH.
A 500 turn coil on 3mm ferrite has an inductance of 10mH. There are
complex formulas to work out the inductance of a single-layer coil and
multi-layer coil, but we will not be going into any of these details.
It is sufficient to say it is impossible to work out the inductance of a
coil by looking at it (unless you are comparing two identical inductors)
and some of the markings on surface-mount components need to be
carefully identified. It is a very important to double-check a value and
that's why this INDUCTANCE METER is so handy.
You may only need it once or twice in a year, but the cost is so low
that it is worth including on your bench as a piece of test equipment.
To keep the cost low, the display is a very simple row of 10 LEDs and a
decimal point.
When the project is turned on, it is constantly cycling through a "read"
operation and when an inductor is found connected to the leads, it
produces a reading on the display.
Suppose the inductance is 100micro-henry.
LED "1" will illuminate, then LED "0," then LED "0." Finally the LED
indicating micro will remain illuminated for 5 seconds.
If you did not observe the sequence, it will repeat as long as the
inductor is connected.
In each of the decades of inductance, the maximum value is "999" and
then the reading will be "1" in the next decade.
For example, if the inductance is 999microhenry, adding a few more turns
to the inductor will create a reading of 1milli-Henry.
ACCURACY
The accuracy of the project comes from the fact that the PIC micro is
capable of reading the number of cycles produced by the oscillator.
Pin 5 is the xxxxxx pin and when it is turned into an input
and assigned to the to the timer register, the pin
will count frequencies up to about 5MHz. The prescaler can be assigned
to the timer to produce a 16 bit register and this is equal to a count
of more than 64,000. If we open the pin for 100mS, we can count a
frequency up to 640kHz and this is what we have done in this project.
Every value of inductance has it own unique frequency of oscillation
when placed in a parallel inductor-capacitor circuit and a program can
be used to determine the inductance.
THE CONSTANT-VOLTAGE SUPPLY
THE SWITCH-MODE SUPPLY
THE 5v2 REGULATED SUPPLY
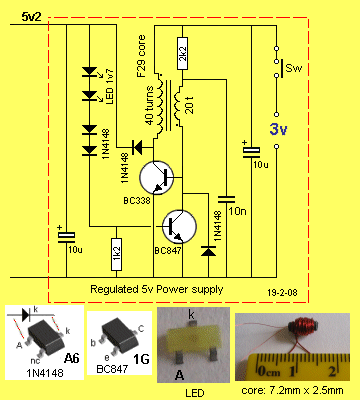
These are all equivalent terms for the 5v2 supply in this project.
A constant-voltage power supply has been used to provide a reliable
reference voltage for the oscillator section.
This has allowed us to use two button cells (3v) to boost the voltage
to 5v with a fly-back inductor.
The 5v2 is detected by two LEDs that each have a characteristic voltage
drop across them of 1.7v, and two signal diodes, with a voltage drop of
0.6v, making a total of 4v6. The voltage across the
1k2 resistor is 0.6v, making a total of 5.2v for the output.
When no-load is detected on the supply, the circuit takes less than 10mA
of which the boost circuit consumes about 5mA and the chips take about
5mA.
The secret to the operation of the circuit is the LEDs and diodes on the
output. These drop
exactly 4.6v. A voltage divider network made up of resistors was tried
but was not successful.
When a load is placed on the power supply, spikes from the feedback
winding pass through the regulator transistor and cause the voltage on
the base to go slightly negative. This upsets the ability of the
transistor to regulate the voltage of the circuit.
When the LEDs and diodes are included, this voltage is absorbed by them and you
will notice the LEDs get brighter when the load is applied.
The signal diode on the base of the regulator transistor assists in clipping the negative pulses
entering this transistor.
The 10n capacitor blocks the pulses from the feedback winding passing into the 2k2 resistor, so that all the signal from the winding is passed
to the base of the regulator transistor.
This capacitor also forms part of an oscillator circuit with the
feedback winding and if it is increased, the circuit
will not oscillate at a high frequency and provide good regulation when
a high-current is required.
The 1N4148 diode on the output passes the pulses from the fly-back transformer to the
5v2 rail and this is used as a high-speed rectifier diode.
This is quite a "powerful" supply and is capable of delivering more than
50mA at 5v2, and if the regulator transistor is not included, the output
voltage will rise to more than 20v. That's why you must get the power
supply working correctly before connecting the chips to the project.
An indication of the correct voltage is shown by the LEDs
illuminating very dimly, as they are passing less than 0.5mA, when the
output is 5v2.
The driver transistor needs to be a high-current device as the charging
pulses through the primary are quite high.
A BC 547 does not have sufficient current-handing capability, so a BC
338 is needed.
The 40:20 turn inductor is also critical. The circuit is operating at
about 1MHz when a load is applied and the transformer needs a "low-loss"
ferrite core made from F29 material to operate at this frequency.
The number of turns on the feedback winding is not critical however the
number of primary turns has an effect on the overall frequency and the
amount of energy that can be passed to the high-speed rectifying diode.
WHAT IS INDUCTANCE?
Inductance is actually "resistance."
It is "resistance" to an AC signal.
Firstly, let's talk about the term "AC." AC stands for Alternating
Current. This is what we call a signal that is changing in amplitude. It
may be rising and falling in a regular way such as the "AC Mains,"
or rising and falling to represent speech. We say "AC" but we really
mean "Alternating Voltage" as the graph of an AC signal always shows the
voltage. This is just one of the technicalities of electronics.
There are two types of signal. One is AC and the other is DC. An AC
"goes up and down" and a DC signal is a "steady signal," such as from a
battery.
When we add say a 100 ohm resistor to the positive terminal of a
battery, the current-flow will be reduced according to the value of the
resistor. (using Ohm's Law) and the voltage across any load we add to
the circuit (such as a small globe), will be lower (smaller) than the
voltage of the battery.
If we connect the same resistor to an AC signal (also called an AC
voltage or AC supply), it will have the same effect. The voltage across
the globe will be smaller than the incoming AC signal.
Now we come to an inductor.
Suppose we have an inductor with a resistance of 100 Ohms. If we connect
it to the same DC voltage as above, the voltage will appear across the
globe.
But if we connect the inductor to an AC voltage, the output waveform
will be much smaller.
Something inside the inductor is causing this.
The inductor has an "effect" on the AC signal.
This "effect" is due to the turns of wire inside the inductor producing
a magnetic field and this field cuts all the other turns of the winding.
So, we can say the inductor is providing a larger "resistance" to the AC
signal.
INDUCTORS IN PARALLEL AND
SERIES
Now we come to connecting inductors in parallel and series.
Inductors are very seldom connected in parallel or series as you can
quite easily create the required inductance with a single inductor.
However this is a good topic to cover, as it will produce an
understanding of inductance.
We have already mentioned an inductor will reduce the waveform of an AC
signal.
For instance, if the waveform entering an inductor is 10v peak-to-peak,
the output may be 1v.
This waveform may be as shown in (a), (b), or (c). The DC component of
the waveform does not matter. The inductor will have the same effect on
reducing the AC component, no matter what DC voltage is present.
Technically speaking, an inductor opposes the change in current. When we
view a graph, it is generally a graph of a voltage and when this voltage
is rising and falling, it is called a "waveform" or "AC waveform" or
just "AC." Whenever a voltage is rising and falling, the current is also
rising and falling at the same time and same rate. We normally draw the
voltage waveform and assume the current is changing at the same rate.
But it is the actual current that is controlled by an inductor and when
a waveform enters an inductor, it produces magnetic flux that cuts all
the other turns of the winding.
You can imagine the current in one of the turns of the winding producing
flux and at same time receiving flux from the other turns cutting
through the turn and producing a very small voltage in the opposite
direction.
The net result is some of the voltage applied to the inductor is
cancelled inside the inductor by the reverse voltage produced by the
flux from the other turns.
This is why the voltage appearing out the end of the inductor is smaller
than the incoming waveform and it is delayed slightly so that input and
output waveforms do no rise and fall at exactly the same time.
There is one other fact that determines the size of the output waveform.
As the load is increased (that is, as the current is increased) the size
of the output waveform reduces. The size of the DC component will also
decrease.
There is also one other factor.
As the current is increased, a voltage-drop will be produced across the
inductor and this will produce magnetic flux. If this flux reaches the
limit for the inductor, the inductor will not be able to smooth the
waveform. The answer is to have a gap in the magnetic circuit that
"absorbs" the initial flux and allows the alternating flux to circulate
around the magnetic path.
As you can see, inductors are a very complex thing to understand.
Inductors have many purposes.
They can be used to smooth a voltage. This is generally where a voltage
has a ripple (called an AC component) superimposed (added to the top of
the waveform) on a DC voltage. The ripple will be reduced when it passes
through an inductor.
An inductor can also be used to delay a signal.
An inductor can be used to produce a spike. This spike can be
An inductor can be used to produce a spike. This spike is generally
higher than the supply voltage. If the spike is 100 times larger than
the supply, the inductor is said to have a "Q factor" or "Quality
factor" of 100.
A spike is produced by an inductor when the voltage is turned off and
the magnetic field is allowed to collapse very quickly. If a capacitor
is connected across the inductor, the voltage is passed to the capacitor
and the capacitor takes time to charge, so the result is not a spike but
a sinusoidal waveform.
There is one amazing feature of an inductor that you must not forget.
The collapsing magnetic field produces a voltage from the inductor that
is of opposite polarity to the supply. This is principle behind the
operation of the power supply for this project. When the driver
transistor turns off, the collapsing magnetic field in the inductor
produces a very high voltage and in graphical terms the circuit looks
like:
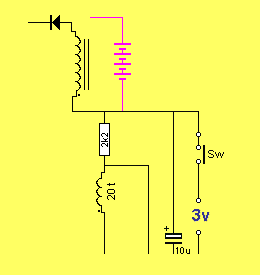
How the "boost" works
The energy in the very high spike is spread
out as a lower voltage to produce the 5v2 rail. The
circuit actually adds only 2v2 to the 3v battery but as the battery
reduces in voltage, the circuit will have to make up the difference.
You can see, the voltage from the primary winding of the transformer
adds like an additional battery (to the 3v), to produce the term: "BOOST
VOLTAGE."
An inductor can form part of a TUNED CIRCUIT. A Tuned Circuit
is one that likes to operate at a particular frequency. When it operates
at this frequency, an amazing thing happens. The amplitude of the
waveform increases. Generally an inductor and capacitor make up a tuned
circuit and in some projects, such as transmitters, the tuned circuit is
also called a TANK CIRCUIT. This comes from early radio days when
this amazing feature was realised and it seemed like the circuit was
acting like a big tank of water, able to supply energy "from no-where."
The special operating frequency of a coil and capacitor is called the "Resonant
Frequency," and they can be in series or parallel.
At this frequency they produce the highest waveform and also have the
capability of reducing or limiting other frequencies. They can be placed
in a circuit that passes only a single frequency and block other
frequencies.
Inductors can be designed to use the magnetic flux produced in the core.
It is then referred to an a solenoid. Examples of this is a door
latch or the solenoid for keeping a door closed (locked) called an
electronic lock; the coil in a relay and Other
examples are: speakers and motors, where the coil in a speaker is called
a "voice coil" and in a motor it is a "pole." Inductors can be used for
the high voltage produced when current is turned off, such as the
ignition coil in a car .
When an inductor has more than one winding we call it a transformer.
Transformers can step the voltage up or down or it can be designed for
very high current such as a welding transformer.
There are more types of transformer(s) than any other component and you
cannot get an understanding of how they work until you experiment with
them.
The first amazing property you will find is the fact that the voltage
emerges from a single winding in the opposite direction when the field
collapses. Next, you will be surprised at the "bite" you get when an
inductor (with many turns of wire) is removed from the supply.
After that you will need to experiment with adding turns to a winding,
using thicker wire, using different materials in the core, operating at
different frequencies and generally seeing how the characteristics
change when the features are altered.
You need to get an understanding of what a transformer or inductor can
do and the only way is with practical experience.
DESIGNING AN INDUCTOR
There are two ways to design an inductor.
The most complex is to use mathematics or a simulation program and work
out the values. This may or may not work in your particular instance.
But after 35 years of designing, the only way to guarantee success is to
follow the practical approach.
An inductor is much more complex than any other component as the
frequency, current, voltage and surrounding components, alter the
conditions considerably.
There is no such thing as a "100 micro-Henry inductor." You have to
specify other values as well. The most critical value is the resistance
of the component. Generally the DC resistance is provided so that its
current-carrying capability is known. You should also know the size of
the core (or magnetic circuit).
In some circuits the resistance of the inductor will affect the current
consumed and the frequency of operation.
These are the factors that cannot be provided in a simulation program
and the resistance of a 100 micro-Henry inductor can be less than one
ohm or more than 10 ohms.
That's why you have to physically build the circuit and try different
components.
Before you start, you should do your homework and study similar circuits
and note the value and physical size of the of inductance.
From there you can try similar inductors and also other values. You may
find the circuit works better at twice the frequency or even 10 times
the frequency. You should also try high-resistance and low-resistance
versions of the same inductance.
Because of the phenomena of resonance, (we mentioned above), you may
have to get the circuit to work at "resonance" and then the output will
be 10 times greater!
We have seen examples of circuits that failed due to the wrong inductor.
When the correct inductor was fitted, the output increased 300%.
Sometimes, the addition or removal of a few turns can change the
operation of a circuit considerably.
Inductors have two types of magnetic circuits. One has a "complete
magnetic path" and the other has a magnetic core.
Basically, the inductor with a complete magnetic path can operate at a
higher flux density and will have lower losses. A complete magnetic path
can be seen in inductors using two "C" cores, or "E" and "I" cores or
laminations or a "pot core." Whenever the magnetic flux can pass through
the centre of the winding, around the outside and back though the
centre, the inductor has a compete magnetic path.
When the two halves of the core are glued together, this type of
inductor can only be used on "AC voltages," as any DC voltage will
produce maximum flux and the core will be "saturated." If the inductor
is to be placed in a situation where DC is present, a small air gap is
needed between the two halves of the core to "absorb" the flux. This gap
needs to be about 0.1mm to 0.3mm and a sheet of paper or "sticky tape"
is suitable.
When the magnetic path is a rod, the inductor will operate at a lower
magnetic flux density and will have higher losses.
1/11/07