 |
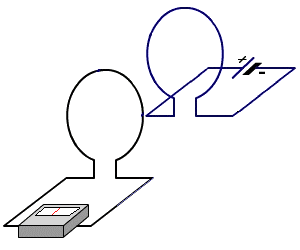
Watch the needle when the movement of the coil
ceases. This is when the magnetic flux is
stationary - "not increasing or decreasing."
Watch the needle when the coil is moving
away from the detecting loop.
In this discussion we are going to keep everything simple by saying this:
The inductance value is in microHenries. Enter L, d, l and Wire Gauge (all four are required) to calculate multilayer
inductor data.
When a coil is wound on a metal core (ferrite or iron) the inductance
increases enormously. The resulting inductance will depend on the
cross-section of the core, the length of the magnetic path and the type of
material and a number of other factors.
This is purely an experimental circuit as the inductor does not perform
any "feature." The voltage across the inductor is simply a reproduction
of the sinewave produced by the transistor. It does not produce the
"fly-back" voltage we mentioned above.
If an inductor is driven by a pulse, the applied voltage is turned off at
some point in the cycle and this causes the driving current to cease.
The magnetic flux that is present at the time when the transistor turns
off collapses immediately and creates a voltage in the winding that
has the opposite polarity to the driving voltage. If there is a lot of
magnetic flux (stored in the iron or ferrite core) the voltage produced
will be very high. HOW DO YOU
DESIGN AN INDUCTOR?
WHAT TYPE OF INDUCTOR?
The same situation occurs with a high-voltage generating circuit, using an
inductor, as shown in the diagram below.
These are just a few of the uses for an
inductor.
When a
capacitor is added to the circuit, the energy flows from the inductor to
the capacitor, and back to the inductor, when the supply is removed, to
produce an "oscillatory effect."
You can create almost any type of inductor by experimentation. You do not
need to know any of the formulae or any of the theory. It can be created by
simple "trial and error."
I admit a formulae will get you started but it will not tell you the type or
size of former to use or the thickness of wire.
The best approach is to copy something similar to the type you need and
modify it by adding or removing turns.
In this way you will be able to "peak" the inductor and be sure you have
used the optimum number of turns.
This may seem to be a simplistic way to create an inductor, however it is
successful. You finish up with an item that WORKS!
Now that we have simplified the approach, let's start with the THEORY:
The simplest inductor is a single turn of stiff wire with air in the centre
(air core).
If a metal object is placed in the centre of the turn, the inductance is
increased.
If additional turns are added, the inductance is increased.
If the diameter of the turn is increased, the inductance is DECREASED.
If the turns are stretched apart, the inductance of the coil DECREASES.
INDUCTORS IN PARALLEL AND SERIES
I have never had to place inductors in parallel or series in a final design,
but during experimentation, it is handy to know what is happening.
Basically, they behave the same as RESISTORS.
In series, the inductance is increased and in parallel the overall
inductance of the circuit is reduced.
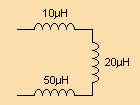
The total inductance is:
10 + 20 + 50 = 80µH
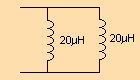
The total inductance is:
10µH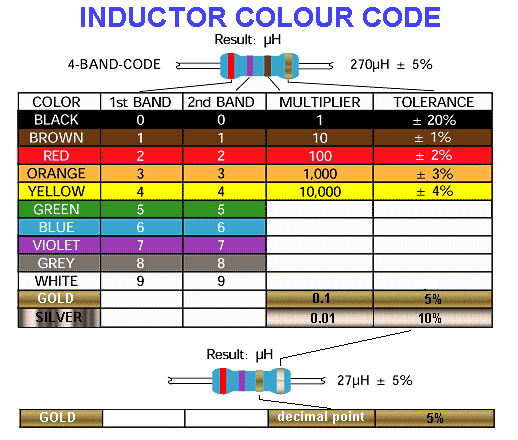
Note: A gold stripe in the 1st 2nd or third location represents a decimal
point. When a decimal point is used, there is no multiplier.
Multilayer Air Core Inductor Calculator
DRIVING AN INDUCTOR
There are two ways to drive an inductor.
1. It can be driven with a SINEWAVE
2. It can be driven with a PULSE
In the diagram below, the inductor is driven by a sinewave from the
driving transistor: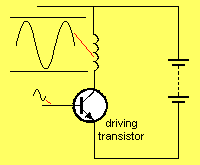
The reason is as follows: The magnetic flux is GRADUALLY increasing and
decreasing during the cycle and although this flux cuts the turns of the
coil it does not produce a voltage that is higher than the applied
voltage.
If another winding (called the SECONDARY) is placed over the existing
winding, it will produce a larger or smaller sinewave, according to the
number of turns on the secondary. The inductor becomes a TRANSFORMER
and this has been covered in another article.
A typical example of a component that looks like an inductor, but is
really a transformer, is a "trigger transformer." It has a primary
winding of about 30 to 100 ohms and a secondary consisting of 1,000 or
more turns.
It has three leads and this may be confusing. The start winding and
secondary winding are connected internally and this turns it into a type
of transformer called an 'AUTO TRANSFORMER." It means the primary
and secondary are connected and thus it does not provide insulation
between windings - one of the most important reasons why a transformer is
used to power an electronic device - when connected to the "mains."
The diagram below shows a trigger transformer:
In the diagram below, the inductor is driven by pulses: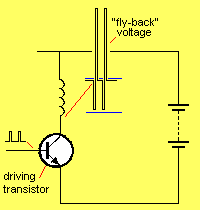
We are not getting something for nothing. In the first instance, the
multiplication of the supply voltage and current produces a certain value
of stored energy. This stored energy is converted from a
low-voltage/high-current to a high-voltage/low-current.
This effect can be used to produce a high voltage from a low voltage
supply. It is commonly called the "fly-back" effect. The output from the
inductor are spikes of very high voltage. These are passed through a
diode and stored in a capacitor. The diode prevents the voltage on the
capacitor feeding back into the winding of the inductor and discharging
the capacitor.
Basically you can't.
In most cases you have no idea how an inductor should appear for a
particular application, its size or how many turns are required.
You need to see an example.
Disassemble a sample, count the number of turns and measure the diameter
of the wire.
Carefully note any features such as the thickness and type of insulation
and the way the inductor has been wound.
Jumble-winding or layer-winding does not alter the inductance but if it
is required to produce an extremely high "fly-back" voltage, the voltage
between any two turns must not be higher than 80v.
This means the turns must be wound in layers with very good insulation
between layers.
If the inductor is to be used in a high-frequency situation, the core
material must be a high-frequency ferrite such as F24.
If you intend to copy an inductor, it is best to have two samples. One
sample is dismantled and the other is used as a reference, to compare
with your prototype.
Suppose you have been shown a circuit
requiring a 10nH choke.
Can any type of 10nH choke (inductor) be used?
How many different types of 10nH inductors are there?
How do you know which type to use?
The answer to this very complex. There are many different 10nH inductors
and most circuit diagrams do not provide sufficient information for you
to get (or make) the correct type.
The value "10nH" is like saying a resistor is "1k." It does not tell you
all the features you need to know such as wattage or tolerance.
The same with a 10nH inductor. The value tells you nothing about its
physical size, the size of the winding etc.
A 10nH inductor can be created by winding thick wire or thin wire onto a
core of magnetic material. The inductor using thick wire will be larger
and the resistance of the coil will be less.
The two 10nH inductors will perform completely differently when connected
to some circuits.
The following circuit shows a typical use for an inductor.
It is connected across a piezo diaphragm.
The collapsing magnetic field of the inductor produces a very high
voltage and this is passed to the piezo diaphragm to produce a very load
output.
For a 12v supply, this voltage can be as high as 120v.
If the inductor has a low resistance, you will have to drive the
transistor very hard during a part of each cycle, to produce a
current-flow in the inductor.
If the resistance (called the DC resistance) of the inductor is high, the
transistor will not have to be driven as hard and thus the circuit will
be more efficient. 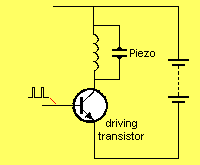
If the inductor has a high resistance, the output from the circuit will
be very high and the transistor will not have to be driven very hard. In other
words, the efficiency of the circuit will be high.

THE "Q-FACTOR"
The "Q-factor" or Quality-factor refers to the voltage generated
by an oscillatory circuit made up of a coil and capacitor. In the circuit
below, the coil and capacitor are connected in parallel and this is
called an L-C circuit (parallel L-C circuit). When this circuit is added
to an FM transmitter, it is given the name '"TANK CIRCUIT."
The two components we are discussing are the coil and capacitor. The
transistor is merely the driving component and has nothing to do with the
feature of producing the high voltage.
We have already explained how an inductor produces a high voltage when
the magnetic flux collapses and this is why the L-C circuit will produce
a voltage higher than the supply.
The ratio of the generated-voltage to the supply voltage gives the
Q-factor. This can be as low as 1 or 2 for a poorly designed circuit, up
to100 or more. The quality depends on how much magnetic flux is produced
and how effectively it cuts the turns of the coil.
As the frequency of a circuit increases, the effectiveness of ferrite as
a core material decreases. The maximum frequency for ferrite is about
100MHz - 200MHz. At this frequency the difference between air and ferrite
is very small. For this reason, air-cored coils are often used. 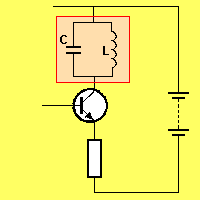
The main point of this article is to make you aware of the need to check
the resistance of an inductor to see if a high resistance or low
resistance version will improve the output of the circuit.
And remember the SECRET . . .
The inductor produces a REVERSE VOLTAGE when the supply is
TURNED OFF: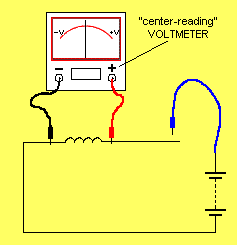
Slow-motion showing showing the
"reverse voltage" pulse produced by the
inductor when the supply is removed.
The end result is a sinewave output.
The animation below shows the energy flowing between the components with
the "centre-reading" voltmeter detecting the voltage: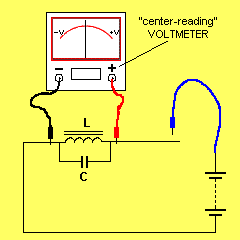
Go to
P3