|
PIC FX |
|
|
WRITING A PROGRAM
20 COMMON INSTRUCTIONS
WHERE DO YOU FIND THE RESULT OF AN INSTRUCTION?
first file is called "red"
suppose red = 1010
1010
CREATING A LOOP
to increase the delay-time we can go to the routine above
256 times to produce a total delay of
INPUTTING AND OUTPUTTING
finally we have to move away from the hidden file and
back to the area where you place your program, with the following
instruction:
To turn ON more than one pin at a time, a number of pins can be made
HIGH by loading the required bits into w and then moving the value to
the gpio register. It is the "1's" in the binary value that make each
pin HIGH. (Don't get confused with "1's" in the trisio register turning
a pin into an input).
INCREMENTING AND DECREMENTING
movlw .30
IMPLEMENTING A TABLE
The XOR is a very powerful operation.
It means exclusive-OR and this means the result is "1" ONLY if one of
the files is "1". It can also be written: EX-OR or
X-OR in some text books.
The XOR function can change a bit with an unknown value to the opposite
value. This is handy to change an output HIGH to an output LOW (to flash
a LED or toggle a bit to produce a sound).
P1
22/6/14
We have made it
very easy for you to write programs by starting with a set of
experiments to show what can be done and how to create the lines of code.
All programs are written on a template in NotePad2 and the template contains the
background information needed by the assembler (MPASM) to produce a .hex file
for the chip. The assembler is a program that takes your .asm (assembly
code) as written on the template, and converts it to a .hex file for
"burning" into the chip.
We use the term "burn" to distinguish it from the word "program" as the
original chips (not PIC chips) were "burnt" via a high voltage into an
EPROM and erased with ultraviolet light. When we say "burn," you know
what we are doing.
All you have to do is change some of the values in the code on the
template to extend or shorten the
time of the flash of a LED or the sound delivered to a piezo.
The layout of the program has already been provided on the template and the
microcontroller starts at the first line of code at location 00 (address
00) and executes each line at a rate of one million lines (instructions) per second.
If the instruction says GOTO, CALL, RETURN or Skip, the instruction
takes 2 microseconds.
This means your program will be fully executed in a fraction of a second
if the code did not contain lines that told the micro to go back and
repeat previous instructions a number of times.
To create a blinking LED that lasts one second, the micro will have to repeat
and carry out one million instructions per second and this is mainly done in
routines called delay routines.
The micro starts at the first set of instructions called SetUp then goes
to Main.
Main is where you write your program and when you want the micro to
perform a particular job, feat or task, you create a routine called a sub-routine and
place it in the sub routine section.
This allows to you call the sub-routine again, (at a different time) and
not have to re-write the instructions.
The same applies to delay sub-routines.
You can create a number of timing (delay) sub-routines and CALL
them at any time.
This means a million microseconds of microcontroller-time can be laid
out in a few lines of code - taking 1 second.
To further assist you in writing programs, we have produced a LIBRARY OF
ROUTINES to answer every requirement.
And on top of this we have provided many projects that can can be copied.
This will allow you to copy-and-paste most of your sub-routines and just
change a few values to suit the new requirement.
We have also provided a list of the 56 instructions that are needed to
write a program.
These instructions are called mnemonics (a word to assist memory
recall) in which each letter represents a word to make a simple
sentence such as decfsz = decrement the file and jump over (skip) the next
instruction if the result is not zero.
There is always a learning curve whenever you start a new field of
endeavour and programming is no different.
It's a challenging field, no matter how you look at it and only by
making the introduction as smooth as possible, will we be able to
introduce beginners to the field.
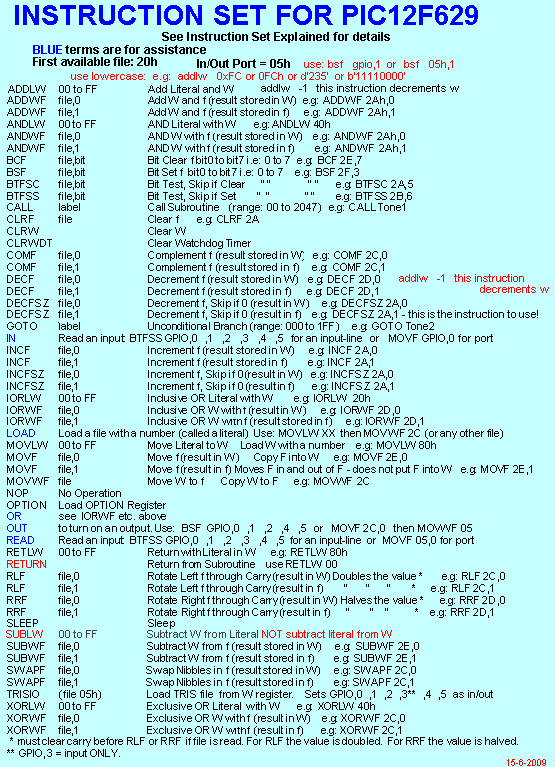
Here are the most-common instructions:
We will name a file "red" This is actually file 20h (the first
available file in a group of 64 files) that you can use and name with
any wording that suits the job it will do.
Each file-name you create will be placed in a list at the beginning of
the program and allocated a file in the micro (starting at 20h) by using
the "equ" statement. This means "red" equates to (corresponds-to)
file 20h.
In the following instructions, the word clear means: "make zero =
"0"
The word set means: "make = "1"
The in/out port of the micro is file 05 but you can also call it "gpio"
- general-purpose input/output.
To send data to this port, the individual lines are made HIGH = 1 or LOW
=0.
bcf gpio,0 - the lowest in/out line
of the input/output port will go LOW
bsf gpio,0 - the lowest in/out line
of the input/output port will go HIGH
to read data on an input, the line is tested:
btfss gpio,0 - the lowest in/out
line of the input/output port is tested to see if it is "1"
btfsc gpio,0 - the lowest in/out
line of the input/output port is tested to see if it is "0"
bcf red,0 - clear the lowest bit
in file "red"
bsf red,1 - set the second
bit in file "red" bsf red,6
- set the 6th bit in file "red."
btfsc red,2 - test the third bit in file "red" and if it is
"0" jump over the next instruction and execute the following
instruction.
example:
btfsc red,2
jump over this instruction - this instruction will normally
send the micro to another location.
execute this instruction
btfss red,2 - test the third bit in file "red" and if it is "1"
jump over the next instruction and execute the following instruction.
btfss gpio,0 - the lowest in/out
line of the input/output port is tested to see if it is "1"
call delay1 - call a
sub-routine When the sub-routine has been fully executed, the
micro goes back to the original location and executes the next
instruction.
clrf - clear a file
clrw - clear w
decfsz red,1 - decrement the "red" file and skip the
next instruction if the result is zero.
goto counter - goto a
sub-routine. When the counter sub-routine has been executed, the last
instruction must tell the micro where to go.
goto $+3 - the micro advance down the program 3
instructions (see below)
goto $-1 - the micro goes to the previous
instruction (see below)
movlw literal load w with a value from 00
to FFh.
movf red,w
- copy the contents of "red" into w
movwf gpio
- copy the contents of w to the output port. Only bits: 0,1,2,4,5 will
go HIGH
movwf red
- copy the contents of w in "red"
nop - No Operation. Waste 1uS of
time - do nothing - used in delays to create extra time.
retlw - return from a sub-routine (you can also place
a value in w and it will return with this value)
trisio - this file makes the in/out lines INPUT or
OUTPUT. Each bit in trisio corresponds to gpio,0 gpio,1 gpio,2 gpio,3
gpio,4 and gpio,5 If a bit in trisio is "0" the
corresponding line is output. If a bit in trisio is "1" the
corresponding line in INPUT.
xorwf red,w - exclusive-OR w with file
"red" and place the result in w. With this instruction "red" is not
changed.
Every instruction has a result (an answer) and the result can be found
in the file contained in the instruction or in the "working register."
The "working register" is the register that transfer the result form one
file to another file. It is the only register that you can put a value
into. A value or "number" is called a LITERAL. Any file can be
incremented or decremented but only the "working register" can accept a
NEW number.
The working register is identified as "w" or "0" when creating an
instruction and it is loaded with 5 by the following instruction:
movlw .5 this means: move
literal (number) decimal 5 into the working register. The result of this
instruction is w = 5 - the working register holds the value
"5"
There are a group of files (empty envelopes) starting at file 20h that
you can use for your routines. These files can hold a value from 00 to
FF (00 to .255) and each file is given a name so you can remember it
during the writing of a program.
Names such as: count, loop, show, red, top, display, time1, time2, time3
etc are suitable.
To put the value .5 into "red"
movlw .5
movwf red
means: move w into file "red" (actually COPY 5 into red as w
still contains 5 and can be copied into another file such as "top").
file "red" can be incremented and the result can be placed in the file
or in "w"
incf red,w
the result is placed in the "w" BUT the file "red" does NOT contain the
new value.
incf red,f
the result is placed in the file "red" and "w" is not touched.
That's why nearly all instructions will use ,f so the result is
placed in the file (as this is what you normally want to do).
The result of an instruction is contained WITHIN the same line as the
instruction.
The result will be in the working register (w) or the file being
operated on, in the above instructions.
Now we come to more instructions:
These are more-complex to understand.
To compare two files to see if they are the same, we load one of the
files into w and xor it with the other file:
second file is called "blue"
movf red - this loads
"red" into w
xorwf blue,w - this will produce the
result 0000 0000 in w if the two files are the same.
or
xorwf blue,f - will produce the result
0000 0000 in the "blue" file if the two files are the same.
blue
= 1010 1010
the xor operation will produce:
0000 0000 because there was no incidence where only one
of the bits was different to the other. The answer is "1" for 1,0
or 0,1. the other two results are "0."
But we still do not know if the files are the same. We have to do a
"test:"
the next instruction to place in your program tests the zero bit in the
OPTION REGISTER.
The Option Register has a number of results, every time you perform a
Boolean operation.
One of the results is the ZERO FLAG. This flag is bit2 in the Option_Reg
and when the result of an operation is zero, the flag goes "1" - in
other words it is SET.
The OPTION register is register 03
btfss 03,z When the
result of an operation is 0000 0000 the zero bit is SET. In other words
it "turns ON" to let you know the answer is ALL ZEROS. You can also
write:
btfss option_reg,z and the assembler will assemble
the program correctly.
THE DIFFERENCE BETWEEN CALL AND
GOTO
Both CALL and GOTO
send the micro to the same location as specified by the name of the
sub-routine included in the instruction.
But CALL comes back after executing the instructions in the sub-routine
and executes the next instruction in the program.
This means you can advance down the program and CALL the same
sub-routine again.
At the end of the sub-routine you must add: retlw 00.
This means the sub-routine is ONLY set-up for a CALL.
If you use the instruction goto counter the micro will not
know what to do when it reaches the final instruction retlw 00.
The micro will use the return value it finds on the "stack" and this
brilliant piece of programming can be used IF YOU KNOW WHAT YOU ARE
DOING.
The stack holds up to 8 values and this means you can go to a
sub-routine by using a CALL instruction and the sub-routine can have a
CALL instruction as one of the instructions and the next sub-routine can
also have a CALL instruction and this sub-routine can also have a CALL
instruction and this can continue for 8 CALL instructions. The
micro must come back via the 7th, 6th, 5th, 4th, 3rd, 2nd, 1st called
sub-routine and finally return to the main program.
ADVANCING UP AND DOWN THE
PROGRAM
The micro normally advances down a program, executing one instruction at
a time.
The location of the micro is held in a counter called the PROGRAM
COUNTER (PC)
You can advance down a program by using the instruction:
goto $+3 or goto $+.12
It works like this:
the current location is $
If you use goto $ the micro will read the
instruction, automatically increment the Program Counter and then
decrement the counter to remain on the same address.
In other words the micro will not advance and it will get "stuck" on the
same instruction.
This a HALT instruction - used for testing a program.
goto $-1 sends the
micro to the previous instruction and this
produces a "loop" and the micro will get "stuck ion a loop."
goto $+1 - advances the
micro to the next location but this
instruction takes 2uS and is used to increase a DELAY TIME.
nop - this advances the micro down the program to the
next instruction and wastes 1uS.
goto $+2 - this advances the micro down the
program by jumping over 1 instruction.
goto $+3 - this advances the micro down the
program by jumping over 2 instructions.
goto $-3 - this sends the micro UP the program
by jumping over 2 instructions.
To get something
done a number of times,
a loop is created. It may be to waste time, illuminate a LED or produce
a tone.
The micro advances down the program at one million instructions per
second and if we make an output pin HIGH to turn on a LED, we need to
waste some time so the illumination of the LED can be seen. This
involves a "do-nothing" sub-routine called a delay.
For a 1-second delay we need about one-million instructions as each
instruction takes 1uS to execute.
Any instruction with a requirement to go anywhere other than a simple
advancement, takes 2uS.
We start a delay routine by selecting a file and calling it delayA.
This file will have nothing in it and if we select the instruction
decfsz we will be able to decrement it 256 times and it will have
zero contents.
Here is the reason: The file starts with zero. The instruction
immediately decrements the file and it "rolls-over" so that all the bits
are "1." This gives the file a value of 0FFh or decimal 255.
When the file is decremented the second time it will contain 0FEh or
254.
This can be repeated until the file contains 1 and the instruction will
decrement it to zero. The same instruction now invokes the "skip if
zero" portion of the instruction and the next line of code is
jumped-over. Thus we have created 256 loops.
The next part of designing the delay is working out the size of each
loop.
If you tell the micro to go up the program 6 locations, the loop will
contain 7 instructions and the time for each loop will be 10uS.
This is executed 256 times producing a total of 2560uS = 2.56mS.
goto $+1 = 2uS
goto $+1 = 2uS
goto $+1 = 2uS
goto $+1 = 2uS
nop
= 1 uS
decfsz delayA,1 = 1uS
goto $-6 = 2uS
2560 x 256 = 655,360uS = 0.65 seconds, by adding the following
instructions:
decfsz delayB,1 = 1uS
goto $-8 = 2uS
The file being decremented MUST be different to the first delay file,
that why it is named
delayB.
The two instructions above add 256 x 3 plus 256uS for the time
when decfsz delay,A is zero = 768uS + 256, making a total
of 656,384uS.
The timing for simple delays doesn't have to be worked out accurately
and you can consider the delay equal to half-a-second.
As you can see, there is an inner loop and an outer loop. This is called
a "NESTED LOOP."
To detect the
action of a push-button, ANY of the pins must be set to INPUT. This is
done in the INPUT/OUTPUT file called the "trisio" file. This file is
hidden inside the micro and can be accessed by the following
instruction:
bsf rpo
The pin you want to be an INPUT corresponds to a particular bit in the
trisio file and is given the value "1" - to correspond to INPUT.
At the same time, you can make all the other pins OUTPUT.
This is done by the following to instructions
movlw b'00000001'
movwf trisio
bcf rp0
The voltage on the switch connected to the input line must go from HIGH
to LOW or LOW to HIGH when the switch is pressed.
The file connected to the pins is called the gpio file or gpio register.
The following instruction will test bit0 to see if it is HIGH:
btfss gpio,0
It works like this:
btfss gpio,0
the micro will go HERE if the switch is pressed
the micro will go HERE if the switch is NOT pressed.
To turn ON an output (In other words "make a pin that is already defined
as an OUTPUT-PIN via the trisio register" - HIGH) to illuminate a
LED, for example, the corresponding bit in the gpio register is SET:
bsf gpio,1 (the ,1 represents
the second lowest pin. ,0 represents the lowest pin, and this is
pin 7 on the chip - GP0. ,5 represents the
highest pin - GP5 and this is pin 2 on the chip.)
Don't forget: Pin 4 is ONLY an INPUT. 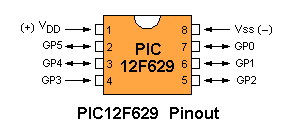
This will turn on 3 pins:
movlw 'b00001110'
movwf gpio
Only the 6 lowest bits correspond to the in-out pins being HIGH/LOW. The
two highest bits are NOT USED. (This also applies to the trisio register
being IN/OUT - the two highest bits do not control any IN/OUT feature).
Incrementing and decrementing a file is nearly
always done in a DELAY routine to "waste time."
When you choose a file to increment or decrement, it may be zero or it
may contain some bits that are "set."
To load a file with a particular value, such as .30 (decimal
thirty), the value is called a LITERAL and is loaded into w:
It is then passed (actually copied) into tempA
movwf tempA
By using the decrement function, the file will be decremented to zero.
If you keep decrementing, the file will go to .255 then .254 and keep
decrementing and looping.
However the instruction decfsz (decrement file and
skip - jump over the next instruction - if the file is zero)
detects when the file is zero and you can go to another part of the
program and perform another task.
We have already explained the concept of advancing UP THE PROGRAM and if
you add a command to "go up the program" such as: goto
$-3 the micro will loop and decrement tempA, on each
pass.
Eventually tempA will be zero (after exactly thirty loops) and
the instruction decfsz will jump over the next instruction and
"get out of the loop."
You can use the instruction incfsz but you need to work out the
number of loops between the value loaded into the file and the value
.256 (because .256 will be 000)
If you need to increment a file, use the following instruction:
incf, tempA,1 - the ,1 is needed to
signify the result of incrementing will appear in tempA.
the instruction: tempA,0 will put the result in w
BUT tempA will NOT be INCREMENTED.
For instance: decfsz tempA,0 will
NEVER "get out of the loop" (covered above) because tempA
will never be decremented.
You MUST use: decfsz tempA,1
You can also use the instruction: decf, tempA,1
and check the zero flag in the STATUS file, but the instruction decfsz tempA,1
is much easier to use.
If you want to increment or decrement a file use: incf
tempA,1 or decf tempA,1
If you want a list of numbers (called data) you need to add them to
the program in a TABLE.
This table can be as long as 255 entries (values) but it MUST be in the
first 256 locations of your program.
This means the first location (000) must contain: goto Start to
send the micro past the first page (called page0).
On the second location you can start the table.
The first instruction in a table adds a value to the PROGRAM COUNTER to
send the micro down the table to the required value.
this instruction is: addwf 02,1
File 02 is the Program Counter and ,1 indicates the
result of addition will be in the PC.
Before going to a table, the w register must be loaded with a value.
This is the value to be added to the PC. If the value is zero, the
first piece of data in the table will be placed in the w register.
Each item of data is placed on a separate line with an instruction in
hex or decimal or binary - or any mixture:
retlw 06h
retlw .25
retlw b'00001110'
the instruction means: return with the following value in
w.
Here's your program:
xxxxxx
movlw 03
call table1
movwf counter
xxxxxx
table1 addwf 02,1
retlw 06h
retlw .25
retlw b'00001110'
retlw
.55
Here's what will happen:
The micro will advance to the instruction movlw 03
and place 3 in the w register.
The micro will create a CALL condition in which it will remember the
location of the next instruction in the program (so it can return to you
program).
The micro will go to (via a CALL condition) table1 and increment
the program counter.
This will make the micro advance down the table to retlw .55
(because the first table-data is advancement zero.
At location retlw .55 the w register will
be loaded with the value decimal 55 and the micro will return to your
program to movwf counter.
The micro will place the value decimal 55 into the file: counter.
The reason why the table is placed in the first page (page0) of the
program is because
addwf cannot compute a value higher than 8 bits. This means the
table cannot go over the boundary between page0 and page1 or the
boundary between page1 and page2 or the other boundaries.
However the table can be at the beginning of page1 and extend to the end
of page1 or inside page3 or page4.
To make sure the table remains in its intended location, the instruction
before table2 is:
org
0x0100 - this instruction doe NOT
take up a location in your program
table2 addwf 02,1
retlw 07h
retlw .35
retlw b'01001110'
retlw
.75
Make sure your instructions in page0 do not go over page0 boundary or
they will clash with the beginning of table2.
You can have any number of tables in any page, but make sure none go
over the page boundary.
The PIC12F629 has 4 pages: page0, page1, page2, page3. Each page is 256
lines of code or table-values. (255 table values is best).
BOOLEAN OPERATIONS
In the
list of PIC INSTRUCTIONS you will find instructions
with the words: AND, OR, (more accurately
called Inclusive-OR) and XOR.
These are called Boolean Instructions or Operations and are very
powerful because they operate on all the bits in a file at the same
time.
BUT YOU MUST KNOW WHAT YOU ARE DOING - because the result may not be
what you expect and you continue the program with the wrong result.
The AND operation is not addition. There are no "carry-over" bits. Two
files are compared and if both files contain "1" the result is "1"
Example:
File A 0000 0011
File B 1100 1110
Result: 0000 0010
For example:
File A 0000 0011
File B 1100 1110
Result: 1100 1101
Note: xxxx xx1x
xxxx
xx1x
result xxxx xx0x
The result is "0" because BOTH files are "1"
Here is the result for the OR operation:
File A 0000 0011
File B 1100 1110
Result: 1100 1111 The OR operation cannot detect
when BOTH files are "1"
That's
why we use the XOR function.
You will find the instructions in the Library of Routines under "Toggle
a bit."
You can toggle up to 8 bits with 1 instruction. Make sure to copy the
instructions to get the correct outcome.
P3
-
writing your own program