|
5v SOLAR POWER SUPPLY |
This
project uses the components
from a
Solar Garden Light
circuit 2.
The Solar Garden Light
can be bought for less than $5.00!!
No kits for this project are available.
There are 4 pages on SOLAR CHARGERS:
SOLAR CHARGER
Solar Light
Power Supply 5v Solar -
Circuit 1
Power Supply 5v Solar - Circuit 2 - this page
![]()

This project uses components from a
Solar Garden Light
with a circuit similar to Circuit 2 in our Solar Garden Light project.
These lights can be bought for less than
$5.00 in most $2.00 shops or similar shops that sell general
household items.
We are also using the housing for this project as we could not buy the
case, battery, solar panel and electronics for $5.00 in an electronics shop.
We have already described the operation of the
Solar Circuit - 2, and shown
that it will produce peaks of more than 40v if the LED is removed from
the circuit.
We can use this characteristic to produce a 5v power supply suitable for
a microcontroller project or an amplifier or FM transmitters etc.
The circuit we have designed will produce a 5v output @ 15mA. If a
higher current is drawn, the output voltage will drop to 4v @ 15mA.
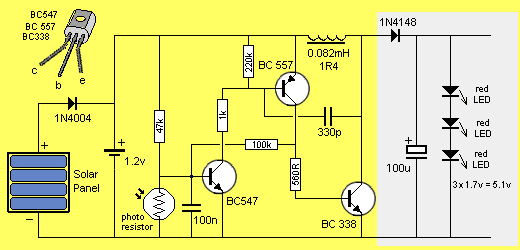
The components we have added are shown in grey in the diagram above.
All you have to do is remove the LED from the circuit and add a signal
diode, electrolytic and 3 LEDs.
If you add three red LEDs, the maximum voltage will be 5.1v.
This can be called a zener reference output and as soon as a load is
connected to the circuit, the voltage will drop and the LEDs will turn
off.
The LEDs are a safety feature to prevent the output voltage rising to
40v!
Do not remove the LEDs as the voltage will rise and if you connect them
to the fully charged electrolytic, they will be damaged.
HOW THE
CIRCUIT WORKS
The
operation of the circuit has already been covered in the Solar Garden
Light article.
The added signal diode rectifies the pulses to charge the electrolytic.
The LEDs provide a maximum output voltage by using their accurate
voltage of 1.7v per LED (for a red LED) to create a 5v supply.
Other LEDs can be used to create a supply up to 20v or more.
As the voltage increases, the current you can draw from the circuit
decreases.
The purpose of the diode between the battery and the circuit is to prevent "back-leakage." When light is not falling on the solar panel and the battery is charged, some current may leak through the panel and discharge the battery. You have to find out if the panel you are using has a slight resistance (back-resistance) when in the dark. The 220k biases the BC 557 off when light falls on the photo resistor as any slight conduction of the BC 557 will turn on the BC 338 very slightly and discharge the battery.
In future articles we will present a
microcontroller project and an FM transmitter that uses this solar power supply.
Keep returning, as the links will be added to the top of this page.
Colin Mitchell
8/1/2008