This circuit will produce one of 4 sounds when the loop connected to J1 is
broken. The power must be turned off to reset the alarm.
The Circuit
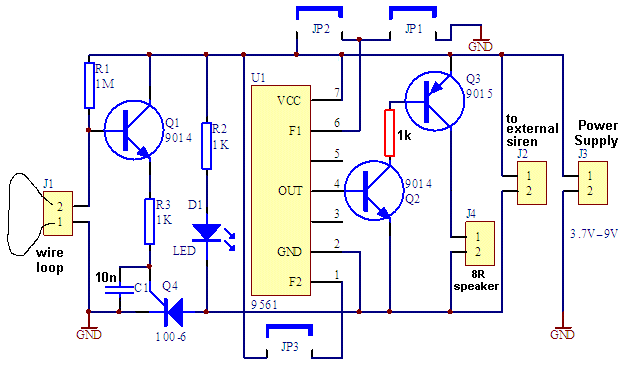
The circuit consumes
about 5uA when "sitting around" waiting for an intruder.
The circuit will operate on a wide voltage range of 3.6v to 5v but of you
want to increase the voltage to 9v, the 1k resistor shown in
red in the circuit, must be added.
The circuit is activated when the wire loop is broken. This action turns on
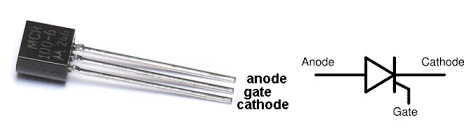
the first transistor Q1 (9014) and this triggers the SCR (100-6) MCR100-6.
This is an SCR (Silicon Controlled Rectifier) in the thyristor family. A
small voltage (and current) on the gate will turn it ON and the only way to
turn it OFF is to remove the Power Supply. Reconnecting the wire loop will
not turn off the alarm. The loop must be reconnected AND the supply must be
removed to reset the alarm.
The circuit produces a "wailing Sound" when none of the 3
jumpers are added.
Fitting jumper 1 produces a "Hee Haw" sound"
OR fitting jumper 2 produces a
OR fitting jumper 3 produces a "Machine Gun" sound.
A small 8 ohm speaker can be fitted to J4 or if you have a wailing siren, it
can be fitted to J2.
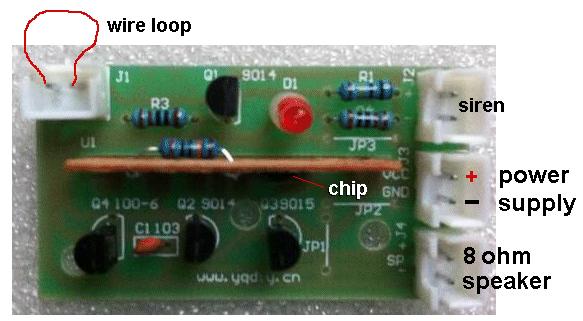
The photo identifies all the components and
how to fit them to the printed circuit board.
Use a constant-heat soldering iron (320 degrees C) and fine solder (0.8mm).
Fit one component and splay the legs slightly so it doesn't fall out of the
holes. Turn the board over and hold the soldering iron on one side of the
lead and the solder on the other side. The solder will melt and flow across
to the iron. This will take less than one second.
Snip the leads close to the solder-joint. Solder one component at a time.
Use the photo below to identify each component and how it is fitted to the
board. All the components must be fitted around the correct way, and there
is only one way to fit them. However the 4 resistors can be fitted around
either way as they are classified as a "non-polar component."
3 of the resistors are fitted directly to the PC board.
The COB module (Chip On Board) is then fitted through the slot on the board
so that the
chip is in the position shown in the photo above.
Hold the module in the slot with pieces of wire jammed in the slot with the
module and solder one end by using plenty of solder to connect the two
lands. make sure the board is at 90° and is protruding evenly along the slot
before soldering the other end. Now add plenty of solder to all the other
lands to make good connections.
Finally add the 100k resistor to the COB module.
You can
buy this kit
for about $5.00 post-free
22-7-2013
|