|
POWERING
A
PROJECT
Page 1B

All projects need to be powered
from a power-source. The most important requirement of a power-source is
to provide a voltage that is constant, reliable and free from
fluctuations.
The voltage supplied to a project is called the SUPPLY VOLTAGE or RAIL VOLTAGE
and for a microcontroller, this must be a MAXIMUM of 5.5v It can be as low as
3v, depending on the type of microcontroller but in most cases the minimum is
4.5v.
For the PIC12c508A and PIC16F84, the SUPPLY RAIL must be between 4v5 and 5v5.
We call this supply rail the 5v SUPPLY, 5v RAIL, POWER RAIL or
SUPPLY RAIL.
Sometimes the microcontroller drives output devices that are also connected to
the 5v rail and when these devices are activated, they can put glitches on the
power rail.
If these glitches are large in amplitude, they may upset the operation of the
microcontroller.
Obviously you do not want anything like this to develop and these notes will
help you.
If a project has amplifying stages (interfacing stages) on the input, noise on
the power rail may enter the microcontroller via these stages and create a
problem.
To prevent any problems, the power supply must be regulated and the
supply rail must be tight.
This is very easy to say, but what do these two words mean?
Regulated means the voltage must remain constant over a long period of
time.
For instance, if you power a circuit from a set of watch-batteries, the
voltage would fall below 4.5v after a few hours of operation of the
circuit would be unreliable.
Using AAA cells or AA cells, will increase the life of the circuit. Although a set
of cells does not produce a regulated supply, the voltage will be maintained
between 4.5v and 5.5v for a considerable length of time.
One way to provide a fixed 5v is to use a regulator. There are a number of
regulator circuits.
You can use a zener diode, a pass-transistor or a 3-leaded device called a
VOLTAGE REGULATOR. All these are designed to provide a fixed voltage on
the SUPPLY RAIL, and they will be discussed below.
A tight supply means the voltage does not fluctuate when devices in the circuit are turned on and off. These fluctuations are called glitches or
spikes and can pass to other parts of the circuit where they are picked up and
amplified. The amplified signal can be passed to the microcontroller as an
input signal and the system will be "reading itself," very similar to
a feedback problem.
The simplest way to prevent spikes is to fit capacitors and electrolytics across
the power rail. A capacitor will "absorb" the spike and
"kill" it - or at least reduce it and prevent the microcontroller
recording the spike as an input pulse.
The size of the capacitor will need to be determined by experimentation however
it is basic to say a very short duration spike can be reduced with a 100n
capacitor such as a monoblock mounted very close to the item you are protecting
(the microcontroller) and an electrolytic will prevent long-duration pulses and
dips in voltage from being passed to other parts of the circuit, and eventually
to the microcontroller.
The size of an electrolytic will depend on the circuit but a general value is
47u or 100u.
When a supply rail is generated from an AC source, such as the output of a
plug-pack and through a bridge rectifier, the voltage must be smoothed with
large-value electrolytics. The normal rule-of-thumb is at least 1,000u for each
amp required by the circuit.
Further smoothing should also be provided by some sort of electronic device
such as a zener regulator, transistor regulator or 3-terminal regulator.
All of these arrangements are designed to reduce the ripple on the rail to a very small
value.
Obviously it is ideal to have no ripple, however an allowable ripple will depend on the amplifying stages on the
front-end of the microcontroller and you will need a CRO to determine the
effect of any ripple on the performance of the circuit.
OVERSHOOT
The best thing to do is "overshoot the mark" and produce a supply that is better
than required.
This means the voltage should be very close to 5v and have very little ripple.
The supply rail should be tested when each device is activated and
deactivated. This is very important as the deactivating of a device can produce
a very large spike.
If the supply is operated from a battery, the effect of a reduction in voltage
(as the batteries get older) should also be noted.
You must know the "tolerance" of a circuit to varying conditions as
this will give the reliability of the circuit over varying
conditions.
One reader commented on his microcontroller project resetting after every 38 cycles of a
routine.
He spent hours diagnosing the program without success. He transferred the
program to our test-bed where the problem was diagnosed as the relay in the
output creating a glitch that reset the micro.
A diode across the relay coil "snubbed" the spike and solved the
problem.
The spike went to the font-end of the circuit where a high-gain amplifier
detected the spike and the micro read it as a reset.
The circuit had three problems, the layout was on an experimental
board and created a very
"loose" supply rail where spikes from the relay upset the input
amplifier. Capacitors across the microcontroller and the spike suppression
diode across the relay was missing. APC board layout will very often improve
the impedance of the supply rail and allow you to add spike-reducing components
where necessary.
5v SUPPLIES
The following circuits show how to produce a 5v rail from different
sources.
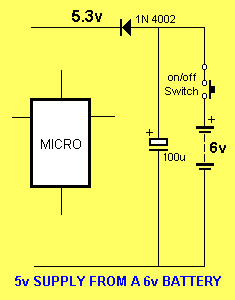
The first circuit will deliver a 5v rail for a microcontroller project from a
6v battery. The power
diode in the rail reduces the voltage to just above 5v for the micro. The diode also prevents reverse voltage
being applied to the
chip. The electrolytic across the battery reduces the impedance of
the supply and allows high-current peaks to be delivered without creating spikes
on the supply rail. The 100u is needed as the battery gets older. The
internal resistance of a battery (called its internal impedance) gets higher as
the battery gets older and this prevents it from delivering peaks of current.
The electrolytic delivers the peaks and keeps the power supply
"tight."

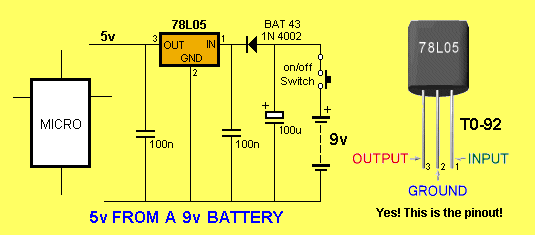
A 9v battery can be used to supply a microcontroller project by
using a 3-terminal voltage regulator such as the 78L05. This is a 5v regulator
in a T0-92 package and looks like a BC 547 transistor.
The only hidden problem with this is the short life of the battery. The
battery voltage can only fall about 1.5v before the circuit starts to
"drop out."
The regulator must have at least 2.2v across it for the circuit inside the
regulator to operate and the diode on the positive line drops
0.2v for a BAT 43 or 0.7v for a 1N 4002. The 100n capacitors are placed
very close to the regulator to prevent unwanted oscillations being generated by
the regulator These oscillations are only generated if the power rails are not kept "tight."

USING A ZENER REGULATOR
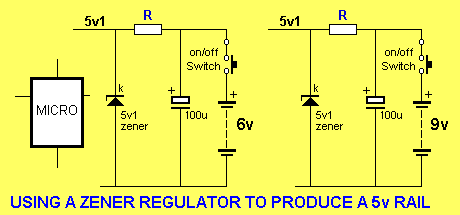
A zener diode can be used to regulate a supply but it is a very wasteful
design. The diagram below shows two zener diode regulator circuits.

They are both the same. The only
difference is the value of R. The way to design a zener regulator is to work out the maximum
current required by the circuit. Suppose it is 50mA. This current will be
flowing from the battery ALL THE TIME. When the micro is just sitting and doing
almost nothing, it may be taking say 10mA. The other 40mA is flowing through the
zener. When the micro is turning on two LEDs, it will be taking say 30mA and the
other 20mA will be flowing through the zener. When the micro is turning
on 4 LEDs, it will be taking 50mA and zero will be flowing through the zener.
During this time the rail voltage will be 5v1. If the micro turns on 5
LEDs, the rail voltage will drop slightly and all the LED will glow slightly
dim.
We say the circuit has dropped OUT OF REGULATION.
If the circuit turns on LEDs for a very short period of time, you can see
the zener regulator is a very wasteful arrangement.
USING A PASS-TRANSISTOR
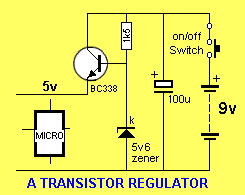
The zener regulator can be made more efficient by adding a series-pass
transistor. The zener is just kept in "breakdown" by delivering
the minimum current to it to create a voltage across it equal to it zener
reference value.
A transistors monitors this zener voltage by connecting the base of the
transistor to this point on the circuit. The transistor acts as an
emitter-follower with the emitter always maintaining a voltage that is 0.7v
lower than the base voltage.
A circuit (such as a microcontroller) can be placed between the emitter and 0v
rail and it will see a constant 5v. The maximum current for this
arrangement is 100mA.

The cheapest and best power supply for the microcontroller projects in our
course is a set of four AA or AAA cells in a battery-box with a diode on the
positive line to reduce the voltage to 5.3v. It will also need a switch on the positive
line.

|


