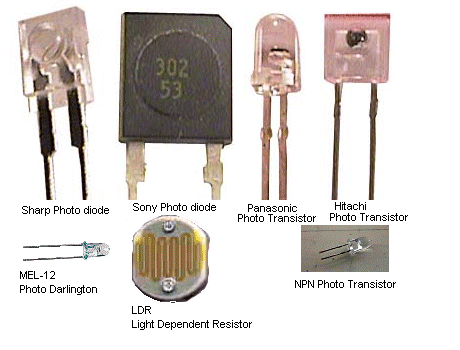
The general appearance of
Photo Devices will vary according to the manufacturer. The diagrams below
show some of the devices we are covering:
Most devices have a long and short lead to help identification as well as a
"flat" near one lead or a corner cut off the shape. Some devices have
a lens to indicate the front side. The LDR, Photo cell, and Photo resistor can
be placed around either way in a circuit.
It is impossible to provide a "universal
circuit" with component values for photo devices due to the fact that each
device differs enormously from the others and the illumination intensity for
your particular application is
unknown.
The only thing we can do is explain how a circuit works so you know which
component to alter so that the photo device is sitting with the right voltage
across it for the situation.
In the following diagram we have three different load resistors.
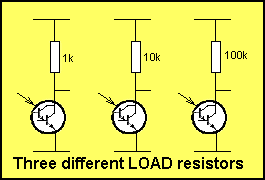
The animation below shows each circuit responding to variations
in light intensity. The device is a Darlington Photo transistor, but exactly
the same "swing" will occur with a Photo transistor or Photo diode.
From this animation you can see the effect of a low, medium and high value of
resistance for the load. The load resistor determines the voltage across
the device since we have already explained that the photo device acts exactly
like a variable resistor, so the circuit is actually two resistors in series,
with the mid-point as the "take-off" point.
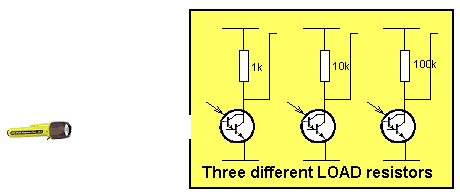
The output of the Photo Device with 3 different LOAD resistors.
The actual value of the voltage across the device will depend on
the supply voltage and the level of illumination.
In the first case, the voltage will sit fairly "high" and
"fall" as the illumination increases.
In the second case, the voltage swing will be large.
In the third case the voltage will be low and fall a very small amount.
In the first and second case, the gain of the transistor is high and this is your
aim if you want the circuit to be "SENSITIVE." In technical terms, the
transistor has the greatest gain. The easiest way to arrive at the best
"setting" for the stage is
to provide a pot on the front end. You will also need a "stop"
resistor to prevent excess current flowing when the device is fully conducting.
Start with a 100k pot and 1k stop resistor. Experiment with the circuit and if
the pot is very hard to adjust because the slightest movement changes the conditions
on the circuit, you can reduce the value of the pot and increase the value
of the stop resistor. In other words, more voltage will be dropped across
the fixed resistor and less across the pot. This mans the pot becomes a
"trim" and moving it from one end to the other adds or removes only a
small resistance.
WHAT ARE WE ACTUALLY DOING?
By adjusting the pot, we are altering the top resistor of the voltage divider.
The resistors form one part of the voltage divider and the Photo device forms
the lower resistance of the divider. There is one other factor that comes into
the equation. The Photo device will have a slightly different change in
resistance (for a particular level of illumination) depending on the current
flow through the divider circuit. But this is as far as we can go without
getting into technical terms - and I promised the course would be totally free
of mathematical complexities.
The only thing you really have to know is this: How to set the conditions on the
"stage" for the range of illumination.
It will take a little bit of experimenting to get the
circuit to work exactly as required.
NEXT

