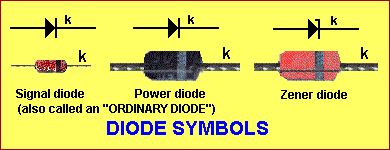
THE ZENER DIODE SYMBOL
The diagram below shows the symbol for an
ordinary diode (called signal diodes and powers diodes) and a zener diode. The
"flag" on the cathode of the zener symbol indicates the diode is a zener. Sometimes zener diodes have a red body but there is no other special
package for a zener diode. Sometimes the zener voltage is written on the diode,
such as: BZX84-C5V6. This is a 5.6v zener.
THE
ZENER DIODE
A zener diode looks like an ordinary diode and in fact it is an ordinary diode
except for one feature. It allows a fairly low voltage to appear across it, when
it is reverse biased. In the animation below, both the zener diode and ordinary
diode produce a characteristic 0.7v drop across them when they are forward
biased. The diagram shows exactly how this 0.7v appears. As the voltage
increases from 0v, nothing flows through either diode until 0.7v is reached.
Anything over 0.7v passes through the diode and thus the voltage on the
left-hand-end of the diode is always 0.7v lower than the supply voltage. We
have used a supply voltage of 2v to show that the effect occurs at 0.7v and any
voltage above 0.7v passes through the diodes.
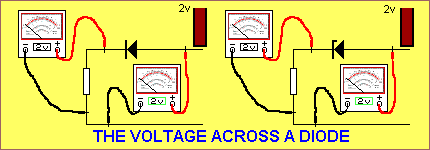
The 0.7v drop is called the "characteristic voltage drop" of the diode
or the "forward voltage drop" - and this applies to both
diodes.
If we reverse the two diodes in the circuits above, we can show the difference between an
ordinary diode and a zener diode. We will take a 5v6 zener diode and a supply voltage
from 0v to 10v.
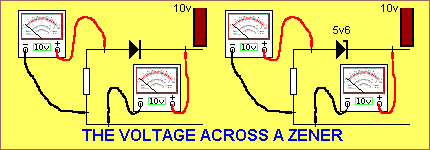
The ordinary diode "resists" the voltage across it because it can
withstand a voltage of 100v. (A signal diode can withstand approx 90v and a power
diode can withstand 100v to 400v or more). The 5v6 zener can only withstand a voltage of 5v6
before it "breaks-down" and allows current to flow. When it
"breaks-down," any voltage above 5.6v is passed to the other side of
the diode and this "new" voltage appears across the load and causes
current to flow through the load.
A LED is a ZENER
Another component that acts
exactly like a zener diode is a LED. A red LED is a 1.7v zener diode and it
produces light according to the current flowing through it. It's a zener
diode with a window, so you can see the current flowing.
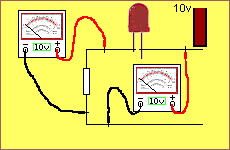
The LED is a Zener diode!
When the voltage is below 1.7v,
no current flows through the LED. As soon as the supply voltage reaches 1.7v,
the LED starts to illuminate. As the supply voltage increases, the voltage
across the LED remains the same (1.7v) and the "left-over"
voltage appears across the resistor. As the voltage rises across the resistor,
more current will flow through the resistor and this current also flows through
the LED and makes it glow brighter.
In the animation above, the voltage on the left-hand voltmeter is always 1.7v
lower than the supply voltage.
THE ZENER REGULATOR
We can re-arrange the zener circuit above very slightly to produce the standard
zener regulator circuit. This is shown in the diagram below:
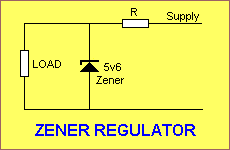
The two components we are discussing are the zener and resistor
R. These two components are in series and the supply voltage must be above 5.6v
for the zener regulator circuit to work. When the supply voltage is above 5.6v,
the voltage across the zener remains at exactly 5.6v and this voltage is
available for the "circuitry" we are supplying with this fixed
voltage. The "circuitry" is called the LOAD.
If the supply rises above 5.6v, the excess voltage is dropped across the
resistor "R.
CURRENT
SHARING
Now we come to the most difficult part of the discussion. The LOAD normally
takes a varying amount of current. As different parts of the circuit turn on and off, the current requirement
increases and decreases.
Normally an electrolytic across the power rails and will deliver the extra
current - this will be added to the circuit above in the final
design.
For the moment, we need to show how the zener provides the extra current and how
it maintains a constant voltage for the load.
In the example below, the LOAD requires a current of 15mA and the supply voltage
allows 20mA to flow into the circuit. This means 5mA will be flowing
through the zener.
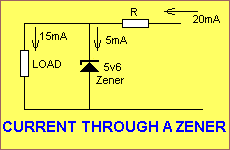
When the LOAD requires extra current, it comes from the ZENER!
This is the way it works:
Suppose the LOAD requires an extra 1mA. Whenever a LOAD requires extra current,
its resistance decreases and this means the voltage across the LOAD decreases.
This slightly-lower voltage will be passed to the zener and it will
turn-off slightly. The result is 1mA less
will flow through the zener and the LOAD will take the extra 1mA.
The reverse can also occur. If the LOAD requires 1mA less, the voltage across
the zener will rise slightly and the zener will take 1mA more. If the LOAD
is removed from the circuit, the zener will take the full 20mA.
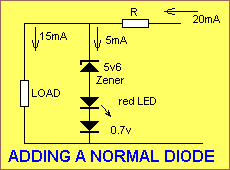
ADDING A LED
A LED can be placed in series with the zener diode to increase the zener
reference voltage. A red LED has a characteristic voltage of 1.7v and other
colours have 2.1v to 2.3v depending on the manufacturing process and the colour.
The size of the LED does not influence the characteristic voltage it develops
but sometimes the quality of the LED (such as HIGH BRIGHT) develops a slightly
different voltage.

The circuit above will put 5.6v + 1.7v = 7.3v across the LOAD. The supply
voltage will have to be increase by 1.7v for the same current to be delivered.
ADDING AN ORDINARY DIODE
An ordinary diode can also be added to the zener line to increase the reference
voltage. An ordinary diode develops 0.7v across it when in the
"forward-voltage" mode. The voltage across the LOAD will be 5.6v
+ 1.7v + 0.7v = 8v. This is a very convenient way to create almost any zener
reference voltage.
OUT OF REGULATION
In the circuit above, the zener is taking 5mA. This means the LOAD can take 15mA
+ 5mA = 20mA and the regulated voltage will remain constant. If the LOAD wants
21mA, the zener cannot supply the extra current and the result is the extra
current flows through resistor "R" and creates an additional voltage
drop across it. This means the voltage across the LOAD falls and thus the
regulated voltage is lost. When this occurs, we say the zener has "DROPPED
OUT OF REGULATION."
WASTEFUL
As you can see from the circuits above, the current flowing through the
zener is not being used for any practical purpose and is being WASTED.
Zener regulators are very wasteful and should only be used if the project is
being powered from a plug-pack.
TESTING A ZENER
To test a zener diode, you will need a power supply that will deliver a voltage
above the expected voltage of the diode. Most zener diodes will fall into the
range 3v9 to 39v and the practical range is 5v6 to about 20v.
This means you will a 24v supply. The simplest answer is to connect 9v
batteries in series or any old batteries that are nearing the end of their
life.
A current-limit resistor must be added in series to limit the current to between
1mA and 10mA. A small zener such as a glass-enclosed type will require about 1mA
or 2mA to flow during the test procedure. A larger zener will need 5mA - 10mA to
flow and "break-down" and create the zener voltage.

To test a zener, connect two or
three 9v batteries and a 10k resistor as show in the circuit above. Add the zener and
watch the glow from the LED. It should be fairly bright. Change the resistor to
4k7 or 1k to get good brightness from the LED. This will prove a satisfactory
current is flowing. Read the voltage across the zener with a voltmeter. If
the supply voltage is 27v and the reading is above 25v, the zener is not
breaking down and it is either a higher voltage device or it is open - and
FAULTY! If the reading is zero, the zener is also faulty. It has SHORTED!
You can also add any combination of LEDs, zeners and ordinary diodes to obtain
any desired voltage.
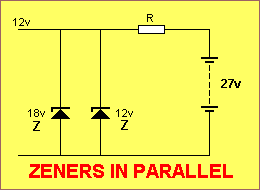
CONNECTING ZENERS IN PARALLEL
Zeners can be placed in parallel but they really don't provide any
real technical advantage.
However here's the voltage they provide and how to work it out.
In the diagram below, a 12v and 18v zener is placed in parallel. The resulting
rail voltage is 12v.
Here's how to work it out.
As the voltage rises, the lower-voltage zener will break down and prevent the
voltage rising any further. Thus the 18v zener will not come into operation and
can be removed from the circuit.
If the 12v zener goes "open," the 18v zener will take over and the output
voltage will 18v.
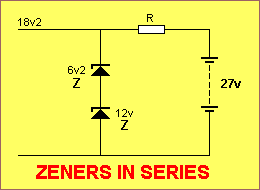
CONNECTING ZENERS IN SERIES
Zeners can be placed in series to obtain almost any voltage. Simply
add the values to obtain the final rail voltage.
There is only one thing to remember. The wattage of each zener must be the same.
The reason is the current required by a zener to maintain breakdown depends on
the wattage of the device. If the 6v2 is a 5 watt zener and the 12v is a 1/4
watt device, the current required to keep the 6v2 in breakdown will be 10 times
more than that required for the 12v and it will get very hot.
NEXT
