|
CURRENT TO VOLTAGE CONVERSION |
Page 75
|
Current to Voltage Conversion |
The term "Current
to Voltage Conversion" is a complex way of
saying a very simple thing.
Before we talk about Current to Voltage Conversion, we will cover
the "visual" way to explain this concept.
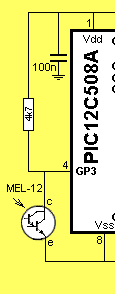
As an example, the MEL-12 photo Darlington
transistor creates a LOW on GP3 of the microcontroller, when light
falls on it in the Robot Beacon:
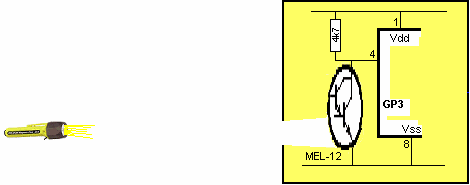
The section of the circuit we are interested in is the MEL-12 and 4k7 resistor:
The MEL-12 is effectively a variable resistor.
When no light falls on it, its resistance is very HIGH.
When light falls on it, its resistance is very LOW.
In other words, it is a variable resistor.
The 4k7 and MEL-12 are effectively two resistors in series.
Here is an animation of the MEL-12 in operation:
Replacing the MEL-12 with a resistor, we get:
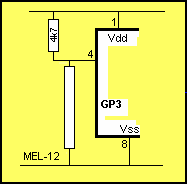
We can see the MEL-12 is the same as a variable resistor. There are two
conditions that are vary easy to visualize:
1.
If we remove the MEL-12 we can see pin 4 is HIGH via the 4k7 resistor.
2. If
the MEL-12 has a very low resistance (say zero ohms), pin 4 is LOW.
The condition between these two extremes is more difficult to describe
and that's why we have used the visual approach.
When two resistors are placed in series, the voltage across each resistor
is proportional to the resistance of each resistor. That's why we can
draw the MEL-12 as a long or short resistance and this causes the voltage
on pin 4 to be HIGH or LOW.
The voltage to current conversion takes place in the 4k7 resistor, but
let's start at the beginning.
|
Current to Voltage Conversion |
Current to Voltage conversion is the skill of placing a component
in a circuit so the current flowing through it will create a
voltage across it that can be amplified or displayed in
some way.
The simplest example is a resistor in the power rail.
In a moment we will see why the resistor has been added.
First, we have to understand the fact that a small current-flow will produce a
small voltage across the resistor and a large current-flow will produce a
large voltage.

The resistor has been placed in the circuit to indicate
when the current-flow is above a certain value.
How can we "see" when the current rises above a certain value?
Simple.
Place a LED across the resistor.
The LED will not illuminate until the
voltage is above 1.7v.
We are using the current flowing through the resistor to produce a
voltage across it.
In other words, we are using CURRENT to VOLTAGE conversion to illuminate
the LED.
(A resistor must be placed in series with the LED because the voltage
across the LED must not rise above 1.7v. This has been covered in
previous pages.)
The following animation shows the LED illuminating when the current-flow
reaches a certain value. At this moment we are not interested in the
actual value of current - this can be set by experimenting with
the value of the resistor.
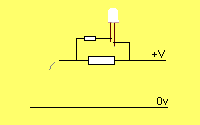
As the voltage rises above 1.7v, the LED gets brighter but the point of
the exercise is to show the conversion of Current to Voltage by
the resistor.
There are many instances where the current though a component is creating
a voltage that is passed to other parts of the circuit.
In the example above of the photo Darlington transistor, the action of
the transistor creates a varying current-flow in the 4k7 load resistor
and this causes a varying voltage to be developed across the resistor.
This varying voltage is detected by the microcontroller as a HIGH or LOW.
The voltage developed across the resistor can be worked out from a simple formula called "Ohms Law."
Ohms Law states the voltage
|
|
It states that when a small current is flowing through a resistor,
a small voltage is developed (you can also use the word "dropped") across
it. And if a large current is flowing, a large voltage is dropped across the
resistor.
Conclusion
If we take the MEL-12 and 4k7, we can use the formula.
At this point in time we are not going into the mathematics of using the
formula as the value of current is required to complete the calculation and this
requires placing an amp-meter (milliamp meter) in circuit to provide the
results.
The value of R is known (4,700 ohms) and from this the formula will
provide the
voltage across the resistor.
The change in resistance of one component affects the voltage across
another component by a process called Current to Voltage
conversion.