|
| ||
|
|
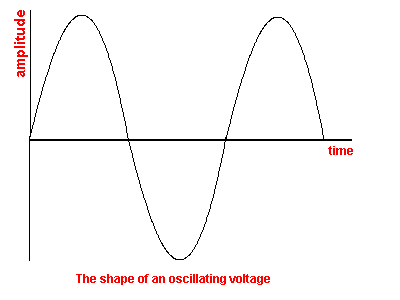
BASIC In this section we are going to talk about waveforms and show how a rising and falling voltage produces a "curvy" waveform very similar to a sinewave. A sinewave is called a natural wave because things like bouncing balls and pendulums produce this type of waveform when in motion. The animation below shows how a bouncing ball produces a curve when the rising and falling motion is combined with forward movement. Move the mouse over the "Move" button and the ball will shift right. The speed can be increased by moving the mouse over the Move button a few times without touching the Come back button. To reduce the speed the mouse is moved over the Come Back button without touching the Move button. The "Come back" button returns the ball to the starting position. Watch the shadow of the ball and you will see different waveforms being traced out.
The next
"interactive feature" shows how a
waveform is produced when a quantity such as voltage, rises and falls. Click
on "Pickup Tracer on new page"
and move it up and down a
few centremetres. The "0's" from the pointer will produce a graph very
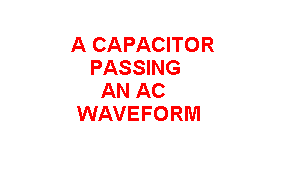
similar to the sinewave above. HOW A SIGNAL PASSES THROUGH A CAPACITOR
The
animation above shows a signal passing through a capacitor. In a previous question
we showed how an uncharged capacitor connected between a battery and LED, caused
the LED to flash briefly while the capacitor was charging, then remain
non-illuminated. This shows how a capacitor passes a current when it is charging. Question 52: A rising
and falling voltage is called an "__ voltage." Question 53: An AC voltage
(passes/doesn't pass) through a capacitor. Question 54: Draw the symbol for
a capacitor: Question
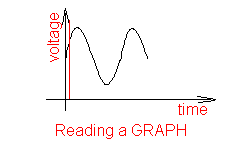
55: A capacitor (blocks/doesn't block) DC. WAVEFORMS Before we can talk about signals entering a capacitor, we have to understand how signals are represented in technical books. The only way you can represent them is by a graph. This is called a GRAPH OF THE WAVEFORM. A graph shows the way the signal has risen and fallen over a period of time. To read this graph (and every graph) you have to imagine having a pointer as shown in the animation below. The pointer gradually moves across the graph and where the graph touches the pointer, the amplitude is read off the graph. In the example below, the voltage rises to a peak then falls to a low, rises to a peak and then falls. The voltage being represented by the graph has a DC component as well as an AC component. We can see this by the fact that the voltage does not go below the 0v axis (x-axis) and you could say it represented a voltage of 7v, with a rise to 10v, and a fall to 3v.
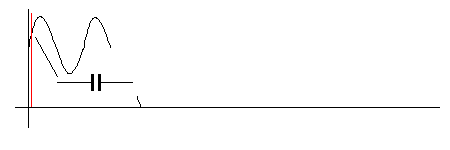
We will now take this one step further and show how the voltage enters a capacitor and emerges with the same wave-shape but with the DC component removed. This is what we mean when we say a "Capacitor blocks DC but passes AC." Take the case of the signal above (a signal is any type of varying waveform). Suppose the signal rises to 10v and drops to 3v. The frequency of the signal is not important. The animation below shows the result:
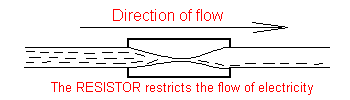
The shape of the signal is not altered by the capacitor. Whatever goes into the capacitor comes out. However the DC component (the height of the waveform above the X-axis) is removed and the signal emerges as a positive and negative waveform based around the x-axis. Without an animation, this important concept could not be demonstrated. As the pointer moves across the graph from left to right, the rise in voltage (that is: the rise in voltage from the starting point of the graph) is passed to the capacitor and the output lead of the capacitor delivers this rise to whatever component is connected to the capacitor. Using an animation, we can also show the concepts of how a resistor works:
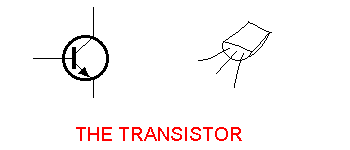
These are simplified interpretations of how components work but the amazing part of being a circuit designer is the ability to "see" a circuit working in your "mind's eye" before actually putting it together. You can also generate the ability to diagnose a fault in a circuit by bringing up a mental picture of the circuit diagram and working out the fault. Mental pictures of "components in operation" is an essential part of understanding electronics. You will need all your ability to understand how a component works. It is the transistor. THE TRANSISTOR The transistor is truly an amazing
device. The way the story goes, one of the inventors worked out the theory for
for its operation on his way to the university, in a train. If you are going to work with a
component, it's very handy to know how it works. It makes designing so much
faster and easier. Transistors come in all shapes and sizes but they all work on the same principle. The different sizes of transistor generally indicates the amount of current they will pass. The diagram below shows some transistor types.
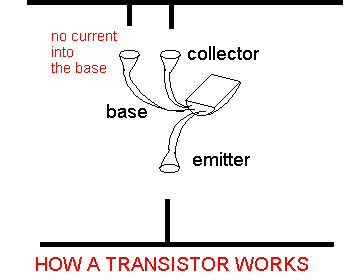
All transistors have three leads: BASE, EMITTER AND COLLECTOR. A transistor is an amplifying device. It can have an amplification factor of 10 or 20 or as high as hundreds and even thousands of times. For instance, if you allow one microamp of current to flow into the base, the transistor will allow 100 microamps of current to flow In the collector-emitter circuit. This means the transistor has a gain of 100.
The names on each line of the symbol of a transistor are always the same but the pinout of a transistor can be different. We have shown the standard "cbe" (c = collector, b = base, e = emitter) when the face of the transistor is UP (the type-number is printed on the face) but the pinout maybe "ecb" or "bce" and you have to consult the manufacturer's pinout guide for identification. An animation is the best way to "see" how a transistor works. When a small current is fed into the base, a LARGE current will flow between the collector and emitter terminals. The animation is not entirely accurate. You have to understand the collector-emitter current flows THE INSTANT current flows into the base.
A transistor has to be connected to the power rails with a RESISTOR on the base lead so the appropriate current flows in the base for the type of circuit you are constructing. On the next page we will combine the transistor and resistor to produce a simple circuit and show how a very small amount of electricity is needed into the base and the transistor will allow a higher current to flow between the collector and emitter leads. | |