|
|
BASIC
ELECTRONICS COURSE
THE
BRUSHLESS
MOTOR
Page 22
 INDEX
INDEX
An
in-depth description
of how the "computer fan" works
We have all seen the fan inside a computer but how many of
us have wondered how it works? This article tells all.
|
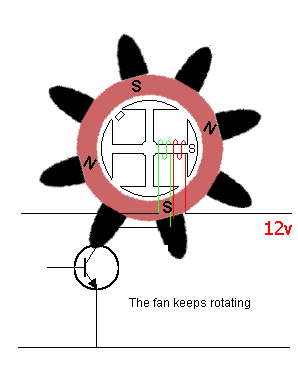
The animation
above shows how one transistor then the other is turned on via
Hall effect device to operate two separate windings. These
windings are connected in opposite directions to generate a
North pole and then a South pole on the 4 stationary centre
poles. This action "pulls the magnetic ring around in a
circular direction to create rotation. Note: the centre pole
is changing from North to South! |
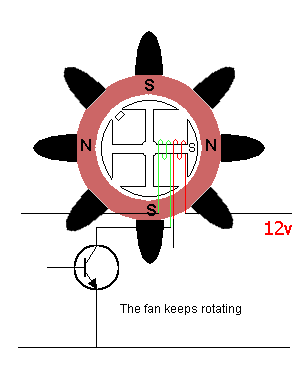
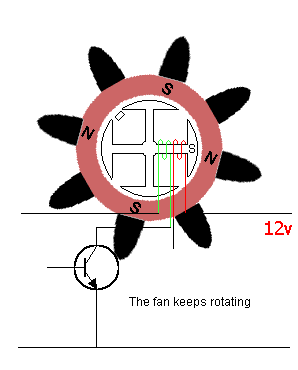
The animation above shows
how one transistor then the other is turned on via Hall effect device
to operate two separate windings. These windings are connected in
opposite directions to generate a north pole and then a south pole on
the stationary centre section.
It's
only through the miracle of animation on the web that the operation of
this device can be explained fully. The animation below is operated by
"Mouseover" on the small boxes and by gliding your
mouse over these boxes you can see the motor in slow
motion. Projects
like this are very important to comprehend because they incorporate
both electronics as well as mechanical principles.
Mechanical principles quite often involve magnetism and/or
electromagnetics as this is one of the ways of turning the flow of
current into movement.
It's interesting to note that the motive force of the future will be the electric motor.
It's
compact, efficient, pollution-free and new designs are emerging, with the aid of electronics.
That's the case with the brushless motor
- it has electronic control.
You may be familiar with the motor in a toy car. It has a 3-pole armature
(the least number of poles to ensure self-starting) and a
permanent magnet field.
In the brushless motor, the "armature" is stationary and the field
(the permanent magnet) revolves.
The armature has four poles and the permanent magnet has a north,
south, north, south arranged at 90° intervals around the circumference.
This is entirely different to a motor with brushes and there is almost
nothing common between the two.
SELF STARTING
One of the most important features of any motor is its
self-starting capability. A motor should not have a "Dead Spot." Unfortunately the
brushless motor has 4 dead spots per revolution but since
it does not stop on a dead spot if used as a fan, this failing does not present
a problem.
Another important feature: A motor should always run in the same direction
each time it is energised. Some motors can be reversed, but a brushless
motor cannot.
Apart from these short-comings, the brushless design has found a valuable
application as a fan and since they can be found in nearly every computer,
it is interesting to find out how they work.
The brushless motor is an "inside-out" design but to keep to a standard
convention we will call the central part of the motor the ARMATURE
and the circular permanent magnet, the FIELD.
For a conventional motor, such as in a toy car, the armature rotates
while the field is stationary. In the brushless motor, the armature
is stationary and the field rotates.
The advantage of a brushless motor is the absence of arcing at the
brushes and almost no RF is emitted. This makes it ideal around computers
and radios. Also there are no brushes to wear out and it is quieter in operation.
It is also classified as a slow-revving motor - another
feature to add to its quiet operation and long life.
The brushless motor is not a constant-speed motor, but as it picks up RPM, the back
emf from the winding on the poles reduces the forward
current so that at maximum RPM the energy into the motor equals the energy delivered
(and used) by it.
Possibly the saving grace for this motor is the way it comes to a stop.
When the motor is at the point of stopping, the permanent magnet
keeps rotating until the poles sit approximately midway between
the arms of the armature.
The reason for this is the armature does not posses any residual magnetism
and each of the N-S-N-S poles of the permanent magnet attract the armature equally.
The equilibrium position is when the poles of the
armature are about midway between the poles of the field magnet.
This allows the motor to start to rotate when power is applied. See the
animation below for a full coverage of how the motor rotates.
HOW
THE CIRCUIT WORKS
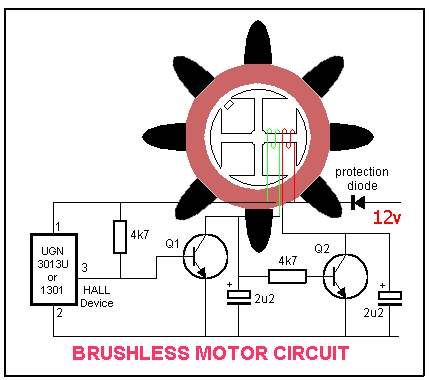
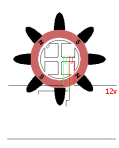
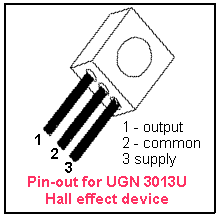
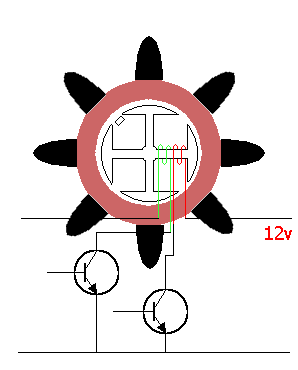
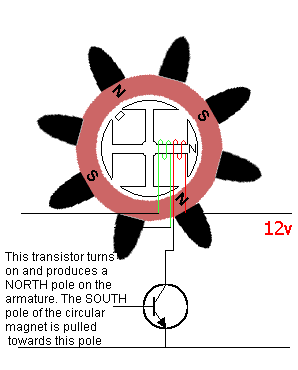
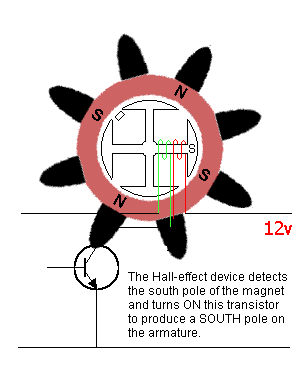
The circuit contains a HALL-effect device and this is connected to the power at all times and its
output is either HIGH or LOW. It is placed at the inside of the
rotating magnetic ring so that when the ring rotates, it detects the north and
south poles. When it detects the presence of a SOUTH
pole, the output switches OFF and the first driving transistor is
turned ON via the 4k7 base resistor. A 2u2 electrolytic between
collector and 0v rail suppresses any spikes from the armature winding
when the transistor switches OFF. The
green winding is now activated and each pole of the armature has over
100 turns of fine wire wound around a soft-iron core to produce an
electromagnet. The magnetic lines (the magnetism) produced by the
winding will attract the opposite pole of the circular field magnet
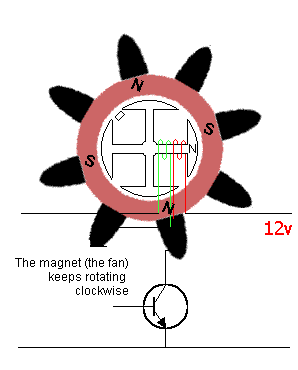
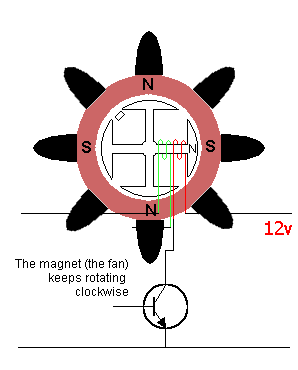
(and repel the "like" pole) to create rotation.
During
this time the second transistor will be switched off as the voltage
between base and emitter will be less than 0.7v. When the south pole is
not detected by the Hall device, output pin 3 will go low and the first
transistor will be switched off. The 2u2 will snub any spike from the
winding and the second transistor will be turned on via the second 4k7
resistor and the first winding. This
is an example of a transistor acting like a SWITCH, being turned
FULLY ON or FULLY OFF. This is the simplest application
for a transistor and when it is used like this, it does not get hot.
Obviously, when the transistor is switched OFF, no current flows, and
it does not get hot.
The same applies when the transistor is turned ON. The voltage drop
across it is the lowest (0.35v) and the least heating occurs. That's
why it is best to turn a transistor FULLY ON or FULLY OFF, if you want
to incur the least heating-effect. This is the basis of DIGITAL
ELECTRONICS and we will be getting on to this topic once we get the
basics covered. The
timing for turning each winding on and off is critical and this is
achieved by careful placement of the HALL device. A protection diode
has been fitted to the circuit to prevent damage to the HALL device if
power is connected around the wrong way. The current consumption for
the circuit is about 80mA for a very small fan, about 150mA for a
medium variety and 250mA for a larger type.
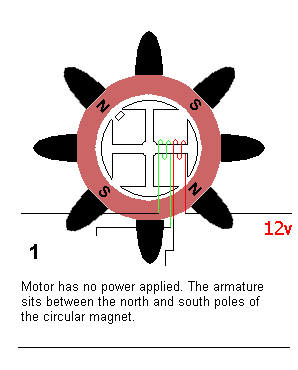
HOW THE ARMATURE WORKS
The operation of the armature is quite complex, so we will cover it in a simple way.
To make things easy we will start by saying the armature is wound with a single winding.
Starting at one arm, the winding
is wound in a clockwise direction. On the next arm (at 90°) the winding is anticlockwise.
On arm 3 the winding is clockwise and on the 4th
arm the winding is anticlockwise.
When current is applied to this configuration, the arms produce a N, S, N, S, pole,
taken in an anti-clockwise direction.
To understand this you will need to go to simple electromagnetic theory and see that
the direction of flow of current in a coil determines
the polarity of the pole (North or South).
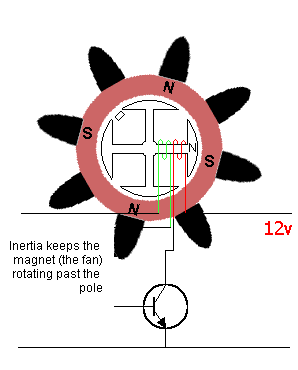
The application of current causes the field magnet to rotate 45° and align with the
poles of the armature. This is shown in
the animation below. To get the field magnet to swing past the
pole, all we have to do is turn the current off and the rotational energy in the magnet
(inertia) will keep it rotating.
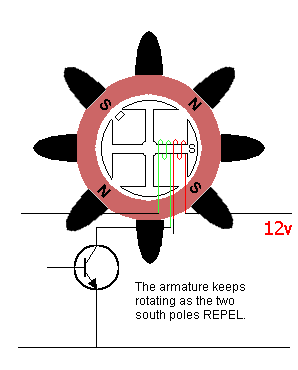
Alternatively we can reverse the current in the armature and this will change the
polarity on the arms of the armature and create a
repulsion effect. The repulsion could force the direction of rotation
to reverse but the inertia of the rotating mass moves it past the critical position
where the field from the armature is directly in
line with the field from the permanent magnet and the repulsion operates
to rotate the motor in the required direction.
Reversing the current is a difficult thing to do, so a clever alternative has been found.
Each of the four poles of the armature has been wound with a second winding.
In actual fact the poles have been wound with two different
colour wires at the same time (called bi-filar winding) so that the start and
finish of each winding can be easily determined when connecting
them to the electronics.
If this second winding is connected to the supply in the opposite direction,
the field produced by the poles is reversed. In other words
the start of one winding is connected to the positive and the start
of the other is connected to the negative. All we have to do now is switch
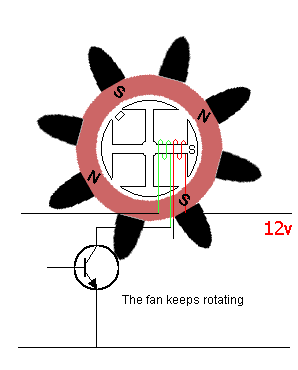
between one winding and the other, to get the motor to rotate.
This is where the electronics comes in.
Situated between two arms of the armature is a Hall effect device. It senses
the magnetic flux from the field magnet and switches HIGH
when a south pole is detected.
The position of this sensor is critical as it must switch the current in the
poles at the correct instant of rotation so that the field
magnet is pulled towards the next pole.
At the point of change-over from one winding to the other, there is a small
amount of hesitation but the
inertia of the field magnet keeps it rotating.
You can detect this "hesitation" or dead spot by physically reversing the motor
with your fingers. You will feel a position where the Hall
device changes from one state to the other.
Since the motor rests between the poles when power is not applied, and instantly
rotates 45° when first switched on, it will not
normally stop on one of its dead spots and thus we can say the motor has a fairly
high guarantee of starting up.
The stalled current consumption is about 50% higher than running current and this
is due to the lack of back EMF. This higher current will
not damage the motor while you are experimenting with detecting the dead spots,
providing you do not stall the motor for a long period
of time.
HOW THE HALL DEVICE WORKS
Here is a simplified description:
The Hall device detects flux from a South pole of a magnet on its front
face and this face is positioned towards the permanent magnet
in the brushless motor.
When it detects south flux, the output goes HIGH and switches the current
from one winding on the armature to the other.
DESIGN CONSIDERATIONS
Apart from the fact that the position of the Hall effect device and the arrangement
of the poles of the permanent magnet is critical,
the shaping of the faces of the arms of the armature has also been
given consideration in some designs in an attempt to reduce the dead spots.
The brushless motor has little or no start-up torque and this means it is not
capable of starting-up under load. Normal 3-pole motors
have a very high start-up torque (and a high stalled current - high
starting current). About the only use for a brushless motor is as a fan. In this
situation it is fairly-well guaranteed to start-up
because it comes to rest under NO LOAD with the arms of the armature
midway between the poles of the field magnet.
Miniature versions of the brushless motor are mounted directly onto heatsinks for
the main processor in a computer, to reduce the size
of the heatsink. The resulting heatsink is smaller than a standard air-cooled
heatsink and much more convenient.
When experimenting with this motor, or any electromechanical device, you have to
accept some standards and definitions. In this case one
of the standards has to be the definition of a north pole.
If a bar magnet is held via a piece of string it will swing in a N-S direction.
The end attracted to the Earth's North Pole is the NORTH
SEEKING POLE and is called the north pole of the magnet. We know that a north
pole does not attract a north pole and that's why we have
defined it as a north-seeking pole.
With this we can accept the north pointer of a compass as the North pole of a magnet.
We can now use a compass to determine the North poles of the magnet in a brushless
motor. When the North pointer of a compass is attracted
to a pole, the unknown pole is a South pole and when the south end of a compass is
attracted, the unknown pole is a north pole. It should
be marked with a dot of red or white paint.
The Hall device responds to the presence of a SOUTH pole on its front face
(the front face has numbers printed on it). The device will also
work with a North pole at the back face (the back face has a dimple or circle
or push-out-pin impression on it).
The magnet does not have to be moving. A stationary magnet will keep a Hall device active.
The magnetic flux density (B) required to operate the Hall device used in our
demonstration motor is approx 22mT (1mT, milli-tesla =
10 gauss) and the release is approx 16mT.
CONCLUSION
This article is not intended to enable you to make your own brushless motor
because, quite frankly, it is too complex.
However if you are lucky enough to be given a noisy or damaged unit, rather
than throw it in the bin, take it apart and compare its operation
with the notes we have provided. Understanding the in's and out's of electromotive
force will stand you in good stead for the design of
traction equipment as this area will be very big in the near future.
![]()
![]()
![]()
![]()
![]()
![]()
![]()
![]()
![]()
![]()
![]()
![]()

Glide your mouse over the boxes
above and study each frame.


NEXT
|
