|
|
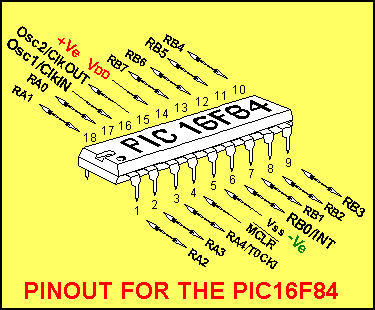
PIC16F84
to
PIC12C508A
Writing programs for the
PIC12C508A

Page 24
INDEX
Writing programs for the PIC12C508A is very awkward and expensive.
The chip is a one-time programmable device and most programs need dozens of
refinements and improvements before they are complete.
It's totally impractical and wasteful to burn a new chip (cost: us$1.20)
every time the program
needs an improvement.
The alternative is to buy a number of window-versions of the '508A, (they need 20 minutes to erase and you will need at least 5 - 10 units to
keep up the supply when working on a program. They are expensive. PIC12C508A/JW - cost us$9.20
each).
The alternative is to use a PIC16F84 chip to develop your program and when it
is complete, the code is transferred to a PIC12C508A.
The PIC16F84 has all the features of the PIC12C508A, and more. It' very easy to
develop a program in an 'F84, provided a number of limitations are remembered.
The only drawback is the unavailability of 5 files:
Files 07, 08, 09, 0A, and 0B are available in the'508A but not in the
'F84. Thus they cannot be used because they
are not common to both chips.
The files common to both chips are:
0C, 0D, 0E, 0F, 10h, 11h, 12h, 13h, 14h, 15h, 16h, 17h, 18h, 19h, 1Ah, 1Bh,
1Ch, 1Dh, 1Eh, and 1Fh.
All the other limitations of the
'508A are discussed below and providing you work within these limitations, the chip should not be
over-looked.
The '508A is very cheap (cost: us$1.20 for the normal DIP version or us$1.05
for the surface-mount type: PIC12C508AT-04/SM from Digi-Key
and Digi-Key)
and it only takes up a very small space on the PC board. The surface-mount
version allows very small, thin projects to be
developed.
It's the first step to designing small projects, before a specialised chip is
produced for the application.
It allows testing and marketing to be done before a large outlay is
undertaken. The biggest advantage is the code-protection feature. By
implementing code-protect, your program is protected from prying eyes and your
intellectual property can be marketed.
We have already coved a number of "building blocks" as well as a number of complete
projects for the PIC16F84 and many of these can be readily adapted for the
PIC12c508A..
In this discussion we will be explaining some of the limitations of the chips,
including the instructions
that differ from the PIC16F84, and how to make sure the program you produce in
a PIC16F84 will run in a '508A.
THE DIFFERENCES
RETURN
The PIC12C508A does not have a RETURN instruction. It has a
"RETURN with LITERAL in W" instruction. The literal value can be
00 to FF. The instruction is: RETLW 00 to 0FFh. This has advantages and disadvantages. You can
leave a sub-routine from two different places and the content in W can indicate
if a certain operation has been successful or not. In other words, the content
of W can operate similar to a "flag."
The following instructions are an example:
|
BTFSS
1E,0
RETLW 00
RETLW 01 |
;Test a
file
;The lowest bit is 0
;The lowest bit is 1 |
The following instructions generate an answer
in W:
|
ReadEE
|
MOVLW 00
MOVWF 09
BSF 03,5
BSF 08,0
BCF 03,5
MOVF 08,0
RETURN |
;Look at location 0 (use 00 to 40h)
;Get ready to read address 0
;Switch to bank 1
;Set the read bit
;Back to data bank 0
;Put value of EEdata into W
;Return with value in W |
You cannot use RETLW 00 in the program above as this will force W
to contain 00 on all occasions. The sub-routine must return with the
result in a file, such as file 08 (another sub-routine will extract the value).
A suitable sub-routine is:
|
ReadEE
FindValu
|
MOVLW 00
MOVWF 09
BSF 03,5
BSF 08,0
BCF 03,5
RETLW 00
CALL ReadEE
MOVF 08,0
(next instruction) |
;Look at location 0 (use 00 to 40h)
;Get ready to read address 0
;Switch to bank 1
;Set the read bit
;Back to data bank 0
;Put value of EEdata into W
|
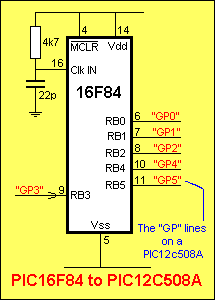
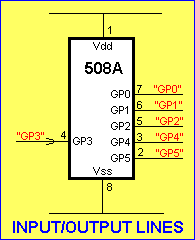
INPUT/OUTPUT LINES
The PIC12c508A has 5 input/output
lines and one line that is input-only.
The input-only line is GP3.
These 6 lines correspond to the lowest six lines of PortB in a PIC16F84.
The exact correspondence is:
|
GP0 =
RB0 = input/output
GP1 = RB1 = input/output
GP2 = RB2 = input/output
GP3 = RB3 GP3 = input only
GP4 = RB4 = input/output
GP5 = RB5 = input/output
|
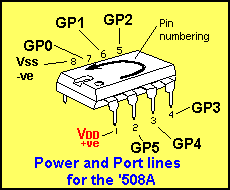 
The following diagram shows the
input/output lines for the PIC12C508A matching the PIC16F84:
THE PROGRAM SPACE
The Program Space in a PIC12C508A starts
at 000 and ends at 1FE. (location 1FF is reserved for trimming the internal
oscillator frequency and cannot be used for programming).
000 to 1FF is called two pages of Program Space and the first page is called
Page0, and the next page is called Page1.
This represents 512 address locations (we can use only 511 locations) and since
each line of a program occupies one address location, this is a 511 line
program. (The PIC16F84 has 1024 program locations).
There are some slight difficulties in using the program space above location
0FFh (256) as the CALL instruction does not operate past location 256. This
gives you a 256 line program and should be enough for almost any project. This
represent half the program space. If you need more space for your program, the sub-routines
can be accessed with a GOTO instruction. Each sub-routine must end with a GOTO instruction.
There are sub-routines (written by expert programmers) to get around this
CALL limitation. If absolutely needed, the author
can be contacted for the copy of these routines.
THE CALL INSTRUCTION
The '508A has a CALL limitation. The CALL instruction only operates to the first 256
bytes (Page0).
The GOTO instruction operates to the whole memory. (The CALL instruction in the
PIC16F84 operates to the whole program area)
There are routines to get around the CALL limitation, but the simplest answer is
to place all routines that you want to CALL, in the first 256 bytes (locations)
of memory (program space).
For instance, the Main routine can be placed in Page1 and the SetUp
routine will have a GOTO Main instruction. Main can consist of
CALL instructions provided all the sub-routines are in Page0. Any sub-routines
placed in Page1 must be accessed by a GOTO instruction in Main and must end with
a GOTO instruction. A CALL instruction can be placed within the sub-routine,
provided the CALLed sub-routine resides in Page0.
THE 'STACK'
When a sub-routine is CALLed, the address of the next instruction is stored in a
special location called the STACK. This address is used to get the micro to
return to the correct location in the originating routine and continue with the
program. For the PIC12C508A and '509, the stack holds only two addresses
(the stack in the PIC16F84 holds 8 addresses).
This means you need to be careful when CALLing a sub-routine. You can CALL a
sub-routine and have the sub-routine call another sub-routine but this is the
maximum depth you can go. The second sub-routine must have a RETLW 00 that goes
back to the first sub-routine and the first sub-routine must go back to the
originating routine.
''SET-UP'' INSTRUCTIONS
The following instructions are common to both the PIC16F84 and PIC12c508A and do
not have to be changed when moving the code from a PIC16F84 to PIC12c508A. The
code will also work in the other direction - when taking code from PIC12C508A
to PIC16F84. All code produced for a
PIC12C508A will run in a PIC16F84.
|
Labels: |
Code: |
Comments: |
|
Start
SetUp
|
ORG 000
BSF 03,5
MOVLW 08
MOVWF 06
BCF 03,5
OPTION 0DFh
CLRF 06
GOTO Main |
;Load the
code at address 000
;Select Bank1
;Put 0000 1000 into W
;Load TrisB file. Make GP3 input. Others output
;Select Programming area - Bank0
;Make GP2 an input and disable weak pull-ups
;Clear Port B of junk |
NOT AVAILABLE
The following instructions are not available for the PIC12C508A and must not be
used when writing a program that will be transferred to a PIC12C508A or '509.
|
ADDLW
Use the following 3 instructions if you want to carry out this operation:
W contains a value. We need to add 8E to the value in W.
e.g: ADDLW 8Eh |
MOVWF
13h ;Move W to any file,
say 13h
MOVLW
8Eh ;Put 8Eh into W
ADDWF
13h,0 ;ADD file 13h and
W together with the result in W
or ADDWF 13h,1
;ADD file 13h and W together with the result in file 13h.
|
SUBLW SUBtract
W from literal, not subtract literal from W.
Use the following if you want to carry out this operation:
W contains a value. The literal is 1A. We need to subtract W from
1A. |
Replace with these 5 instructions:
MOVWF
13h ;Move W to any file,
say 13h for temp storage
MOVLW 1Ah ;Put
1Ah into W
MOVWF 14h
;Move 1Ah to file 14h
MOVF 13h,0
;Move file 13h back into W
SUBWF
14h,0 ;SUBtract W
from 1Ah with the result in W |
| CALL
Use CALL instruction only for sub-routines that are in the first 256 bytes
of memory. |
| RETURN Use RETLW 00 to RETLW
0FFh |
| TABLE A table cannot go over the 256-byte boundary |
TRIS GPIO This refers to the DIRECTION-CONTROL-REGISTER for the '508A.
This is equivalent to file 06 in Bank1. The instruction should be replaced with
lines 1, 3 and 4. Line 2 is a line that would be placed before TRIS GPIO to
tell the direction control register to make the 6 lines of the '508A input or
output. (line GP3 can be input-only).
BSF 03,5 ;Select Bank1
MOVLW 08 ;Put 0000 1000 into W
MOVWF 06 ;Load TrisB file. Make GP3 input. Others output
BCF 03,5 ;Select Programming area - Bank0 |
| BCF GPIO, 0 Replace with BCF 06,0 etc
(to suit both microcontrollers)
|
|
BCF 05,0 etc
PortA not available for PIC12c508A Use only Port 06, bits 0 to
5.
|
PROGRAMMING THE CONFIG
BITS
When writing a program for any PIC
microcontroller, the program must start with three lines:
The DEFINE line
The INCLUDE line
The CONFIG line
The DEFINE line identifies the microcontroller being used in the program.
It can be written as any of the following:
#DEFINE PIC16C84
list P=16F84
LIST p=16c84
LIST P = 12C508A, F = INHX8M
The INCLUDE line tells the assembler the Processor Specific Variables.
It can be written as any of the following. The "" or <> are detected
by the assembler and must be present:
#include "p16f84.inc"
include <P16F84a.inc>
INCLUDE <P16C84.INC>
#include <p16c84.inc>
The CONFIG line sets the configuration bits.
It is preceded by a double underbar thus: __CONFIG
It can be written as any of the following:
__CONFIG 3FF1h (for PIC16F84A)
__CONFIG 3FF3h (for PIC16F84A)
__CONFIG 0FEAh (for PIC12c508A)
__config _XT_OSC & _WDT_OFF & _PWRTE_ON & _CP_OFF (for
PIC16F84A)
__config _RC_OSC & _WDT_ON & _PWRTE_ON & _CP_ON (for
PIC16F84A)
The configuration bits are also called fuses
and are responsible for determining: Reset Parameters, Oscillator mode, Watchdog Timer, Power-up
Timer and Program Memory Protection (also called Code Protect). The
configuration register consists of 13 bits that are "1" when a new chip is delivered. They must be programmed correctly, otherwise the chip
will have the watchdog timer enabled and be suited for RC oscillator. In most
cases, the watchdog timer is turned off, so that it does not have to be
constantly reset.
Only the 5 lowest bits are utilized.
There are two versions of the PIC12c508A. A windowed EPROM version (expensive)
and the standard One Time Programmable device. Both
CONFIGs are supplied.
Bit 4. When the configuration bit for MCLRE is
made "1," pin 4 becomes a master reset for the chip and when pin 4 is
taken LOW, the chip resets. If configuration bit 4 is made "0,"
the MCLR function is internally
tied to the power rail and pin 4 of the chip can be used as an input pin. (GP3).
Bit 3 is Code Protect. When it is "1," code protection is off.
When it is "0" code protection is ON.
Bit 2 is Watchdog Timer Enable. When it is "1," watchdog timer
is enabled. When it is "0," watchdog timer is disabled.
Bits 1-0 are Oscillator Selection bits:
11 = ExtRC - external RC oscillator
10 = IntRC - internal RC oscillator
01 = XT Oscillator - normal crystal oscillator
00 = LP Oscillator - 38kHz watch crystal
Summary of CONFIG bits for PIC12c508A:
The __CONFIG for programming a PIC12c508A:
CONFIG bits:	4	3	2	1	0
	            MCLRE        CP          WDT       FOSC1    FOSC2

		0 	1	0	1	0        __CONFIG 0FEAh
	              (dis)    (code not        (off)     	(internal osc)
                                        protected)
		0	1	0	0	1       __CONFIG 0FE9h
                                                                          (external Xtal osc)

		0	1	0	0	1       __CONFIG 0FEBh
                                                                          (external RC osc)
Summary of CONFIG bits for PIC16F84A:
Bit 4 is Code Protect. When it is "1" code protection is off.
When it is "0" code protection is ON.
Bit 3 Power-up Timer Enable. When it is "1" power-up timer is
enabled.
When it is "0," power-up timer is disabled. The Power-up timer
produces a 72mS delay and prevents the chip starting to execute code until 72mS
after supply voltage has been detected.
Bit 2 is Watchdog Timer Enable. When it is "1," watchdog timer
is enabled. When it is "0," watchdog timer is disabled.
Bits 1-0 are Oscillator Selection bits:
11 = RC oscillator - external RC components. The chip will operate from 1Hz to
4MHz.
10 = HS oscillator - High Speed crystal or resonator - maximum frequency for
the chip
01 = XT Oscillator - normal crystal oscillator - such 455kHz,
2MHz, 4MHz etc - use this when using a crystal.
00 = LP Oscillator - 38kHz watch crystal
The __CONFIG (used in this discussion), for programming a PIC16F84A is shown in red:
CONFIG bits:	4	3	2	1	0

	               CP        PWRTE      WDT       FOSC1    FOSC2


                	1 	1	0	1	1        __CONFIG 3FF3h

	        (code not     (enabled)      (off)          (external RC osc)
                         protected)
Note:
You can use a crystal on the
PIC16F84 when developing a program and use the internal RC components in the
PIC12C508A when the program is complete. Just make sure the __CONFIG bits
reflect this decision. You will also be asked the type of oscillator for each
chip when "burning" the program into the chip. The internal oscillator in the
PIC12C508A is very close to 4MHz.
SUMMARY:
To program a 12C508A:
List P = 12C508A, F = INHX8M
#include <p12C508A.inc>
__CONFIG 0FEAh
To program a PIC16F84A:
List P = 16F84
#include <p16F84.inc>
__CONFIG 3FF1h
THE
TEMPLATE
The following template can be used to prepare a program in a PIC16F84. When the
program is operating perfectly, it can be downloaded into a PIC12C508A or
PIC12C509. Only the Define, Include and Config lines need to be changed. Don't
copy and paste the following template as it has hidden formatting instructions.
Click
HERE for the .zip file. Download the file and
extract it to a folder and load it into your text editor program, such as
TEXTPAD or NOTEPAD.
The .zip is called: Blank_F84.zip and the file is called
Blank_F84.asm Load and save it as UVC_F84.asm (for Ultrasonic
Volume Control - or some other name), but make sure it is not saved as a .txt
file as the assembler wants to see a .asm file
Every time you make changes and improvements to the file, save it with a new
letter such as:
UVC_F84A.asm UVC_F84B.asm UVC_F84C.asm -
only 8 letters in the file name are allowed in some programs.
;Blank_F84.asm
;Project:
List P = 16F84
#include <p16F84.inc>
__CONFIG 3FF3h ;_CP_OFF & _PWRTE_ON
& _WDT_OFF & _RC_OSC |
Start
SetUp
Table1
Delay1
Main
|
ORG 000
BSF 03,5
MOVLW 08
MOVWF 06
BCF 03,5
OPTION 0DFh
CLRF 06
GOTO Main
ADDWF 02,1
RETLW 08
RETLW 01Ah
RETLW 0BEh
RETLW 0FFh
XXX
XXX
RETLW 00
XXX
BTFSS 06,3
XXX
XXX
CALL Delay1
XXX
BSF 06,0
XXX
CALL Table1
XXX
GOTO Main
END |
;Load the code at address 000
;Select Bank1 to set in/out bits
;Put 0000 1000 into W
;Load TrisB file. Make GP3 input. Others output
;Select Programming area - Bank0
;Make GP2 an input and disable weak pull-ups
;Clear Port B of junk
;Test the input line
;Make the lowest output HIGH |
|
When the program is operating
perfectly, a PIC12C508A chip can be programmed. Only the 5 lines in the
heading need to be changed. Copy the lines in red,
add ProjectName-508A.asm and include the name of the project, then add the
rest of your lines of code and save the file as:
ProjectName_508A.asm (use 8 characters.asm) such as:
;DiceA508.asm
;Project: Dual Dice - Large Display
;ProjectName_508A.asm
;Project:
List P = 12C508A, F = INHX8M
#include <p12C508A.inc>
__CONFIG 0FEAh ;_MCLRE_OFF & _CP_OFF
& _WDT_OFF & _IntRC_OSC |
| |
|
|
|
NEXT
|
