![]()

100 TRANSISTOR TRICKS
For more articles and projects for the hobbyist: see
TALKING ELECTRONICS
WEBSITE
email Colin Mitchell:
talking@tpg.com.au
| A lot of time is spent on the web showing and explaining
how to design a transistor amplifier. Most of the discussions are vague, inaccurate and fail to explain anything. I have produced a revolutionary article on what a transistor REALLY IS. It is really a variable resistor and you can see the discussion HERE. And you can see the other article on understanding how to design transistor stages HERE. You must not spend a lot of time, worrying about how to design a transistor stage such as a common emitter amplifier as the gain of the transistor and the waveforms and output load are not know and cannot be determined and you cannot get any sort of accuracy. The only way to approach this is to build the circuit and experiment with the values. That's why you don't need to spend any study-time on this topic and certainly don't need any mathematics. It is much more important to spend time learning and understanding how a transistor can be interfaced and connected to devices (and chips) to solve all sorts of difficult problems. That's where the skill of the electronics engineer comes in. I have designed hundreds of circuits and modules and sold them on the internet and not one module has been copied or resold as a "clone." That's because very few people understand how circuits work and if one of the modules does not work, they are incapable of fixing it. That's also the reason why not a single University or School or College has bought a single kit from me in the past 50 years as the instructors are incapable of diagnosing and fixing anything if the student messes up the construction. I have evidence that the instructors are petrified if a student brings a module for repair. That's because the electronics they have learned and teach is completely WORTHLESS. It does not give you any ability to see how things "work." This brings me to the point that none of the courses are worth the money you pay, and you come out with absolutely no understanding. It's just a whole lot of mesmerizing mathematics, to hide the real fact that they have taught you NOTHING. If you can't see how a transistor REALLY WORKS, you will not be able to design anything out of the ordinary. That's why nothing like I have designed, has been produced or presented on the web. That's why it is important to read the article: What a transistor REALLY IS: HERE. ooooooooo000000000000000000000ooooooooooo We will start with some very simple circuits and show what can be done: |
|
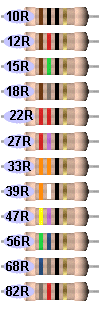
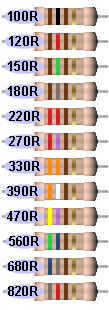
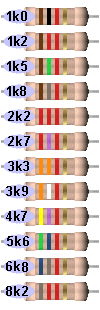
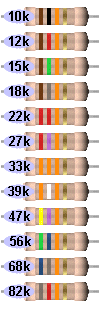
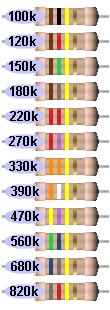
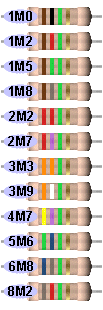
THE
COLOURS OF EVERY RESISTOR These are what we call the "common 10% range." These are suitable for 90% of all projects and you only need a different value for some special circuits where an accurate voltage is required. You can always get any value you want by combining two resistors in parallel or series, so you don't have to buy 1% resistors.
|
|
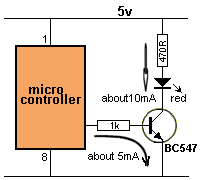
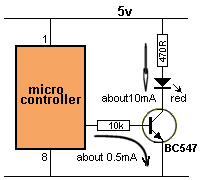
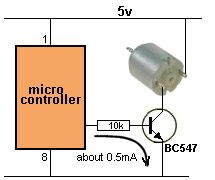
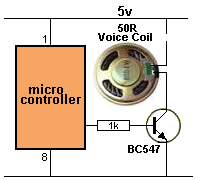
THE SIMPLEST CIRCUIT The simplest circuit is a transistor connected to a microcontroller. A microcontroller produces a 5v output with a current capability of 20mA. The base of a transistor never rises above 0.7v because the base is connected to a diode inside the transistor this is one of the features we cannot change. We have to "match" 5v to 0.7v and this is called INTERFACING. The simplest may to connect these two voltages is with a resistor. The resistor will have a voltage across it of 4.3v and depending on the value of the resistor, it will allow a current to flow. This current will flow into the base of the transistor and turn it ON. The transistor will have the capability of allowing 100 times this current to flow through the collector-emitter terminals but the actual current is not determined by the transistor but by the LOAD in the collector. The LOAD in the collector is actually a resistor connected between the collector terminal and the positive rail. When this resistor has a low value of resistance, a HIGH current will flow. When the value of resistance is high, a small current will flow. This flow is nothing to do with the transistor. The transistor is capable of delivering a high current and the load can take any current up to this value. I am capable of giving you one million dollars a day, but you are only capable of spending $100,000. If I increased your capability, like reducing the value of resistance of the LOAD, you may be able to spend $200,000 a day. The maximum current from a microcontroller is 20mA. A 270R resistor connected the output of the micro to a transistor will allow about 20mA to enter the base. A 1k resistor will allow about 5mA and 10k will allow 0.5mA. You cannot connect the output of the micro directly to the base because this will not allow the output to rise higher than 0.7v and the FET transistor on the output will not be turned on correctly and FULLY and it will get hot. Don't forget the FET is microscopic and may get damaged. This is called a DIRECT CONNECTION or DC connection because there is no capacitor involved. When the output of the microcontroller goes HIGH, the transistor turns ON and the LED illuminates. You have "activated" the transistor and it has turned into a low-value resistor and the current through the transistor and the current-limiting resistor is sufficient to illuminate the LED. Reducing the value of the current-limiting resistor will make the LED glow brighter. But you cannot remove the current-limiting resistor. The LED will glow too bright and be destroyed. A LED requires from 1mA to 20mA for 3mm or 5mm LEDs. Larger LEDs need 250mA to 350mA and they illuminate a vary big area. You have to know how much current the LED needs before you start but if you do not know, start with 1k resistor. The CURRENT-LIMITING resistor determines the current. Every LED and every different colour LED will produce a voltage across it called the CHARACTERISTIC VOLTAGE. Do not worry about this voltage. Just put a 1k resistor in series with the LED and see how bright it is. You can vary the brightness by changing the value of the resistor. If you make the resistance too low, the LED will go brightly and go "pop." This will be your first lesson. Do not worry about any of the formulas for LED resistor values or any of the voltages across a LED. These values will change slightly from different manufacturers and we will cover this topic later.
Fig:1 shows a microcontroller driving a
transistor and illuminating a LED. This is just a simple example as a
microcontroller can drive a LED directly from an output.
You don't deliver more current than necessary to the base of a transistor because the project may be battery operated and you want the module to take the lease current. Base-current is effectively "wasted current" and need to keep it a small as possible. You can get LEDs that take 1 to 5mA and are so bright they blind you, so you may not need the transistor. This is just a point to remember as the microcontroller will deliver up to 20mA. |
|
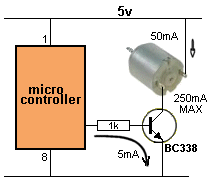
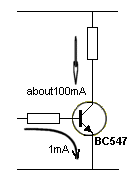
DRIVING A MOTOR If we replace the LED with a motor, it will not work.
The circuit above is designed to deliver about 50mA maximum and this may
not be sufficient to activate a motor when it is under load.
We have changed the transistor to one capable of delivering up to 1 amp.
We have changed the base resistor to 1k. We have changed the gain
of the transistor to 50 to be sure it will deliver the current.
The 5mA x 50 = 250mA. This is what the circuit will deliver IF the
motor asks for up to 250mA. |
|
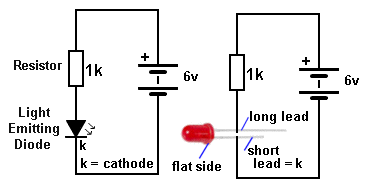
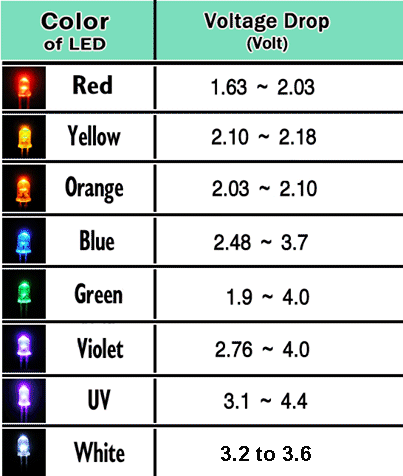
CONNECTING LEDS Connecting LEDs to a circuit is very simple and easy. You don't have to worry about voltages or current or any special connection. All you have to do is connect a LED to a 6v battery with a 1k resistor in series and look at the brightness. You need a 6v battery because some LEDs will not work with a 3v battery and none with work with a single 1.5v cell. However all LEDs will work with a 3.7v lithium cell. We will start with the simples circuit. It is a 5mm
red LED, 1k resistor and 6v battery. The LED must be connected around
the correct way. If is connected around the wrong way it will not
illuminate. (It may not get damaged). There are two ways to identify the
leads. The short lead is called the cathode (k) and some LEDs have a
flat side to indicate this lead. The cathode lead goes to the
negative lead of the battery and we also call the negative of the
battery the 0v rail.
It is unnecessary to use any formulas or mathematics to work out the
value of a resistor as you don't know the current required by the LED.
The only way is to experiment with different values and pick a value
that uses the least current for the brightness you accept,
especially if the project is powered by batteries.
|
|
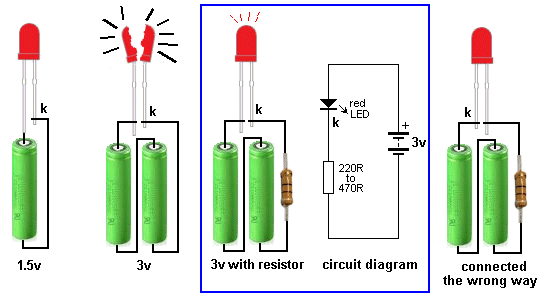
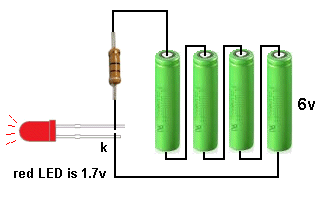
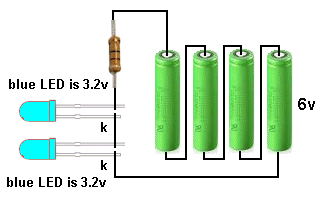
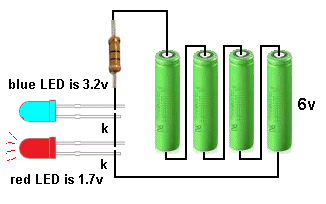
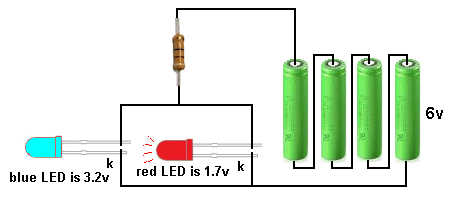
CONNECTING LEDS IN SERIES LEDs can be connected in parallel and series. There are laws and limitations to doing this, so we will simplify the complications by outlining just a few requirements.
Two
blue LED cannot be connected across a 6v supply as the
need about 3.2v + 3.2v = 6.4v and
we only have 6v. The LEDs will not illuminate. The voltage is
insufficient.
You can connect any colour LEDs provided the total combined voltage is not
higher then the supply voltage. |
|
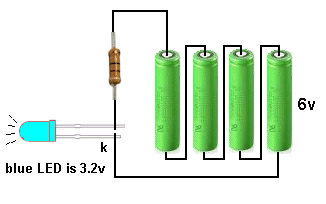
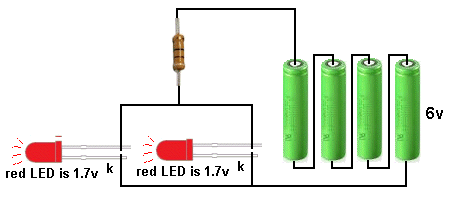
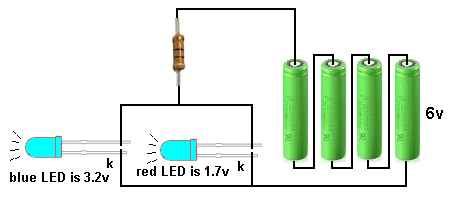
CONNECTING LEDS IN
PARALLEL Connecting LEDs in parallel is a problem. You can only connect LEDs of the same colour in PARALLEL.
When a red LED and blue LED are connected in parallel (or any colour is connected in parallel with a red LED) the red LED will have a characteristic voltage across it of 1.7v and this voltage WILL NOT RISE. This voltage is not enough for any other colour to illuminate and only the red LED will illuminate. |
| Now you know the limitations of connecting LEDs in Parallel and Series, you can create LED displays THAT WILL WORK. |
| Here's the
first trick that no-one has ever mentioned. For low-power output from a
speaker, you can use 8R, 16R, 32R or even 50R and a quality speaker will
deliver the same volume. A speaker is just like a motor. It has an electromagnet winding called a voice-coil and a magnet. When current flows through the voice-coil moves due to the interaction with the magnet. Exactly the same as motor revolving. Both of these items work on a principle called AMP TURNS. It's the multiplication of current and the number of turns that produces the "magnetism." And the stronger the magnetism (magnetic flux) the stronger the motor and the the louder the sound. When you multiply the current through an 8 ohm speaker and the number of turns on the voice-coil, you will find it is the same as a 16R speaker and even a 50 ohm speaker. The advantage of a high-impedance speaker is the low current and the circuit likes a low current.
|
|
THE CURRENT GAIN OF A TRANSISTOR When you see a transistor with current of 1mA entering the base, you can assume the collector current can be a maximum of 100mA. This is the called the "amplification factor" of the transistor. A BC547 transistor can only handle 100mA, so this applies to all the "small-signal" transistors. By "small-signal," the data sheets really mean small current. If a transistor is rated at 1 amp, only allow 500mA, etc.
The circuit may not produce a gain of 100
due to the surrounding components, but this is the way you "see" a
transistor "in action." Every time you see a transistor in a
circuit you assume it has the capability of increasing the current by
100 times. Voltage may also be increased but there is no "accepted
trick" for dealing with voltages. |
|
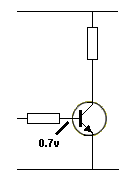
THE BASE VOLTAGE
Too much time is spent on YouTube, about the 0.7v base voltage. It is so small that we are not going to take it into account.
However, you need to know the voltage on the base must
be higher than 0.7v for the transistor to be operating. The only time when you need to know
about the 0.7v base voltage is when you want to turn the transistor OFF.
|
|
THE C When you see a transisto0%. |
|
THE C When you see a transisto0%. |
|
THE C When you see a transisto0%. |
|
THE C When you see a transisto0%. |
|
THE C When you see a transisto0%. |
| INCREASING THE VOLUME A transistor can be connected to the output of a microcontroller with a resistor and a simple way to remember the base current is to remember 1k base resistor delivers 5mA. 470R delivers 10mA. 220R delivers 20mA ad this is the maximum for a microcontroller. The transistor will deliver 100 times this current (in theory) but you should never go for the maximum. As the current through a transistor increases, its gain decreases. Normally a small-signal transistor has a gain of 250, but we normally allow a gain of 100 and we can reduce this to 30 or 50 if the current is high. This make sure the circuit will always work. |