5x7 Display Testing Page1
![]()
TESTING THE
DISPLAY
When all the components have been fitted, the LED display should be tested to make
sure all the LEDs are working.
The first test is an electrical test to make sure each of the LEDs
illuminates and has the correct brightness.
For this you will need a very simple piece of TEST GEAR.
It is a 470R resistor connected to the positive lead of a battery snap and a stiff
piece of wire (cut from a resistor) soldered to the other lead. These leads
are now called PROBES.
Place the positive probe on one of the 100R resistors on the PC board and the negative
probe on one
of the collector of the first transistor. One of the LEDs should illuminate. Try each of the 100R
resistors and each of the LEDs in a column should illuminate.
Repeat with the collector of the other transistors.
Replace any faulty or weak LEDs as the display must have uniform
brightness.
There are 3 possible causes for a LED not to illuminate.
1. Dry joints on the underside of the board,
2. LED fitted around the wrong way, and
3. Your soldering-time is too long or the soldering iron is too. LEDs can easily be
damaged by excessive heat and this will cause their brightness to be
reduced. Use a small soldering iron (preferable a temperature-controlled
iron and keep the tip clean. Only use fresh solder for each joint and this
will keep the soldering time to a minimum.
DRIVING THE DISPLAY
We will now test the display with a number of TEST PROGRAMS in the PIC
chip.
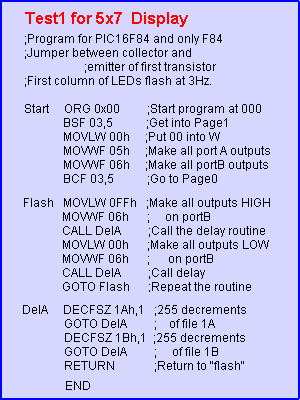
The first Test Program is called TEST1.
A jumper must be soldered between the collector and emitter of the first
transistor so that all the LEDs will illuminate when the output lines of the
PIC chip go HIGH.
Test1 will make the first column of LEDs flash at 3Hz.

|
||
|
:1000000083160030850086008312FF3086000C20A6 :10001000003086000C2005289A0B0C289B0B0C281E :020020000800D6 :00000001FF |
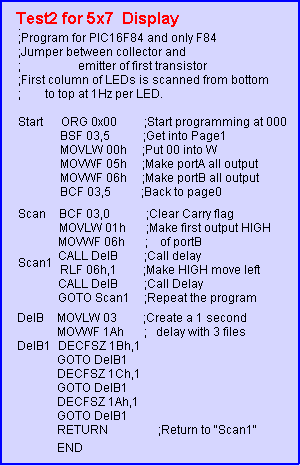
Test2 checks to see that each LED is wired in the correct order. The delay is 1Hz:

|
||
|
:1000000083160030850086008312031001308600BD :100010000C20860D0C20092803309A009B0B0E281B :0A0020009C0B0E289A0B0E28080016 :00000001FF |
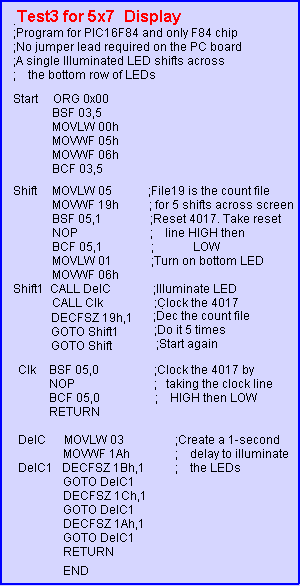
Test3 tests the
4017. The 4017 scans the columns. It has a "5-shift" and is then
reset.
This program tests the outputs and makes sure the the wiring is correct. The
accompanying animation shows the result of the program.

|
||
|
:100000008316003085008600831205309900851420 :10001000000085100130860015201120990B0C2856 :100020000528051400000510080003309A009B0BFA :0C00300017289C0B17289A0B17280800B3 :00000001FF |
All the chips
and the wiring has now been tested. These are the type of steps you must go
through when designing a prototype, to make sure all the circuitry is
correct before starting to write a program.
The next step involves writing a scan routine that takes data from 5 files
and displays it on the "screen."
The five data files are called a VIRTUAL SCREEN or GHOST SCREEN. It's a
programming technique that is easy to follow. Whatever is contained in the
five files is displayed on the screen. That's all the routine does. Each
routine is designed to do a small job. This makes the program easy to
trouble-shoot, easy to understand and easy to come-back to, at a later date.
It also makes it easy for others to follow.
After this we shift or change the data in the five files to produce movement on the screen.
For all this, go to: Testing
Page2
![]()