|
|

This project will keep you amused for hours. It's a simple COMBINATION LOCK with two buttons.
They must be pressed a special number of times and the first LED will illuminate. For the next steps, the timing between the presses is important.
If you get it right, the next LED will come on. If you get it wrong, a LED will go out.
This project is compact and challenging and teaches three different sections of electronics.
The heart of the circuit is a tiny PIC microcontroller (PIC12F629) and it's programmed when fitted to the board.
This involves IN-CIRCUIT PROGRAMMING and if you have not encountered this before, this project will get you started.
You will also encounter surface-mount components and you can learn programming to change some of the features of the project.
In all, this project offers lots of features on a PC board the size of matchstick.
WHERE DO YOU START?
This project comes as a kit for us$12.00 (plus us$7.00 postage
world-wide) from Talking Electronics. The chip is pre-programmed
and the kit is complete, including the button cells.
The PC board also has a programming socket so you can re-program the
chip to modify the complexity of the
game.
The first thing to do is build the project and see how far you can
progress through the puzzle, by illuminating the LEDs on the board. You
can always re-load the program but this article is mainly designed to
get to into programming. It's the stepping-stone to greater things.
Writing a routine requiring the input from a switch, is one of the most
difficult to create as you have to exclude all the unwanted possibility
of pushing the switch at the wrong time or the wrong number of presses,
etc.
There are 3 additional articles to help you get into programming PIC
chips
CONSTRUCTION
All the parts fit on a small PC
board, the size of a "match-stick." The only unusual
connections are the wires to hold the button cells in place. They slip
into the cut-outs on the board and make contact with the top and bottom
wires.

We have used surface-mount components as this is the way electronics is
going. It is cheaper to produce a surface-mount product than any of the
older styles. Surface-mount components can be fitted up to 10 times
faster and the board is smaller. We have not used the extremely small
surface-mount resistors as they are too small to have the resistance
value printed on them.
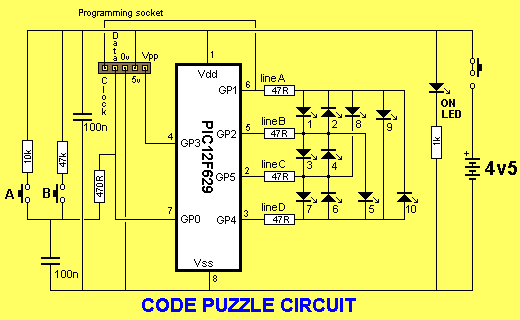
HOW THE CIRCUIT
WORKS
All the operation of the circuit
is done inside the microcontroller. The only things you have to consider
are the voltage and stability of the supply. The 100n across the supply
prevents spikes and the voltage must not be above 5.5v as some PIC chips
will perform incorrectly with an over-voltage.
Each of the outputs we have used in this project are "Tri-state." This
means they can be HIGH, LOW or OPEN. In the "open" state they are
infinite impedance.
To turn on LED1, line A is HIGH and line B is LOW. All the other lines
are made OPEN by turning them into INPUT LINES.
The total resistance for the LED is about 100R and this allows about
25mA to flow.
To reduce the brightness of the LED, it is turned on for about 25% of
the time.
This combination for each bit of the IN-OUT port is stored as a
subroutine, such as LED1, LED2 etc.
To "turn on more than one LED at the same time" can be done if say LED1
and LED2 sub-routines are multiplexed. You will lean more about
multiplexing later in the series.
THE
PROGRAMMING SOCKET
The programming socket uses an
adapter that connects into the output of PICkit2. Five of the 6 lines
from PICkit2 are used in the programming function. The 6th line of
PICkit2 will be available when expansion software is released.
A kit is available for this project under $12.00. It comes with a
pre-programmed microcontroller and all the surface-mount components in a
strip. These must not be removed until required as some components are
not marked.
If you have not soldered surface-mount components before, we have
provided links to website address and movie clips to show exactly how to
solder them in place.
That's the brilliance of the web. It's just a clock away to anything you
require.
The only thing it cannot give you is skill. But with a fine tipped
soldering iron and fine solder, the components can be soldered in place
quite easily. We have not supplied extremely small devices and the
resistors are clearly marked.
The only components needing care are the transistors and LEDs. But if
you have a temperature-controlled soldering iron, you can take up to 2
seconds to make a joint.
PRELIMINARY INFORMATION
A lot of basic information has been
provided on the web, by Talking Electronics, for those starting the world of
microcontrollers.
The scope of the information is considerable and the headlines of each
are as follows:
WHERE TO NOW?
The next step is to learn PROGRAMMING. This project has been written in
ASSEMBLY CODE. We have used the 33 instructions that come with the chip
and these instructions are called mnemonics as they are groups of
letters or a word that tell you exactly what each instruction does.
We have not used any "shortcuts" or "tricks" or "advanced programming"
in our programs so you can follow every instruction to see exactly what
the micro is doing at every step.
Some instructions only do a very simple thing like setting or clearing a
bit in a file, but others will test a bit in a file and jump around the
next instruction if the bit is set, or decrement a file and jump around
the next instruction if the file is zero.
This means the instructions are classified as "quite powerful" when
compared to the early microprocessors.
There are actually thousands of instructions as each file from 20h to
64h can have any bit SET or CLEARED or DECREMENTED and lots more.
But the biggest selling point for the microcontroller is the RISC
feature (Reduced Instruction Set Computer) (Controller), where you only
have to learn about 33-35 instructions and reference the instruction to
the file you want to operate on.
We have written an article that starts you at the beginning and explains
how to layout a programming page (called an assembly page), provides a
list of every instruction for the PIC12F629 and explains all the things
you have to put on the page to get the assembler to assemble your
program and produce a .hex code. The article is:
Start Here with PIC12F629.
CREATING THE
PROGRAM (How the project was created)
There are two ways to write a program. One way is to write very clever
code, using instructions other than those provided in the
List of Instructions, such as "$+2" or "bz."
The other is two write very simple sub-routines that are easy to
understand and easy to see what is being done.
This is what we have done. We call it "linear programming," where the
micro advances down the program, calling routines such as delay routines
and output routines as required.
Since there is over 1,000 lines available for your program, you don't
have to "save a line" by producing a very clever command. That's why
some of our routines are long, but easy to understand.
We have only used the 33 -35 instructions in the
List of Instructions. We have not used instructions like: "$+2" or "bz."
Programming in a higher language, such as BASIC, C, or any of the others
is like telling someone to put something together, such as a gearbox,
via an interpreter and over a phone-line. When things don't work, you
don't know where to start.
Here's an email from a frustrated programmer using "C":
I've lost count of
the hours I've spent chasing bugs that were 'my fault', because I didn't
know about a weird behavior of C or its preprocessor.
Personally, I would only program a
PIC in C if "tied to a horse, and dragged forty miles ... by my
tongue".
I'd much rather deal with instructions that you can see what they do.
Mike Halloran
Ft. Lauderdale, FL, USA
Of course, high level programming has its advantages, but for the
projects we are presenting, it is much easier to use the
Instruction-Set for the PIC12F629 and avoid any frustrations.
The first thing to do is design the printed circuit board as this will
dictate which lines are used for the display.
Once this has been done, the program can be written.
Since each LED is turned on by a combination of two lines, the
activation of each LED has to be worked out and placed in a sub-routine.
These sub-routines are called LED0, LED1, LED2, etc.
The next item is to detect switch A and switch B. This is one of the
most difficult things to do as it involves "human interaction."
THE SWITCH
There are two problems with the switches in this project.
The first problem is debouncing each switch and the other is detecting
each switch individually.
Debouncing a mechanical switch is a big problem.
In most cases the microcontroller is advancing through the program so
quickly that when a switch is detected, it processes the result very
quickly and when the switch is released, the contacts bounce and make
contact a number of times before they separate. This has to be worked
out in the program so the switch does not give two or more reading for
each press.
The program also has to read the switch on the first pass and set a
debounce bit in a file so that it reads the switch only once.
Both switches are connected to the same input line and and the micro
discharges a 100n capacitor. The switch is then pressed and charges the
100n. After a delay period the micro looks at the input line to see if
the capacitor is charged to about 60%. The low value resistor on switch
A will charge the capacitor quickly and the micro firstly looks after
this time-period. If the line is HIGH the sub-routine returns with 01 in
W to signify switch A pressed. The micro then looks at a time-period
when switch B will charge the capacitor and if it is charged, W is
loaded with 02. Otherwise W returns with 0 to indicate no switch is
pressed.
All this is done in the switch routine.
This this is not sufficient.
Another very clever programming feature has to be included.
The problem is this:
If switch A is pressed when the program is part way through the delay
before looking at the input, the capacitor will not be charged enough to
register a HIGH and and the sub-routine will then extend the time,
expecting to detect switch B. Thus switch A will be detected as switch
B.
To prevent this, the sub-routine does a pass to see if any switch is
pressed and the carries out a determination. This way the switch is
guaranteed to be pressed before the sub-routine is processed.
CODE
PUZZLE SOLUTION
The solution to the CODE PUZZLE
is not going to be provided in the article. This would spoil the whole
purpose of the project.
The only way to get the solution is to read the assembly program
containing all the assembly code and notation for each line as well as
each section.
You will appreciate writing the program in assembly code (mnemonics) as
almost anything can be written and when it doesn't work, it's just a
matter of preparing a short sub-program and making the micro "goto" it.
In the sub-routine you can see the value of a particular register by
decrementing it and outputting to a LED in a series of flashes or
putting a "goto" in a sub-routine and seeing if the micro gets to the
particular location by outputting to a LED if the micro reaches the
sub-routine.
ADDING YOUR OWN
IDEAS
This is an ideal project to test
your programming skills. You can change any of the codes or create an
entirely new code for any section.
But before you do, here is the way to do it:
Suppose you want to change the code at section 3.
The first ting to do is change to the last instruction in "Set Up" to:
goto Out2, so the micro will immediately go to the
beginning of section 3, turn on LED2 for 2 seconds and then produce a
blank screen at the beginning of section 3.
Read the program at section 3 and understand what each instruction is
doing.
Only change one item or idea at a time and test each change before
making another change.
28/8/07