LED Power Meter
Kit available from Talking Electronics
The LED Power Meter is a piece of TEST EQUIPMENT for RF Projects. It detects the output power of our FM transmitters. It is included in some of our articles, but not all.
It is very handy to see the output power of an RF transmitter as a reading on a multimeter and although it is not graduated in milliwatts, the power can be seen to rise and fall as different improvements are made to the circuit.
This is the general article on the project. Additional information is given in each FM bug article.
So, here is the general description . . .
THE LED POWER METER
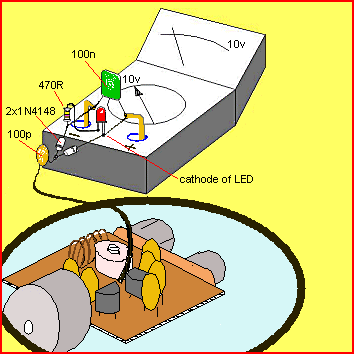
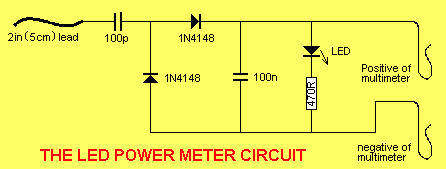
The LED power Meter is a simple RF detector using diodes to charge a capacitor. The voltage developed across the capacitor is indicated by a multimeter set to a low voltage range. The circuit is soldered together without the need for a PC board, as can be seen in the diagram below and paper clips are used for the positive and negative terminals of the multimeter.
It will only take a few minutes to put this circuit together. The power from the output of an FM transmitter is indicated by the illumination of a LED and the voltage reading on the multimeter gives a further indication of the output.
A digital multimeter may be used but the presence of RF may produce a false reading.
Likewise, the radiated energy may upset some analogue meters and you may get full scale deflection on the 15v range as well as the 250v range! But the LED won't lie. It will accurately indicate the RF and you can see the change in brightness as you adjust the coils in the output stage. Some of the cheapest and simplest multimeters will give the best results as they have a low sensitivity and the radiated RF energy will not induce a reading. Even a damaged multimeter can be used, provided the 10v or 15v DC scale is operating.
The reading is not calibrated and does not represent milliwatts output. It is only a visual indication.
We have designed over 10 FM transmitters for inclusion in the pages of this e-magazine and each one has different features and characteristics. Some are designed for 3v operation, some are for 9v operation, some are stable for hand-held situations and others are designed for high output. The illumination of the LED will range from barely visible to very bright.

The Voyager MkII connected to the LED Power Meter

|
LED Power Meter Parts |
| 1 - 470R 1 - 100p ceramic 1 - 100n ceramic 2 - 1N 4148 diodes 1 - 5mm Red LED 1 - 2in (5cm) hook-up wire 2 - paper clips No PC board required |
BUILDING THE LED POWER METER
USING THE LED POWER METER
To Top
Build the circuit for the LED Power Meter exactly as shown in the diagram above
and make sure the input lead is exactly 5cm long. If you keep to the same layout as shown, your readings will closely coincide with
ours.
The lead of the power meter is used to radiate the signal and you will get a range of 10 metres or
so.
When dealing with RF, lead length is very important and if the input lead is longer, the meter will produce a lower
reading.
The type of multimeter will also affect the reading and this is why we cannot give a quantitative value for the
output. Keep the multimeter away from the transmitter to prevent it picking up
any RF radiation.
Connect the 2in (5cm) lead to the antenna point on the FM bug under test and turn the project on.
Do not fit the antenna to the bug, just the LED Power Meter.
The lead of the LED Power Meter will act as an antenna, so place a
radio nearby and tune it to about 88.5MHz or somewhere at the low
end of the band. Move the turns of the oscillator coil either
together or stretch them apart until a feedback whistle is picked
up by the radio. This is the frequency of transmission.
When the turns are pushed together the frequency decreases and when
moved apart, the frequency increases.
You must not use any metal objects near the coil when moving the turns.
If you do, the reading will be upset.
The best item to use is a match or plastic knitting needle as you
should keep your fingers and hands away from the coil while adjusting
it.
The multimeter will show a reading and this voltage will
depend on the quality of the transistors.
Some of our FM transmitters have a second coil in the antenna circuit called a
peaking or tuning coil and when this is adjusted, the output of the circuit
will rise further.
This is the advantage of the LED power meter. It shows the improvement as the
circuit is "tuned" or "peaked."
Some of our "bugs" have an air trimmer to tune the bug into a blank
spot on the dial. You should do this with a non-metallic instrument such
as a plastic knitting
needle filed to create a flat screwdriver. You can see the vanes moving in and out
of mesh with the stators and the meshing should be mid-way at the
start of the test so you can raise or lower the frequency by turning
the trimmer.
As the vanes move out of mesh, the capacitance of the trimmer decreases
and the frequency of the output increases.
Once you are satisfied the
project is working, remove the LED Power Meter and solder the antenna
lead to the board.
Move the radio a short distance away and tune across the band to make
sure the output is coming through and to see if you have picked
up the main frequency of transmission.
Carry out some experiments yourself and you will be very impressed
with the performance. All our designs are the best performers on the market and
will hear a "pin-drop."
![]()