|
PROTOTYPING |
There are three levels of prototyping.
They all revolve around the number of changes needed to get the circuit to work.
1. DESIGNING FROM SCRATCH
If you are developing a circuit from scratch, you may need to change many of the components during the development and even add more devices.
For this type of designing you need a board with all the components on one side and it is best to use a board without any holes so the components can be soldered to lands with fine wires joining them together.
Sometimes the layout is critical and the impedance of fine wire will upset the operation of the circuit. This is important to know as it determines how far apart the components can be on the final layout.
You don't want any boards with long tracks as this will limit the number of places to add components. Lands with wide and narrow spacing are needed so surface mount components as well as standard components can be fitted.
You can use surface-mount components or through-hole components with the leads cut short, but it is important that all the components are visible and all wiring can be seen at the same time.
This allows you to concentrate on the whole circuit and prevents distractions like turning the board over to desolder a component.
2. BUILDING A CIRCUIT
If you are building a circuit that requires very little modification, you can use a prototyping board with holes for through-hole components.
If you are going for a production-run, it is much cheaper to use surface-mount technology.
Nearly all components are available in surface-mount except, say high wattage resistors, and some large capacitors, but the appearance of a surface-mount design makes it look "up-to-date" and produces a lot of "quodos." Surface-mount components are now available in small quantities and this will allow you to design a circuit and make sure it works.
3. LAYOUT
Sometimes you can "kill three birds
with the one stone." If you want to design a circuit to fit a particular
layout; you can design, build and lay-out the components at the same
time on a surface-mount grid. No surface mount grid will be totally
suitable but you can combine different areas to get a good indication of
the final design.
SELECT YOUR BOARD
Select your prototyping board wisely.
Look for a board that holds your chip and has plenty of lands for the
surrounding components.
The following board is a design from Talking Electronics. It is one of
the simplest prototyping board and is designed to hold a surface-mount
chip up to 20 pins or two small chips.
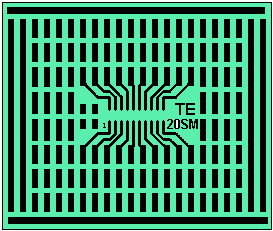
A SM Prototyping board
SOLDERING THE
COMPONENTS
Surface Mount components are designed to to be submerged in solder and
you may think they are very tolerant to heat. But this is not true. The
simple reason is the sensitive semiconductor material is very close to
the lead and the lead is a very good conductor of heat. This makes any
heat applied to the lead very critical.
In the process of soldering surface mount components, they are firstly
glued to the board and the board is then turned up-side-down and placed
just above a solder-bath. A wave of solder then "licks" across the board
and connects the components.
This action occurs very quickly and the solder bath is EXACTLY the
correct temperature. In fact soldering is done at a temperature BELOW
hand soldering and faster than any hand soldering.
That's why nothing is destroyed.
To prevent damage to any semiconductor device, when you are building an
SM circuit, use a temperature-controlled soldering iron set to 320°C
(600°F)
and very fine (0.7mm) solder. The temperature of the iron should be set
so that just does not melt the solder and then
increase the temperature slightly. Check the temperature by trying to
remove the enamel from a length of enamelled wire. It should take at
least 15 seconds to remove.
If you want to remove the enamel from wire for connecting the
components, increase the temperature slightly so that it takes about 3
seconds. Reduce the temperature back to 320°C
for delicate components like transistors, IC's and LEDs.
For these items, only solder one lead at a time and put your finger on
the device to cool it down. LEDs will very easily lose their brightness
if they are overheated and anything can go wrong with a microcontroller
if it is overheated.
To solder a surface-mount IC to the board, for example, put a very small
amount of solder on the land for pin 1 and the diagonally opposite pin.
Place the chip on the board and while you are holding it down, place the
iron on pin 1, melt the solder on the land and push the chip down.
Repeat to the opposite corner.
The rest of the pins can now be soldered by using very fine solder.
Place the solder where the pin touches the board and heat the land. This
will very quickly heat and melt the solder and cause it to run under the
pin. Repeat with all the other pins.
If you increase the temperature of the tip (to solder quickly), it will
get very hot and be destroyed in a few days. Once the outer coating is
destroyed by heat or flux, the inner layers will be eaten away very
quickly.
High-temperature soldering is not a good idea with surface-mount
components as the increased temperature will do more damage than the
increased speed in soldering.
The cheap soldering iron sold in a $2.00 shop and auto stores is far too hot for our job
and is an absolute disaster for this type of work.
You need to follow our guidelines closely as the margin-for-error is
very narrow for surface mount. It is very easy to destroy a
microcontroller and it will be very frustrating to locate the fault.
28/8/07