XENON
FLASHER
![]()
This
discussion covers 3
different Xenon flashing circuits from disposable cameras. From them, you will learn circuit tricks that have NEVER been shown in
any theory book. The first circuit comes from a
Fuji camera:
You are going to like this project.
It costs less than $3.00, contains six BUILDING
BLOCKS, re-cycles a disposable flash camera and you are going to
learn a lot about electronics. THE
1.
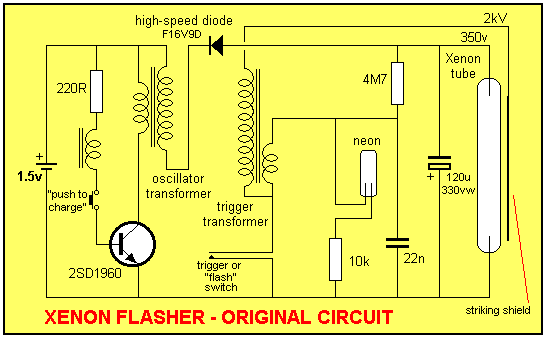
THE SINEWAVE OSCILLATOR The feedback winding is connected between the 220R resistor and the
base of the transistor. When the transistor turns on, the voltage
produced in the feedback winding ADDS to the voltage supplied by the
resistor and this turns the transistor on MORE.
2. THE CHARGE-PUMP
3. THE TIME DELAY CIRCUIT
4. THE RELAXATION OSCILLATOR
5. THE TRANSISTOR IN BREAKDOWN MODE
6. THE TRIGGER TRANSFORMER MORE
ON THE "CIRCUIT" DIFFERENT
CIRCUITS
GETTING THE CIRCUIT "OFF THE BOARD"
POWERING THE FLASH UNIT A RELATED PROJECT
HOW THE CIRCUIT WORKS
CIRCUIT 3:
THE AGFA CIRCUIT HOW THE CIRCUIT WORKS
ADDING
THE REPEAT FLASH
The first circuit covers 6 BUILDING BLOCKS.
You will need an old "disposable Flash
Camera" plus two extra parts to carry out the modifications.
No kits are available for any of this discussion. You can get an old camera from a friend
or a photographic shop and the
parts from an electronics store. The
other circuits have different features. So let's start with the
first circuit . . . .
Everyone has seen a disposable flash camera.
Every supermarket, photographic store and corner shop has them near
the check-out counter. For less than $20 you get a pre-loaded
camera with a flash! It's absolutely amazing technology, but what a
waste of resources! After 12-27 flashes, you throw away the camera and a
perfectly good flash unit.
With a little bit of fore-thought, manufacturers could have made
the camera re-loadable, but that would defeat the purpose of
disposability!
It seems such a waste, to throw away a complete high-voltage flash
unit, but that's the cost of progress.
Well, now you can take advantage of this and pull apart a USED camera. The next time you buy a disposable camera, ask for it to be
returned to you when the store develops the film.
Alternatively you can ask the store to save the next unit that comes in
for development - after all, they throw the units away!
For this project, all you need is a flash unit and two extra components
- a BD 679 transistor and a high speed diode. (For a discussion on transistor pin-outs, and finding if the transistor
is PNP or NPN, go to:
transistor pin-outs.)
You can turn the flash unit into a REPEATING FLASHER CIRCUIT that will flash at
the rate of about one flash every 2 or 3 seconds, depending on the
quality of the battery. The flash unit draws a very high current and
only a fresh alkaline cell will be suitable. That's the only
problem with the circuit. It draws a very high current.
Note: Although the project is written as "XENON
Flasher" the letter "X" is pronounced
"Z" as in ZENON.
The brilliance in technology does not stop with the electronics. If you
look at the shutter assembly, you will note it opens the
"hole" (also called the pin-hole) as it moves from left to
right then closes it again as it moves from right to left. This
allows sufficient light to enter the camera.
When in flash mode, the shutter opens the hole (by moving from left to
right) but the flash has not yet been triggered. The conditions will
generally be fairly dark and the film will not been exposed. (it will
not have "taken a picture") The shutter then hits the "trigger
switch" and the xenon tube flashes immediately. This illuminates
the subject and as the shutter closes the hole, the film is exposed.
This effectively give s the camera two shutter speeds! How
clever!
THE BUILDING BLOCKS
This project has 6 separate building blocks:
1. A sinewave oscillator - more realistically called a feedback
oscillator or blocking oscillator.
2. A charge-pump - a diode charging a capacitor
3. A time-delay circuit
4. A relaxation oscillator - not used when in the repeat flash mode
5. A transistor in breakdown mode - this is one of the added components
6. A trigger transformer
WARNING
This project generates 350V DC and stores the voltage in a large
electrolytic. This voltage will not kill you, but will deliver a nasty SHOCK!
For this reason, the project has a great benefit. It will teach you to
work very carefully on equipment with high voltages and if you do get a
shock, you will appreciate electricity EVEN MORE! Simply discharge the
120u electrolytic with a screwdriver or jumper lead before working on
the circuit. I do. I'm not silly. I don't want to get a bite or tingle
each time I pick up or work on the board.
There is no reason why beginners cannot experience working on this
project as it contains non-lethal high voltages and is a very good
grounding for electrical safety.
We forgot to mention the other high voltage produced by the circuit. As
you will learn in the notes, a trigger transformer is also included in
the circuit and it produces a very high voltage to trigger the Xenon tube to
produce a flash. This trigger voltage is approx 2,000 volts but
since it is only present for a very short period of time, you would
have to be holding the circuit at the instant when a flash occurs, to
feel the spike. None the less, this 2kV is part of the
circuit and adds to the fact that this project is packed with
features. 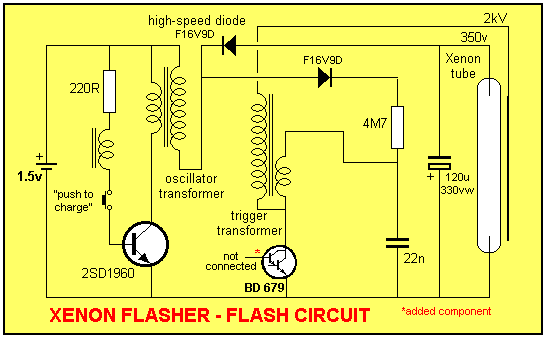
We start the discussion with the transistor oscillator. It's not really
a sinewave oscillator as this infers the output is a nice, clean
sinewave. It's really a blocking oscillator or pulsed oscillator
or feedback oscillator or flyback oscillator as the high voltage
produced by the secondary winding occurs when the transistor is
switched off and the magnetic flux collapses and creates the high
voltage in the secondary (also called the tertiary or
"overwind") winding. For more details on the operation of this type
of oscillator, see our project:
"Making
your own 3v inverter."
The oscillator
converts the 1.5v DC supply voltage to a 350v AC waveform. This
waveform is rectified by a high-speed diode and charges a 120u 330v
electrolytic.
The oscillator consists of three components:
1. A transistor
2. A transformer, and
3. A 220R resistor.
For an oscillator to work, it must have positive feedback. In other
words, positive feedback is a signal that encourages the transistor to
keep moving in the direction it is travelling. This can be in the
"turning-on" direction or the "turning-off"
direction. It's a bit like encouraging a cyclist to peddle harder up
hill. That's positive feedback. Then to encourage him to peddle
harder down-hill. That's also positive feedback.
The transistor gets turned on a small amount by the 220R
resistor on the base. Current flows through the transistor and also the
winding connected to the collector. This is called the primary winding.
The primary winding produces magnetic flux and the important thing to
remember is the flux is EXPANDING FLUX. In other words the flux is
getting stronger (or more-accurately: MORE LINES OF FLUX ARE BEING
PRODUCED - THE FLUX-LINES ARE CLOSER TOGETHER).
This flux passes through all the turns on the transformer and a
voltage (and current) is produced in each turn. There are three
separate windings on the transformer, (we really say the current is
available as a current cannot be measured until is it actually
flowing):
1. The primary winding
2. The secondary winding, and
3. The feedback winding.
The transistor keeps turning on HARDER until it cannot turn on
any more. The flux in the transformer is a maximum but it is not EXPANDING
FLUX. It is called STATIONARY FLUX. Stationary flux does not
produce a voltage or current in the other windings and thus the voltage
and current produced in the feedback winding ceases to flow. This
causes the transistor to turn off a small amount and the magnetic flux
in the transformer is REDUCED. This flux is now called COLLAPSING
MAGNETIC FLUX and it cuts the turns in the transformer and the voltage
it produces in the turns is in the OPPOSITE DIRECTION.
This is one of the amazing features of a transformer. It will produce
an output voltage with positive on one wire and negative on the other,
when the magnetic flux is expanding. When the flux is moving in the
other direction (collapsing) the output voltage is REVERSED.
This reverse voltage turns the transistor OFF a small amount and it
keeps turning the transistor off until it is FULLY OFF. The reverse
voltage from the feedback winding ceases, an the transistor gets turned
on again by the voltage and current supplied by the 220R
resistor.
This is how the cycle repeats and the oscillator operates at approx
3kHz. In other words, this action is repeating 3,000 times per
second.
The charge-pump consists of the secondary winding of the oscillator
transformer, the high-speed diode and the 120u 330v electrolytic.
The secondary winding consists of many turns of
wire (I haven't counted them). The voltage from this winding
is in the form of a pulse or sinewave with an amplitude of about 350v. i.e: the
distance from top to bottom represents a voltage of 350v. This is fed
into a diode and as we have mentioned in the previous pages of the
course, a diode only allows voltage (and current) to flow through it
when the anode is higher than the cathode. You will notice the diode
has been placed in the circuit in the reverse direction to the way we
have suggested in the theory section. That does not matter, it works
exactly the same, except the negative pulses pass through it (because
the positive pulse emerges from the other end of the transformer and
this is really the pulse that goes around the circuit and passes
through the diode in the forward direction) and charge
the electrolytic. The electrolytic has been fitted with the positive
going to the 0v rail.
Thus, on every negative pulse (from the top of the transformer), the voltage charges the electrolytic. If
you place a voltmeter across the electrolytic, you can see the
voltage rising. It rises quickly at first, then at small voltage increments. This
corresponds to the graphs we have covered previously, where the
capacitor charges quickly at first, then slows down as the capacitor
charges to its full value. It charges quickly at first because the
charging voltage is very high and the opposing voltage on the capacitor
is small and thus the charging voltage has a lot of
"pressure" to get the charge into the capacitor.
The time-delay circuit
consists of the 4M7 resistor and 22n capacitor.
In the original design, these two components form a time-delay circuit
to let the user know when the storage electrolytic has reached full
voltage. The 22n charges via the 4M7 and when 65v appears across it,
the neon lamp produces a pulse of red light.
The neon just doesn't produce a constant red glow, it
flashes at about 1 flash per second. The lamp flashes when the voltage
across the 22n reaches 65v and keeps glowing until the voltage falls to
about 45v. It then goes out. The 22n charges up via the 4M7 and the
lamp flashes again when the voltage reaches 65v. The 4M7,
22n, neon lamp and 10k form a relaxation oscillator with the voltage
across the 22n ranging between 45v and 65v. The 10k resistor prevents
the voltage across the 22n falling too low and has an effect on the
flash-rate. If you look at the waveform on a CRO, it will be
similar to a sawtooth. We are not using this waveform for any purpose
in this project, it just happens to be a very simple way to illuminate
the neon lamp with the least possible energy, so the main circuit is
not "bled" of too much energy.
Our project takes advantage
of the fact that a transistor will breakdown when sufficient voltage is
present across the collector-emitter terminals and restore its high
impedance when the voltage is removed.
We have added a second high-speed diode to the output of the
transformer. This has been done to pick up the positive pulses from the
transformer.
the purpose of this diode is to charge the 22n as fast as possible to a
very high voltage to breakdown the transistor connected to the primary
of the trigger transformer. The transistor happens to be a darlington
type but this is not necessary. Almost any transistor will perform
however its current-handling capability needs to be high die to the
heavy spike of current delivered by the 22n to the transformer.
The point at which the circuit "triggers" or
"fires" depends on the breakdown voltage of the transistor.
The transistor is rated at 80v between collector-emitter but the actual
breakdown effect does not occur until about 280 - 300v.
We need to get the voltage up to this value as soon as possible so that
the trigger transistor will "fire" and ionise the tube ready
for a flash.
The energy stored in the
22n capacitor is passed to the trigger transformer when the transistor
breaks down. The 22n will have about 300v across it and this voltage is
delivered to the primary of the trigger transformer via the BD 679 transistor. The secondary has a large number of turns and the
transistor delivers a pulse of energy to the primary. This pulse of
energy lasts only a very short period of time and the magnetic flux
builds up and collapses. The collapsing flux produces a very high
voltage (approx 3,000v) in the secondary and this is passed to a plate at the
back of the Xenon tube (in our case the reflector is the "backing
plate" and it effectively ionises the gas in the tube
by generating a voltage gradient between the outside of the glass tube and the gas
inside and it becomes a very low resistance. The 180v
on the electrolytic is also on the ends of the tube and the energy
in the electro is instantly delivered to the tube. The result is a
brilliant white flash.
Unfortunately this project
cannot be left in a "ready" state as the circuit consumes
about 250 - 300mA just to keep the electrolytic charged and a single
cell will last only a few hours. Once the
electrolytic is charged, it will remain charged for a long time,
provided the neon tube is taken out of circuit, as it
"bleeds" off a small current through the 4M7 and will keep
flashing until the voltage reduces to about 100v. If you can
design a circuit to turn the oscillator on and off, to keep the
electrolytic charged, it can be kept "ready."
Otherwise it will have to be "fired up" every time
it is needed. This will only take about 15 seconds or so and it can be
used in an alarm project to indicate when the alarm has been triggered.
Normally a blue strobe light is used, but the circuit can take
its place, provided the supply is kept to between 1.5v and 2v.
Unfortunately not all flash
units are the same. Our flash unit was taken from a FUJI camera and
even different model cameras may have a different circuit.
The only thing you can do is try the modifications outlined in this
project and see if they work. Otherwise you will have to carefully get
the circuit off the board and compare it with the one we have drawn. The
basic operation of all flash units is the same. One of the possible
differences is the positive or negative charging of the storage
electrolytic.
If your flash unit does not
work after you have added the transistor and resistor, you will have to
check to see if it is the same as
ours.
This will involve getting the circuit off the board. This is not easy
and not difficult, it just requires a lot of patience and care.
There are two things you need to know before starting - to make the
process much easier - the symbol for each
component and an approximate layout for the diagram. In this case the layout and components will be almost
identical to the circuit we have provided. The only difference may be
the orientation of the high-speed diode and electrolytic. If these are
around the other way, the switching transistor must also be placed
around the other way.
You can start anywhere on the board. Turn the board back and forth to
make sure you can see where the leads are going through the board and
follow the tracks from one component to another. Check everything
over and over to make sure you haven't made a mistake. It's so easy to
think a track connects to a particular component whereas it connects to
an adjacent component.
If you don't know the symbol for a particular component, sketch its
outline and draw the leads on the sketch. Later you may be able to
identify the device by the value of the surrounding components.
If the flash unit is
powered by an external power supply, you will have to keep the voltage
between 1.5v and 2v so that the oscillator transistor is not
over-driven.
With many types of electronic devices, the circuit will consume a
considerably higher current if the voltage is increased slightly. This
is due to many factors, one of which is the saturation of the
transformer when a higher voltage is applied. The higher voltage will
cause a higher current to flow and this will produce a higher flux
density. The transformer may not be able to accept a higher flux
density and the result is additional current is drawn by the circuit.
The higher current may damage the transistor.
In addition, the higher voltage will produce a higher "back
voltage" (called back emf) and this voltage is in the form
of a spike that can puncture the transistor. In fact a "power
transistor" is more likely to be instantly damaged by a spike than
by overheating.
If you want to add a larger cell, the most economical cell is size
"D" (called the normal torch cell). Placing two or more cells
in parallel will increase the time the circuit will operate.
Fitting a 6v battery and using diodes or resistors to drop the voltage
is a very uneconomical way to power the circuit. You will get no more
life out of the four cells in a lantern battery than using a single
"F" cell.
USING THE PROJECT
The project can be used as a "dummy camera" to scare
intruders. Using a mercury switch on the input, (or an ordinary switch) will turn the unit
on.
If you like oscillators and high
voltage, a similar project is: "Making your own 3v Inverter."
It is a 3v inverter that produces a high voltage (approx 120v) to drive
an electroluminescent panel or length of electroluminescent
"rope" or "string." More details of this
project can be found HERE.
CHANGING THE FLASH-RATE
One of the
requests for this circuit was to increase the flash-rate. The order came to Stelar Laboratories to supply 70 flashing Batons for the Gay Mardigras.
The Fuji circuit was the best of the three circuits to use as it has the fastest
charge-circuit and the flash rate was increased by reducing the value
of the reservoir electrolytic. By reducing the capacitance of the main
reservoir electrolytic, it will be charged faster to the level detected
by the neon and the flash-rate increases. We simply put another 120u in
series with the first electrolytic to get 60u.
It is interesting to note that the 4M7 charging resistor can not be
decreased below 2M2 as the circuit will stop working.
Why is this?
The reason is simple. The trigger transformer relies on receiving a pulse
of energy into the primary and the collapsing
magnetic flux produces the high voltage.
If the feed resistor is too low, a current continues to flow in the primary
and the magnetic flux does not
collapse!
Photos to come for this article!
CIRCUIT 2: THE KODAK CIRCUIT
The next circuit we will study
comes from a Kodak camera. This has a
number of very clever features. Firstly, the circuit is an automatic
charger. It charges the 120u electrolytic then switches off. This
increases the life of the battery considerably as the circuit is only
powered for 15 seconds or so for each picture and there is no need
for an on-off switch. The switch on the circuit is a "start"
switch. The circuit also charges up the electrolytic again, after the picture is taken, ready for the possibility of another
photo. This action occurs merely because the circuit is
"upset." The camera actually gets left with the electrolytic fully charged
and it is gradually discharged through natural internal leakage.
We can only describe the circuit "in general" and cover some
of the clever features because the actual operation of the circuit (its
efficiency, for example) is a product of the the size of the
transformer and the gauge of the windings (especially the primary
winding) and the characteristics of the transistors. Some types of
transistor
work better than others and this may be due to current handling
ability or maximum operating voltage (zener properties) or the gain of
the transistor.
For example, this circuit takes 4 times longer to charge a 120u
electrolytic to 260v, than the first circuit, due to the transformer being much smaller, (the
primary winding is much thinner), and the frequency of operation is
much lower.
The supply voltage is 6v and the current consumption is about
300mA.
A high supply voltage has an advantage. The supply rail can fall a
certain amount before the performance of the circuit
reduces. In addition, the current requirement from each cell is
less.
For a 1.5v supply rail, the voltage cannot drop by more than 0.5v
before the performance of the circuit reduces.
In addition, the 1.5v circuit draws over 1 amp when a low-impedance
cell is connected. An alkaline cell is a low impedance cell (it can
deliver a very high current) and the flash rate is noticeably higher
when this type of cell is connected.
All of these circuits are intended for intermittent use and the current
requirement is of little concern, but if you want a circuit to use most
of the energy of a cell, the current consumption must be kept
as low as possible.
All battery ratings are taken at a few milliamp (for AAA and AA cells
the current is between 10 and 50mA) for C and D cells the current
is about 100mA) and the cell is only used for a few hours per day then
rested. When the terminal voltage of a cell falls to 0.9v or 0.7v the
test is terminated. The multiplication of the current and number of
hours of operation is multiplied together to get the amp/hr
capacity.
You can see that these represent very light duty and if the
requirements are increased, the capacity of the cell is reduced.
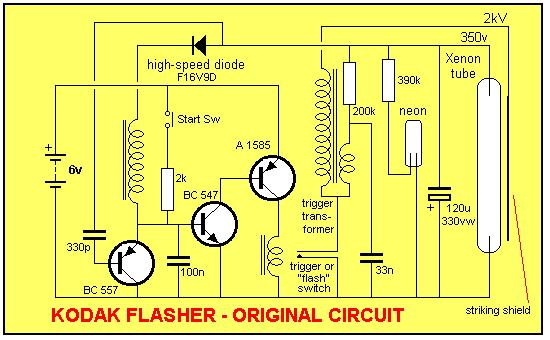
The Kodak circuit is fully automatic. The "start" button is
pressed and this turns on an NPN transistor via a 2k resistor. The
circuit begins to oscillate and the voltage from the feedback winding
gets superimposed on the DC voltage from the start switch to keep the
circuit oscillating. The button can now be released and the circuit
will keep operating.
Each time the feedback winding produces a pulse, it charges the 100n
capacitor and this puts a negative "set" on the base of the second
transistor. If this negative voltage gets too high, the pulse from the
feedback winding will not be able to turn the transistor ON and the
circuit will stop. This is fully discussed in another article
"Making Your Own 3v Inverter." The
100n is constantly being discharged by the first transistor and this
transistor is turned on via a pulse from the high-speed diode. As the
main storage electrolytic gets charged, the pulses entering it get
smaller and smaller. Eventually the pulses are so small that they do not
pass through the 330p capacitor and the first transistor is not turned
on. This causes the 100n to charge negatively and after a short time the oscillator
circuit is prevented from beginning a cycle - and it stops. The 120u is fully charged and some of the high voltage
is bled into the neon lamp circuit to illuminate the lamp. This lamp
only takes a fraction of a milliamp to create a red glow and the
operator of the camera is informed that the camera is ready for
use.
The 33n storage capacitor is charged and when the trigger switch is
activated by the shutter, the energy from the 33n is passed into the
primary of the trigger transformer to create a very high voltage across
the ends of the flash tube to ionise the gas within the tube and allow
it to flash.
If you study the circuit in the off state, you will find absolutely no
current paths and thus the circuit consumes no current when at rest.
The first transistor is kept off via the 330k and 220k. This keeps the
second transistor off and the second transistor keeps the third
transistor off. The LED is reverse-biased when the circuit is at rest
and thus no current is consumed.
The repeat-flash components can be added to the Kodak circuit, exactly
as above.
There is probably a dozen or more "tricks"
in the design of this circuit that is not evident on a simple circuit
diagram. You have to have the PC board in your hand to see how the
flash tube has a shield around the rear surface so the voltage from the
trigger transformer is able to ionise the gas in the tube.
The 330p detecting the pulses from the charging circuit is a high
voltage type and the 120u electrolytic is a special "photo"
type that can be discharged very quickly without being damaged.
The rest of the tricks lie in the design of the oscillator transformer
and trigger transformer.
If you are going to design a circuit similar to this, you must start
with a circuit that works and change one component at a time. By choosing
a value higher or lower you will be able to determine how much effect
it is having on the circuit.
This technique applies to all forms of circuit design. Start with
something that is guaranteed to work and make small
modifications.
Now we will see how another design engineer tackled the flash circuit:
This circuit takes a slightly different approach to the
job of flashing a Xenon tube in a disposable camera.
It has a couple of different features and shows how you can tackle the
same problem in a different way.

The circuit is turned on by a "start" button that puts a
small DC voltage (from the 1.5v DC supply) into a 100u electrolytic.
The voltage across this electro is passed to the base of an NPN
transistor and this causes the collector-emitter leads to have a low resistance.
This turns on a PNP transistor and the PNP transistor delivers current
to the main oscillator transistor. The oscillator stage now looks almost
exactly like the oscillator stage of circuit 1. The circuit will
start-up quickly and the operator will not have time to release the
"start" switch before the waveform on the collector of the
oscillator transistor is able to pass spikes of energy into the 100u
via the diode.
This will give the electro added voltage so that the circuit stays on long
enough to charge the 120u 330volt electrolytic for the flash tube.
The 100u in the time-delay circuit (also called the start-up circuit)
is gradually discharged by the 330k (and also the 220k) and these are
designed to turn the circuit off completely.
An indicator LED is included in the circuit and you will notice it is
up-side-down to what you would expect.
As the voltage across the 120u electrolytic reaches 260v, the magnetic
energy in the transformer is not required by the electrolytic and larger negative pulses
develop. These pulses are fed to the LED via the 150R
resistor and the LED begins to illuminate.
The circuit shuts down to absolutely zero current via the 330k bleed
resistor removing all the voltage from the 100u electrolytic.
The first transistor is said to be in a 'high impedance"
arrangement so that it bleeds very little from the 100u while it is
keeping the rest of the circuit active.
The 150R on the emitter is forming a dual task and needs
describing.
The aim of the circuit is to get as much charge into the 100u as
possible so that the circuit stays on for as long as possible.
When the circuit turns on, current flows through the 150R and this
causes a voltage to develop across it to raise the emitter. This means
the base will be higher and thus a higher voltage is needed on the base
to keep the transistor turned on. This is not a problem but the
advantage is the transistor draws less current (bleeds less current)
from the 100u and so the delay time is extended.
The other (and main) reason why the resistor is added is to raise the
voltage on the collector of the first transistor so that the second
transistor can turn on the oscillator transistor.
With out the resistor, the first transistor can "pinch off"
the oscillator transistor because the voltage between the collector and
emitter of the first transistor can go as low as 0.3 to.0.5v and this is
below the turn on for the base of a transistor.
Our modification to create a repeating flasher can be added to this
circuit. See the BD 679 transistor added to the Fuji circuit above.
![]()