|
| ||
|
|
BASIC
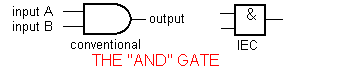
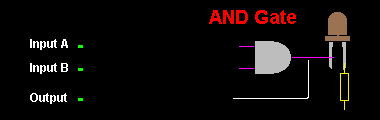
DIGITAL BUILDING BLOCKS Writing programs for microcontrollers is a completely different field of electronics and is really not very difficult. But you need to know basic electronics so you can correctly design the stages that connect to the microcontroller. That's why designing with microcontrollers will be introduced later. In the meantime you need to know the basics of GATES. These are classified as DIGITAL BUILDING BLOCKS. They are called DIGITAL because they operate on digital principles. They require a signal (also called a PULSE or INPUT) that is either 0v (LOW) or rail volts (HIGH) and give out a signal that is either LOW or HIGH. Gates can also accept MORE THAN ONE INPUT but always have ONLY ONE OUTPUT. Gates do not amplify (we are talking about voltage amplification). The amplitude of the input must be very close to rail voltage for the gate to work and the output is very nearly rail voltage. Gates are DECISION MAKING BLOCKS. They take 1, 2 or more inputs and make the output HIGH if a certain condition is present. It may be all inputs HIGH. Or all inputs LOW. Or only one input HIGH or LOW. A "gate operation" can be programmed into a Microcontroller, constructed with individual components such as diodes and resistors or obtained as a CHIP. This discussion describes that last two. There are lots of times when a GATE is required in a circuit and it's important to understand HOW THEY WORK so you can make one if needed. For example, an alarm circuit may require to be triggered when a door is opened AND a pressure mat is activated. This feature can be built into the microprocessor controlling the whole circuit or you can use a separate chip. But if you know how gates work, it may only require a few extra components. The situation above is an AND decision. The digital block for this is drawn as:
The block has two
inputs and a single output. It can have 3 or more inputs but we
will describe only the two-input version of all gates. The
"conventional" symbol is the easiest to remember. It
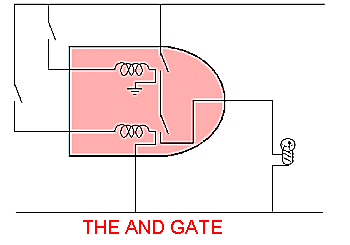
is like the letter "D." The mechanical way of explaining how the gate
works is shown below. Two relays inside the block must be
activated for the globe to illuminate.
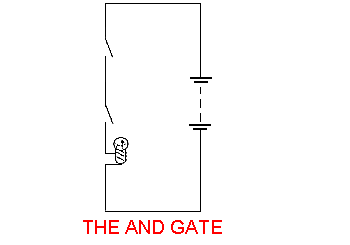
The electrical equivalent of the AND gate is:
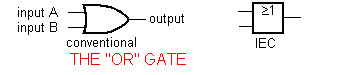
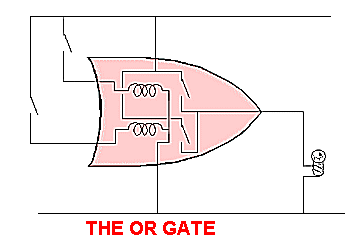
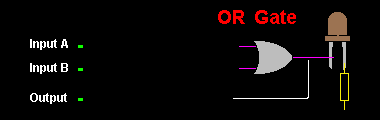
There is also the OR gate, where ONE input will activate the output. The digital block for this is:
The mechanical OR is shown below:
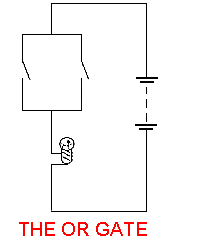
The electrical equivalent of the OR gate is:
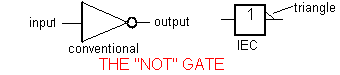
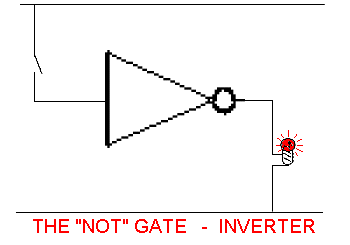
If you require a globe to NOT WORK when an input is HIGH, the gate is called an INVERTING DECISION MAKER or INVERTER. The block for this is drawn as a triangle with a circle or "bubble" on the output. The circle indicates inversion and the block is called a NOT function (remember the circle as a bow or KNOT).
The NOT gate is an inverting gate. When the input is LOW the output is HIGH and when the input is HIGH, the output is LOW. This is shown on the diagram below:
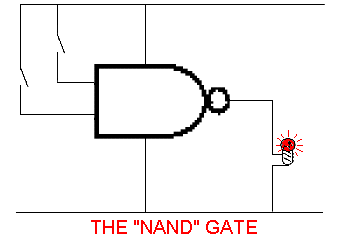
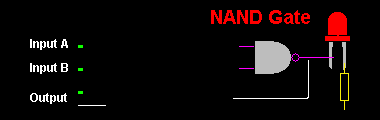
We can combine the AND gate with the INVERTER to obtain a gate with 2 (or more) inputs and "inverts." The result is a NAND function (comes from Not + AND).
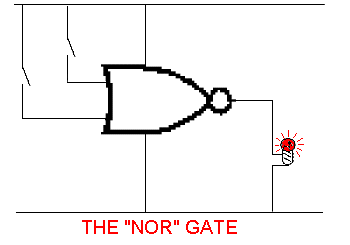
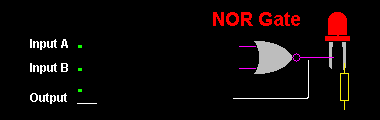
For a NOR gate, the output is LOW when any input is HIGH.
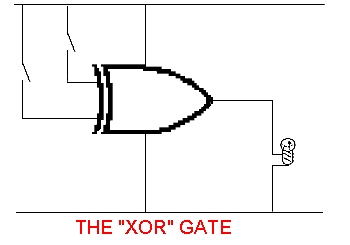
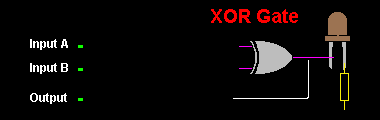
Another very handy gate is the EXCLUSIVE OR. The output is HIGH when ONLY ONE of the inputs is HIGH. You will notice the OR gate above has this feature but the output is also HIGH when BOTH inputs are HIGH. The standard OR gate is sometimes called the INCLUSIVE-OR for this reason.
There is one gate that really
doesn't perform like a gate. It is the BUFFER. The output is the
same as the input. It was needed for the original logic chips as
they required a small amount of current into the input lines and
if a chip had to drive a number of other chips, a BUFFER was
required.
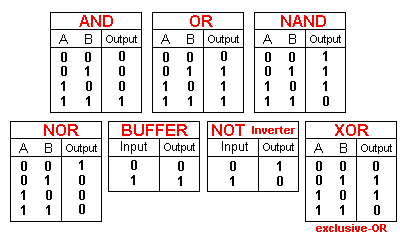
Each gate produces a number of results and these can be placed in a table so it is easy to see exactly what will happen when each combination of HIGH's and LOW's is presented to the gate. This table is called a TRUTH TABLE and the truth table for each gate is shown below:
Study the following waveform diagrams to see how each gate operates:
Question 119: Name the gate that that has a single input and the output
is INVERTED. Question 120: Name the gate that
is HIGH, only when both inputs are HIGH. Question 121: Name the gate that
is only HIGH when ONE INPUT is HIGH. WHAT
DO GATES DO?
MAKING
A GATE All the gates discussed above can be produced by using 1, 2,
3 or 4 gates of a QUAD NAND GATE chip, such as 74HC00. This is
fully discussed in the book "Electronics Notebook 1 with
STARTING IN TTL." A kit of components is also available for
you to make your own TTL trainer deck and by using jumper wires
(supplied in the kit) you can create all the LOGIC BLOCKS
described above. The total cost for the TTL Trainer deck (all
components - and batteries) and the book:
"Electronics Notebook 1 with STARTING IN TTL."
including pack and post $42.00
Click HERE
to order.
| |