|
Page
7:

THE
RESISTOR
The resistors used in these projects are identified by coloured
bands. These bands are painted around the body to identify its value.
TALKING ELECTRONICS
Interactive has a calculator that delivers the
value of resistance, when you enter the colour bands. This calculator
can be found "HERE."
Nearly ALL the resistors used in our projects have a gold band. This
indicates the resistor can be 5% larger or smaller in value than the indicated
value. Most resistors are very close to the indicated value
and, in general, the value of a resistor is not important.
We
will now explain how to work out resistance values by using the colour
bands. Hold the resistor so the fourth band is GOLD.
The first two
bands of colour provide the two digits in the answer and the third
band provides the number of zeros. The answer will be in OHMS.
The letter "R" means "Ohms". The letter
"k" means "thousands of ohms" or kilo-ohms.
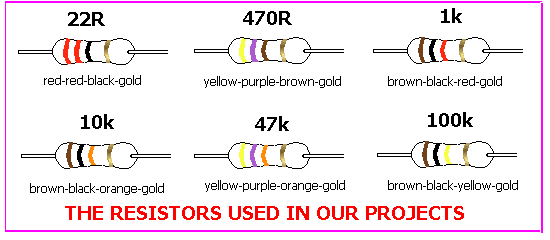
Here are the resistors used in the projects and their colour bands:
In
a moment we will show how the colours are worked out but first we will
discuss resistors in general.
PREFERRED
VALUES
The value of a resistor is measured in ohms. A low value resistor may
be 10 ohms or 22 ohms. A high value resistor may be 100,000 ohms,
330,000 ohms 1,000,000 ohms or even higher.
This is an enormous range and we need this range for electronics. If
we had a resistor of each value from 1 ohm to 5 million ohms we would
need 5 million types! This is impractical and the designers of
circuits have found that in most cases, the value of a resistor can be
10% higher or lower than a specified value and the circuit will work
perfectly ok. So the manufacturers of resistors worked out a range of
values to provide designers with a complete coverage without the need
for too many types.
This is called the range of PREFERRED VALUES and starts at 10
ohms (there are also lower values). The next value is 12 ohms, then 15 ohms, 18 ohms, 22 ohms, 27 ohms 33
ohms 39 ohms 47 ohms 56 ohms 68 ohms and 82 ohms. This is the
first 12 values and they may seem like unusual values but each value
has been worked out on a 10% tolerance scale. The next values are
100ohms, 120
ohms, 150 ohms, 180 ohms and you can see a pattern emerging - they
follow the first group except they are ten times greater. Each group
is called a decade and the next decade is 1000ohms, 1200 ohms, 1500
ohms, 1800 ohms etc.
In the old days, when a manufacturer made a batch of resistors, he
could not control the final value. So he simply made resistors and
tested them just before adding the bands of colour. He did not want to
throw any resistors away so when making 100 ohm resistors, for
example, he had some at 100 ohms, some at 101 ohms, some at 125 ohms,
some at 80 ohms and lots of other values.
Every resistor between 90 ohms and 110 ohms would be banded as 100
ohms. Resistors from 111 ohms to 133 ohms would be banded 120 ohms and
in this way the value of any resistor would be either the exact value or
only 10% away from the exact value. In electronics, most circuits will
work perfectly ok with a resistor that is slightly higher or lower
than the stated value. Electronics is not that critical. We are really
talking about the old days of radio and the use of valves - where the
resistor values were not very critical. Modern electronics (digital
electronics) is somewhat more critical and resistors are much more
accurate as you will see by the gold band on the resistors in the kit.
Gold represents a tolerance of 5%.
RESISTOR
COLOUR CODE
Resistors have always been the most difficult component to identify in
electronics and that's why they need a lot of study. Once you master
the colour code you will feel much happier.
To the casual observer, any circuit board is a mass of
"little coloured things" called resistors, with no
indication of what value they represent. Once you know the resistor
colour code you will be able to work out the values and relate them to
a circuit diagram.
That's why it is so important to master this part of electronics. The
resistors required for the experiments in this section are contained in a kit of parts
and must be separated from the rest of the components and correctly
identified.
This is the first thing you will be doing so you don't fit the wrong
value in any of the projects.
If you fit the wrong value, the circuit may not work and some of the
other components may be damaged. Later on you can experiment with
changing resistor values but at this stage you should only fit the
specified values.
IDENTIFYING
THE RESISTORS
Separate the resistors from all the other components and place them on
the bench so that the gold band is to the right.
The gold band indicates the resistors have a tolerance of 5%. In other
words they are more accurate than older-style 10% types. This gold
band does not concern us in this course but it DOES tell us which way
around to hold the resistor so that the colour bands can be read
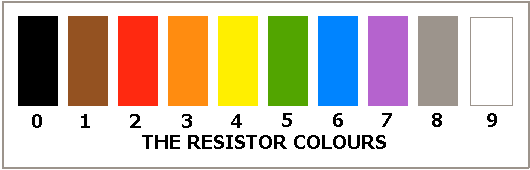
correctly. Only 10 different colours are used for ALL resistors.
The following table shows these 10 colours and the number given to
each:
READING
THE VALUES
Hold the resistor so that the 3 colour bands are to the LEFT and the
right hand band is either gold or silver.
The first colour gives the first DIGIT of the resistance. The second
colour give the second DIGIT in the answer. The third colour gives the
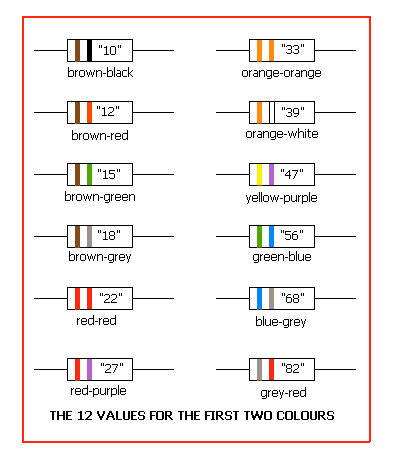
number of zero's in the answer. There are only 12 resistors in each
decade and they have the following first two colours:
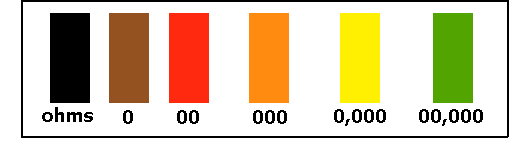
All
you have to do is add the number of zero's to get the resistance. Use
this table to give the number of zero's:
For
example, what is the value of a resistor with colour bands:
red
red black
2 2
Ohms
Answer:
22 ohms. This is written 22R
What is the value of a resistor with colour bands:
red
red red
2 2
00
Answer:
2,200 ohms. This is written 2k2
A resistor with colour bands:
yellow
purple orange
4
7
,000
This is written 47k.
A resistor with colour bands:
orange
white brown
3
9
0
This is written 390 ohms or 390R.
STANDARD
FORM
To make it easy to recognise the value of a resistor, it is important
to present the value in a STANDARD FORM - an easily recognised form.
This involves using the letters: R, k and M to represent ohms, kilo
ohms and Meg ohms (instead of writing lots of ,000's).
For example a 4,700,000 ohm resistor is 4.7 Meg and the decimal point
is replaced by the letter M to give 4M7.
A 2,200 ohm resistor is 2.2k and this is written as 2k2. A 100,000 ohm
resistor is written as 100k. A 10 ohm resistor is written as 10R, as
the letter R represents ohms. The letter R was possibly chosen as a
short form of "Resistance."
A 2.2 ohm resistor is written as 2R2. A 1,000 ohm resistor is written
as 1k, and so on.
WHAT DOES A
RESISTOR DO?
This is not an easy question to answer because a resistor is able to
do many things, depending on where it is placed in a circuit, its
value and the surrounding components. Every resistor carries out a
particular task, and sometimes it does more than one task.
To keep things simple we will cover only a few tasks. In future pages
we will cover more features.
1. ZERO OHM
RESISTORS AS A LINK
We have already shown that resistors are marked with coloured bands to
show the value of the resistance in OHMs and they have a value from
.22 ohm (actually from zero ohms - a zero ohm resistor is used as a
LINK on a PC board and the purpose of this component may be to act as
a bridge to jump over other tracks on the board or it may be a
temporary component that can be removed and changed at a later date.
It can also be a "test point" where the resistor (link) is
removed for testing or calibration.
Resistors can be as high as 10M or greater, depending on the purpose.
This is an enormous range and depending on the value of the resistor
and the other component(s) around it, so its function will be
determined.
2. THE
RESISTOR AS CURRENT LIMITING
Whenever a resistor is placed in a circuit, the current flow through
that part of the circuit will be less when the resistor is fitted.
Some components, such as Light Emitting Diodes, will take too much
current if they are connected directly across a battery or power
supply.
To prevent them burning out, a resistor must be connected in series
with one of the leads.
This has already been covered in previous pages.
3. THE
RESISTOR AS A VOLTAGE DIVIDER
The resistor can also act as a voltage divider. When two
resistors are placed in series, the voltage at their join is a
percentage of the voltage across them. The actual voltage can be
determined by mathematics or experimentation. For example, If two
equal-value resistors are connected in series to a 12v supply, the
voltage at their mid point will be 6v. The value of the resistors can
be adjusted so that the "pick off" voltage is 9v, or
11v or any voltage up to 12v.
4. THE
RESISTOR IN A TIMING CIRCUIT
The resistor can also be used to create a TIMING CIRCUIT by combining
it in series with a capacitor. This will be covered later in the
course.
The resistor limits the current into the capacitor so that it takes a
PERIOD OF TIME to charge. Whenever you see a resistor and
capacitor in series you can be fairly certain they form a timing
circuit. There are lots of other functions for a resistor including a
fusible resistor that is simply designed to burn out if the current
through it gets too high, and these will be covered in future pages.
PARALLEL
AND SERIES
Resistors are placed in parallel and series for a number of reasons -
more on this later.
TALKING ELECTRONICS
Interactive has shown how to connect
resistors in series and parallel. For details go "HERE.
|