5x7 Display
Construction Part
2
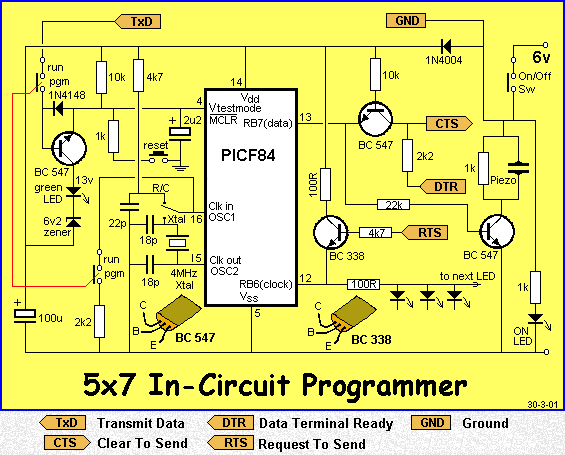
Part2: The 5x7 In-Circuit Programmer
![]()
The diagram for the In-Circuit Programmer section of the 5x7 Display project is shown below. It has been presented separately to keep it easy-to-understand however both circuits are combined on the 5x7 Display PC board and all you have to do is change the program switch to "pgm" and download a program via the PIP02 software. Slide it to "run" and the program will execute. The PIC chip does not have to be removed from the PC board.
This circuit is part of the 5x7 Display project
HOW
THE CIRCUIT WORKS
The operation of the circuit has been fully covered in the project
MULTI CHIP PROGRAMMER.
Its operation is very complex because it has to take voltages from the
serial port of a computer to generate a 13v line, using an existing program in the
PIP02 software as well as drive the lines of the chip while they are
connected to other parts of a circuit.
The most difficult line to get operational was pin 12. It is connected to a very low impedance
output (a LED on the display) and this meant we had to drive the line very
hard to get it to recognise a HIGH. The 100R and BC 338 was necessary
to do this.
Basically the chip is supplied with a 13v signal on pin 4 and this turns it
into programming mode with pins 12 and 13 turned into high impedance lines
ready to accept programming signals.
The 5v from the battery pack is used to supply voltage to the chip during
programming mode. Normally the computer will supply the 5v to the chip but
we need extra current to deliver a HIGH to pin 12 and so the power switch is
kept ON.
The power LED on the board indicates this. When the program is downloading,
the 13v indicator LED is illuminated and the piezo tells you the data
pulses are being sent to the chip.
PROGRAMMING PIC CHIPS - we
call it "Burning A CHIP".
This project can be used as a regular PIC programmer, for programming PIC16F84
chips for other projects.
If you are designing a project without an in-built programmer, you can use
this project to program the chip. This is the reason we included an extra 18
pin IC socket. Fit the PIC chip into this socket and then fit both into the socket on the board. It is much easier to remove the
chip when it is held in a "carrier socket." You can remove the
chip with your fingers and it saves prying the chip out of the socket with a
screwdriver.
For a step-by-step discussion on how to program (burn) PIC16F84 chips with
the 5x7 "in-circuit" programmer, click HERE.
Go back to: Construction Part 1:
![]()