|
Fault Finding |
There are lots of faults
that can occur in household wiring, and many of them are covered in this
article.
The aim is to prevent faults from occurring by following our previous
discussions, but if a fault is occurs, here is what to do.
This routine also applies to COMMISSIONING the circuit (testing the circuit for
the first time), before power is applied.
If the mains has already been connected,
TURN IT OFF. Make sure no-one can turn it ON. Normally the
supply will not be connected - but if it is available, turn it OFF.
Any transformers from 15VA to 250VA can be used and if you do not have
identical transformers, you need 2 transformers with the same secondary
voltages. If one transformer has a number of secondary, tappings, select
the one that matches the other transformer.
CUTTING HOLES
24/4/2014
We will not be using the "MAINS" for any of our testing.
The supply we will be using is an isolated supply with very limited
current.
We call this a TEST SUPPLY and is produced via a transformer or a 12v to
240v inverter.
The capability of the TEST SUPPLY is 15VA to 250VA. It has the same
amplitude and frequency as the mains, but is isolated from the mains and
has a very small current capability, so any major fault will not cause
damage to the wiring.
Start the Testing or Commissioning process by turning all the switches
OFF.
This especially applies to fluorescent lights as
they exhibit a very high resistance when measured with a multimeter but
will come on when the supply is present.
Go to the fuse box and turn ON all circuit breakers except the incoming
breaker.
Measure between the bottom of the main circuit breaker and the incoming
neutral bar with a multimeter set to high ohms.
You should have a very high resistance and the needle should not move.
If it does, turn off one circuit breaker at a time until the resistance
increases.
You have now located the run to the short-circuit, leakage or powered
device.
Switch OFF the circuit breaker to the faulty "run" and measure between the top of the
breaker and the neutral bar with the meter set to low ohms. - in other
words, the Active and Neutral of the "run."
Remove all globes from the run because one of the switches may be manufactured
up-side-down and it is ON when the rocker shows OFF.
The resistance of the filament of a globe will be as low as 40 ohms when cold, so any resistance below 40
ohms (such as 0 ohms to 10 ohms) indicates a short-circuit.
Look at your wiring diagram and find the middle of the run.
Go to the switch in the middle of the run and un-twist the wiring.
This will eliminate half the run.
Keep halving the run until you find the fault.
It could be one strand of wire touching another or a fault inside a power
point.
You must get an OPEN CIRCUIT for the entire wiring of the house before you can
start.
Once you get an OPEN CIRCUIT you can check each light and power point.
For this you need a TEST POWER SUPPLY consisting of
an ISOLATING TRANSFORMER.
You can buy these but they are expensive.
A cheap alternative is to make your own.
Get two identical transformers and
connect the secondary of one transformer to the secondary of the
other.
![]()
an ISOLATING POWER SUPPLY
If you can only get 15vA transformers, you will only be able to test
each output with a 15 watt globe.
Put the two transformers in a box with a switch and add two jumper leads
with covered alligator clips.
You now have MAINS VOLTAGE but with only 15 VA to 250 VA capability. The
MAINS we are supplying is also isolated.
Connect either lead to the bottom of the incoming circuit breaker and
make sure this breaker is OFF.
Connect the other lead to the incoming neutral lead.
Get a 15 watt globe and insert it into a bayonet fitting and turn it ON.
Check the two-way switching.
Buy or make a globe on a plug, just like a night-light and plug it into
each of the power points.
Don't forget to check the power point in the cupboard for the
dishwasher, overhead fan, ignition for the gas cook-top and oven.
Make a note of all the outlets that do not work.
For every switch and every power point you will have an active-IN and
active-OUT lead.
Sometimes you will have two or more active-OUT leads and maybe one of
these is still sitting in the wall.
This is where your wiring diagram comes in.
For each switch you need and active-IN and active-OUT. These two actives
are joined together and taken to one terminal of the switch. The
neutrals are joined and also connected to the neutral going to the light
and these three neutrals are protected by inserting into a 30 amp double
screw connector.
The three earth wires are also twisted together and fitted into a
30-amp double screw connector.
Any metal light fitting must be earthed and even though a bayonet
fitting does not have any metal parts, the earth lead must cone
connected to the spare terminal so that if a metal light fitting is used
in the future, the earth wire is available.
The wiring of a "run" consists of "loops" called active loops and if one
is missing or a connection has been forgotten, the rest of the run will
not operate.
Your wiring diagram will help you locate the fault.
If a wiring diagram is not available, you need to take the switch-plates
off the wall and use your multimeter set to 250v AC. Probe the active
and neutral with the meter and watch the needle.
If you don't know where the Active-OUT is going, you will need a cable
tracer.
This is a very simple circuit made on a matrix board with a CD40106 IC
and a few components, called an RF TONE GENERATOR
This kit is available from Talking Electronics for $8.00 plus $4.50
postage.
You must turn OFF the supply and untwist the active, neutral and earth
so the Active-OUT cable is completely separated.
Connect the RF TONE GENERATOR to any wire and use a standard FM radio to
pick up the tone.
The tone has been specially set to be different from all the other
buzzing on the radio and you can tune across the band to pick up at least
three harmonics.
Select the strongest and move the radio across the wall and ceiling to
detect the presence of the cable. This will work up to about 5
metres from the transmitter.
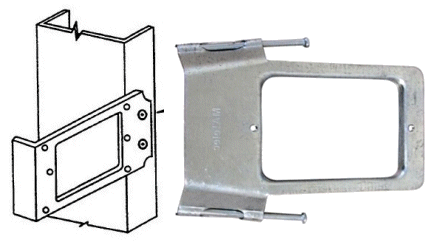
CUTTING THE RECTANGLE FOR POWER POINTS
Cutting the hole for a power point is quite easy.
Normally the cable will be pulled through a hole by the plasterer, but
if a lead is missing you can find the STUD BRACKET with a powerful
magnet.
Stud Brackets can be fixed to steel stud in a steel-frame house or woo
studs.
Use the magnet to fid the top, bottom and sides of the bracket and cut
into the centre and towards one of the edges. The rectangle of the
bracket will help you create the rectangle and don't forget the cut the
plaster away for the two fixing screws.
As a last resort, you may have to cut holes in the ceiling and walls to
locate the faulty cable.
If the house is not complete, you can open up a hole behind a round
fluorescent light fitting to look into the ceiling space or cut holes
sin the flooring above.
Drill 4 holes with an auger bit and cur between with a
reciprocating saw. Cut on an angle so the rectangle will fit back into
the floor without falling-through.
Use no-more nails to glue the piece back in place and keep the flooring
level by adding chips of wood in the cracks.
When cutting a rectangle in the ceiling or wall. back the sides of the
rectangle an odd shape so you can see which way to replace the
rectangle.
Glue small pieces of plaster on the inside of the rectangle and wait for
the next day.
Prepare the hole by cutting the edge of the plaster with a knife to make
a clean edge. FDO the same with the piece of plaster.
Glue the rectangle back in place with fairly thin mixture of filler,
making sure the type you use is easily sanded.
"Butter" around the edge of the hole and around the edge of the rectangle
with the filler and fit the piece
in the hole.
Make sure it is exactly flat with the plaster sheet.
Add a very thin layer of filler over the cut so you don't see it.
The filler can be sanded the next day with a large sanding plane with
120 grit paper and you will not be able to see the hole. Use 2 coats of
paint and make sure you brush-out any brush marks by painting in one
direction and finishing off at 90 degrees.
This is a 3-day job so leave plenty of time to do it and don't leave it
for the plaster or painter.