LOGIC
PROBE
with
PULSER
![]()
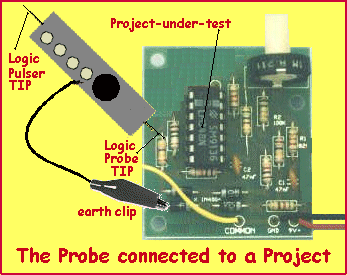
USING THE LOGIC PROBE
To use the Logic Probe section of the project, connect the "earth"
(the alligator clip on the lead) to the earth (0v rail) of the project you
are testing. Switch the Logic Probe ON and a short beep may be heard. Place
the probe tip on the earth rail to prove the Logic Probe is detecting a LOW
and repeat for the power rail. Since the power rail for the
project-under-test and the Logic Probe are separate, you need to make sure
the Logic Probe will see the power rail as a HIGH - that's the purpose of
the pre-testing we just covered.
Note: The project-under-test must be operating on a supply voltage of at
least 5v. If it works on a voltage as low as 3v, the Logic Probe will not
(may not) recognise the 3v as a HIGH.
This is one of the limitations of some Logic Probes - except those that
connect directly to the project-under-test.
You are now ready to take a test. Place the probe on one of the components
in the diagram below (or one of the tracks) on the project-under-test.
The Logic Probe will
emit either a HIGH tone, LOW tone or a beeping sound.
This will indicate, a HIGH, a LOW or a SIGNAL is present on the line.
power source and SWITCHED ON.
i.e: It must be turned ON.
The probe will produce a HIGH, LOW or Pulsed tone
from the piezo.
You cannot determine the frequency of the signal on a line, from the sound
emitted by the Logic Probe. It only indicates a signal is present. A "signal
line" is also called an "active line," or "digital line" and may be a clock
line to another chip or a "bus line" in a complex computer project. If you
need to know more details about the quality, frequency or pattern of the
signal, a CRO (Cathode Ray Oscilloscope) will be needed.
Go to:
Introduction to the Logic Probe with Pulser - discusses how the project
works etc
TESTING CIRCUITS WITH THE
LOGIC PROBE
The Logic Probe can also be used to test all types of circuits, providing
the waveform has an amplitude of at least 5v. In general, if the signal in a
circuit will trigger a microcontroller, it will also be large enough to be
detected by this Logic Probe.
Before using the Logic Probe for the first time, you must be sure it is
operating correctly. The 5x7 Display Project provides an ideal project to
test the operation of the "Probe."
Some of the lines of the micro in the 5x7 are turning on and off at a fairly
fast rate. Pins 6 to 12 drive the anodes of the LED display and these are
active when the display is illuminating. Probing these lines will activate
both the HIGH and LOW LEDs on the "Probe."
The clock line to the "shift-chip - a 4017" (pin 17) is activated for a very
short period of time and is low for a very long period of time (in computer
terms) and the HIGH LED on the "Probe" will glow fairly dull while the green
LED will be very bright. A faint beep will be heard from the piezo along
with the high tone.
A very brief pulse can be detected on the reset line to the 4017 (pin 18)
and this will prove the Logic Probe is capable of detecting a glitch or
pulse.
When the Logic Probe has been tested for performance, it is ready for
testing "unknown" circuits.
![]()