LOGIC
PROBE
with
PULSER
![]()
USING THE LOGIC PULSER
The low frequency consists of an ON-OFF pattern that turns a LED on and off
approximately two times per second. Every alternate ON period consists of a
number of HIGH-LOW waveforms that will turn the LED and off very quickly,
(about 1,000 times per second) but our eye cannot detect flickering above
about 10 pulses per second and thus the LED appears to be on for this part
of the cycle.
The Logic Pulser produces a square wave suitable for clocking digital chips.
The diagram below shows the waveform produced by the Pulser. Two
different frequencies are contained within the one waveform.

If the waveform is injected into a speaker, it will respond to this
waveform and produce a tone. The result is we can use the one waveform
for two different tests.
To use the Logic Pulser, connect the negative lead (or "earth"
lead) of the Pulser (the lead
with the alligator clip) to the negative rail of the project-under-test.
Switch On the Pulser and also the project you are testing.
The output of the Pulser is 5v and the current is limited to less than 25mA,
via a built-in 100R resistor.
This means you can probe almost any component, transistor or chip
without fear of damage.
If you touch one lead of a LED, it will blink at approx 2Hz. If this
does not occur, try the leads around the other way. Normally a LED is connected to
the negative rail of a project. If it does not illuminate, you can safely say
it is faulty.
If you touch one lead onto a speaker, (with the earth clip on the negative
of the project), the speaker will emit a low-level beeping. Probing though
the driver transistor (if the project has a driver transistor) will produce
a louder output.
The Logic Pulser will also clock digital chips as well as micro-controllers
by placing the tip of the Pulser on the clock line. In other words, the
Pulser will take the place of an external oscillator, and the chip will
increment or count (or a micro will
advance to the next instruction). But since a micro normally operates at
approx 4MHz, the program will advance at a very slow rate,
since the Pulser is injecting at less than 1kHz.
The Logic Pulser can also be used to test circuits such as shown below. The
diagrams show where to place the probe. The earth lead must be attached and the circuit-under-test
must be switched ON. The
Logic Pulser will "get the circuit working."
In other words it will send a pulse to the micro and the program in the
micro will produce an output. In some cases the circuit will not respond to
the pulses produced by the Logic Pulser. The program in the Micro
may be very clever and reject anything other than the expected pulse from a device
such as a glass breakage detector or a pressure mat, etc.
The way the Logic Pulser works is this: The signal out of the Pulser is
STRONGER that the signal on the line in the circuit-under-test. In
other words the signal from the pulser has a HIGHER CURRENT but the current
is not high enough to damage any of the circuitry, just high enough to
take-over the circuit on the PC board and change the state of the line.
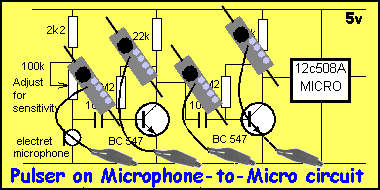
There are 4 points on this circuit to inject a signal with the Pulser.
Start at the Micro and work back to the microphone.
This way you are using the Micro to "prove" the circuit is
working.
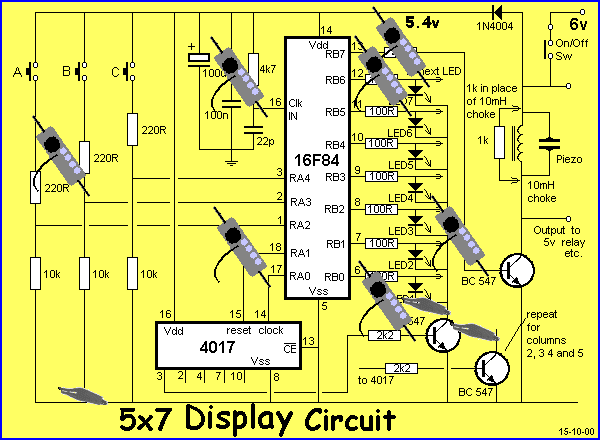 There are many points
on the 5x7 Display project that can be tested with the Logic Pulser. The
There are many points
on the 5x7 Display project that can be tested with the Logic Pulser. The
earth clip must be connected to the negative rail and both the Pulser and
5x7 Display Project
must be turned ON. Each individual LED can be tested with the Logic Probe by firstly
connecting
the earth clip to the collector of the "sinking" transistor as shown in the diagram
above.
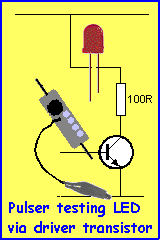
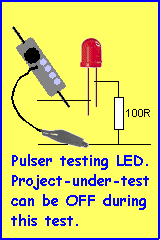
The Pulser can be used to test a LED. When testing via a
driver transistor, the project-under-test must be ON.
If the LED does not have a driver transistor, the project-
under-test can be OFF.
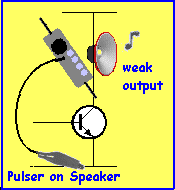
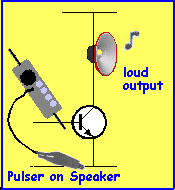
When testing a speaker, the Logic Pulser is placed on the
collector
of the driver transistor. The current from the Logic Pulser will
produce
a low-level output from the speaker. The probe is then placed on the
base
of the driver transistor and the output from the speaker will increase.

This diagram
shows how the different parts of the Pulser waveform
drive the LED and speaker. The LED only sees the HIGH-LOW @2Hz
and the speaker only sees the 1kHz waveform @1Hz intervals.
This is only a few examples of how to use the Logic Pulser.
It is called a Logic Pulser because the amplitude from the Pulser is capable
of clocking digital circuits - the signals are at LOGIC LEVEL.. The Pulser can also be called a SIGNAL
INJECTOR however the term Signal Injector normally refers to an audio or RF
signal injector and these have a low output (amplitude) and the waveform
will not (may not) clock a digital circuit.
The Logic Pulser can be used to test Audio circuits - such as amplifiers and
radios.
When testing an amplifier, the process is to start at the output and work
your way towards the font-end.
In this way you can use the speaker to determine if each stage is working.
If one channel of a stereo amplifier is faulty, you can use the good channel
to provide a reference. Turn the amplifier ON and start at the output by
injecting into the speaker. As you work your way towards the input,
the tone from the speaker will increase.
When probing IF (Intermediate Frequency) stages of radios, the square-wave
nature of the waveform will pass through the IF coils and you can test all
the stages.
Go to: Introduction
to the
Logic Probe with Pulser - discussion on how the project works etc
Go to: Using
the Logic Probe - Using the Logic Probe to test circuits
![]()