|
Mains Tracer |
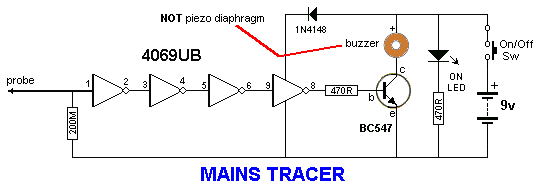
This project is one of the projects that has been designed to
support our article:
Become
An Electrician. It's a guide for those who want to
become an Electrician.
Having tried many of the Mains Detectors on the market, to
find they are not sensitive enough, this project was designed
with a number of improvements. The output is a buzzer, rather
than a LED to give a very good indication of the level of
electromagnetic radiation. The buzzer has an
internal coil and transistor, to produce a self-contained oscillator. It just
needs DC to activate. It is not a piezo diaphragm and has NO
piezo element inside the case. It is a metal diaphragm.
A MAINS TRACER is essential when trying to find a cable.
It works on cables in ceilings and walls. It will chirp when the
light-switch is turned-on and pick up the AC in a power cable.
When the probe is near electromagnetic radiation, the buzzer
reacts and this allows you to accurately
detect the location of the cable.
You can also detect the enormous amount of activity around a
computer (mainly the keyboard) and this may account for the
common occurrence of headaches.
You can also check for activity around the head of a bed to see
if electrical wiring in the wall is influencing your
night-sleep.
It will detect signals up to 30cm and is the most sensitive
detector of all those tested.

CONSTRUCTION
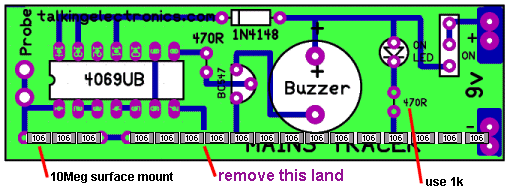
All the parts fit neatly on the PC board.
The IC fits into a socket with the cut-out shown on the overlay.
The placement of the transistor is also shown.
The buzzer must be connected with the positive on the buzzer going to
the hole with the "+" sign. The diode must be fitted with the
line on the body down the correct hole and the LED has a shorter lead
(cathode) down the hole marked with the arrow-head on the symbol.
The most crucial item to connect is the battery snap. The "cup" on a 9v
battery is the negative, but we are making a RECEIVING snap, and the
"cup" is the positive. You must look at the diagram to see how
this is connected.

MODIFICATION
200Meg resistors are not very common and it
is necessary to make a value as close as possible to this value by using
a number of 10 Meg surface mount resistors.
Here is the way to place 17 x 10Meg surface mount resistors on the
board:

The land on the top of the board in the
position shown in the diagram above must be totally removed and any
traces of the plate-through hole material must also be removed from the
top surface so the surface-mount resistors do not contact the 0v rail at this
location.
Start at one end of the board and place a resistor. "Butt-joint" the
next resistor to it so that as many resistors as possible can be placed
along the board. We are aiming for 200Meg or as near as possible.
The value of this resistor is very important as the input impedance of
the chip is very high and anything less than 100M will load the input
and reduce the sensitivity of the probe.
The 470R resistor for the LED can be increased to 1k as we are supplying
a high brightness LED in the kit.
MODIFICATION-2 VERY HIGH SENSITIVITY


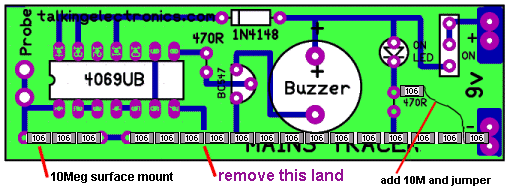
The completed project with the mods to make it
VERY SENSITIVE
The sensitivity of the project can be increased by putting a "set" on
the input voltage so the probe responds to a smaller waveform.
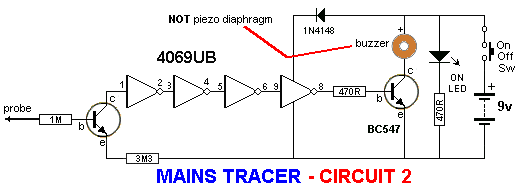
MAINS TRACER -
CIRCUIT-2
The Mains Tracer MkII PC board:
Both PC boards are included in the kit with all the components. You can
decide which board you wish to populate.
This is done by adding a 10M resistor into the resistor on the front end
to provide about half-rail-voltage to the input.
This will mean the input only has to rise and fall a few volts to
change the state of the gate.
The "set" does not turn the buzzer on, but when the probe is placed in
an area of electromagnetic interference, only a small amplitude signal
is needed to alter the tone from the buzzer.
The probe will detect interference from the keyboard of a lap top at 20
cm and household wiring at more than 30cm.
You can check the radiation from the screen of your TV and from the
"Smart Meter."
The following circuit shows how to produce a high input
impedance using a transistor in emitter-follower mode.
It produces the same high impedance as the circuit above, without having
to use the string of 10M resistors.
The only problem is the circuit is not biased to create the
super-sensitivity of the circuit above.
You have a choice of building either circuit. 

|
MAINS TRACER |
|
1 - 470R 1 - 1k for LED in place of 470R on PCB 1 - 1M 1 - 3M3 20 - 10M surface mount resistors 1 - 1N 4148 diode 1 - 3mm red LED 1 - battery snap 1 - CD 4069UB IC 1 - 14 pin IC socket 2 - BC 547 transistors 1 - buzzer 1 - mini slide switch 1 - 20cm fine solder 1 - 10cm tinned copper wire for battery snap 1 - 20cm 0.61 enamelled wire for probe 1 - Mains Tracer PC Board MkI and MkII (both boards supplied) Not in kit: 1 - 9v battery |
29-5-2014