Go to: Talking Electronics
METAL
DETECTOR-1
A fun metal detector to find coins at the beach
All the parts for the PC board, PC board, battery and winding wire $10.00
including pack and post. You will also need an AM radio, base-board to
mount the parts and a wooden handle approx 1.5 metres long.
See also Metal Detector MkII
See this site for lots
of projects on metal detectors:
Geotech
See also our:
Metal Detector Article
Kit for
Metal Detector kit MkI $10.00
plus postage
![]()
GOLD
DETECTOR!
This project has not been called a GOLD! detector as this name
has been left for the more complex detectors that actually
discriminate been gold and other metals. There is an enormous difference between detecting
gold and ordinary metals (called base metals). Apart from the fact that gold is over 1000 times more expensive, its magnetic
differences are such that we can produce a metal detector that will
discriminate between metals, both ferrous and non ferrous, and GOLD!
Gold detectors have come a long way in the past 15 years, especially
during the rapid rise in gold prices, about 10 years ago.
At that time, "GOLD!" was on everyone's lips and as its price soared,
GOLD FEVER took over and fossickers by the thousands took to the countryside
to try their luck.
In areas where gold was found some 100 years ago in Australia, the country was
dotted with prospectors combing the hills and flood-plains with
gold detectors.
Encouraged by reports of sizeable nuggets being discovered, buyers
flocked to purchase gold detectors. Prospecting shops sprung up
everywhere and offered detectors not much more complex that this
model with an amplifier (the equivalent to the AM radio), for
$299! You may laugh, but when gold fever strikes,
people do the craziest of things.
The chance of picking up a nugget
of gold is a million to one. This is because the ground where they
are found is quite often filled with iron and other minerals that
will affect the reading of electronic detecting equipment and reduce
their sensitivity. To overcome this we must employ very sophisticated
circuitry so that only the "signature" of gold is registered on the
equipment.
As you can imagine, detecting the difference between an aluminium
ring-pull from a small nugget is an almost impossible task as ring-pulls
are generally closer to the surface and swamp the minûte signature
of any lumps of gold that may be buried deeper in the ground.
Also the background effect of the minerals in the soil has to be
cancelled and when you do this, you lose some of the sensitivity of
the detector. The answer is to tune the equipment for the terrain
you are covering so that it is at peak performance. This requires
a fair degree of skill and that's why more advanced detectors
are available on the market.
To start you in this interesting field we have designed a very simple
detector. It only requires a handful of components and an evening's
work.
This way you will learn electronics while being able to go out and
find something valuable.
It's not only gold that's worth finding but a whole range of items
including money, jewellery, metal objects and things that have been
lost for 100 years or more.
One of the best places to search is the beach. Lots of things are
lost in the sand every year and it's very easy to scan the surface
with a detector and dig them up.
Because this project is very simple we have not called it a gold detector
as it cannot discriminate between any of the base metals and gold.
Instead, the word "gold detector" can only be introduced with a more
elaborate model where some form of discrimination is available.
We have called this design a "metal detector" as it lets you know
when anything of a ferrous or non-ferrous nature is placed in the
field of the coil.
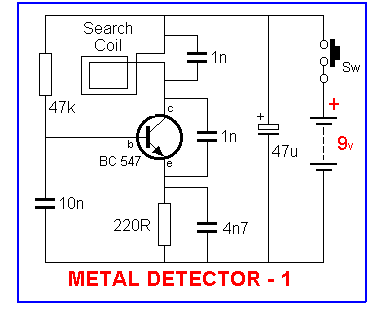
HOW THE CIRCUIT WORKS
We will start the discussion when the conditions have settled down
after a few cycles and the voltage on the base of the transistor is
stable (fixed by the "holding" or "resisting" action of the 10n capacitor).
The circuit is an oscillator and the way it keeps oscillating is due to positive feedback. This is the case with all oscillators and
the component that provides the feedback is the 1n capacitor between
the collector and emitter of the transistor. It may seem unusual that
the transistor can be turned on via the emitter to keep it oscillating,
but in fact it does not matter if the emitter or base receives a
signal as the important factor is THE VOLTAGE DIFFERENCE between these two
terminals.
If the base is kept fixed and the emitter voltage is reduced, the
transistor sees a higher voltage between the base and emitter and it
is turned ON harder. If the voltage on the emitter increases, the
transistor turns OFF as the difference between the two is reduced.
This is exactly what happens in this circuit. The 1n capacitor between
the collector and emitter influences the voltage on the emitter to
turn the transistor on and off. It does this by constantly monitoring
the voltage on the tuned circuit and passing the change to the emitter.
In this project, the TUNED CIRCUIT is the parallel components consisting
of the inductor (the search coil) and the 1n capacitor across
it. This is called an LC circuit in which the L is the inductance of the inductor
in Henries (or mH or uH) and C is the capacitance of the capacitor
in Farads (or uF or nF or pF).
We start when the transistor turns ON and allows a pulse of energy
to enter the tuned circuit (later you will see how the transistor
turns on).
The pulse of energy (current) starts by trying to entering both the
coil and capacitor. You would think the coil has the smallest resistance
but the capacitor is uncharged and presents a theoretical zero resistance
and begins to charge. When a small voltage appears across it, you
would think the coil would become the least resistance as it consists
of only a few turns of copper wire.
But the wire is wound in a coil and forms an inductor (it has inductance).
When a voltage is applied to it, the low resistance of the inductor
allows a current to flow but this current produces magnetic flux that
cuts the turns of the coil and produces a back-voltage that opposes
the incoming current. It works like this: Suppose you supply 200mV
to the coil. The back voltage it produces may be as high as 199mV
and thus you only have 1mV with which to push current into the coil.
If the resistance of the coil is 100milli-ohms, the current will be
about 10mA. The capacitor will accept more than this and so
it gets charged first.
As the voltage on the capacitor increases, it presents its voltage
to the inductor and allows a current to flow (at
a rate which the coil will accept) to produce magnetic flux. This flux is called electromagnetic lines of force and creates an expanding
field. The capacitor cannot provide energy for very long and after a short
time the current reduces and this causes the magnetic field to
begin to collapse.
The collapsing magnetic field produces a voltage that is opposite
to that originally supplied to it and the bottom of the coil becomes
positive with respect to the top.
If we think of the coil as being a tiny battery we see it adds its
voltage to the 9v of the supply and the collector end of the coil
becomes higher than 9v.
This voltage is detected by the 1n feedback capacitor (between the
collector and emitter) and it passes the voltage to the emitter where
it increases the emitter voltage. The base of the transistor
is kept stable and fixed by the holding action of the 10n capacitor
and the transistor turns off slightly. This action continues and
eventually the collector
can be considered to be removed from the circuit so that it puts no
load on the tuned circuit. When an inductor is not loaded like this,
the collapsing magnetic field will produce maximum voltage.
This is the case in the circuit above and as the magnetic field collapses,
it produces a voltage (about 25v) that is considerably higher than
that applied to it. This voltage is passed to the "C" component of the tuned circuit (the 1n capacitor connected across the coil) and
the capacitor charges up.
When
all the magnetic flux has been converted to voltage the capacitor is
charged and it begins to deliver this charge back to the coil. In the
process, the voltage across the capacitor is reduced and this voltage
is detected by the 1n capacitor across the collector emitter terminals
of the transistor. The result is the voltage on the emitter is reduced
and the transistor is turned on slightly to deliver a pulse of energy
to the tuned circuit.
This is when another pulse of energy is injected into the system and
the cycle repeats.
The frequency of the circuit is about 140kHz and is set by the inductance
of the coil and the capacitor across it.
When we place a piece of metal in the magnetic field of the coil, some of the lines of flux pass through the metal and are converted
to an electric current called an EDDY CURRENT in the metal.
This means we lose some of the magnetic flux and so there is less
available to return to the coil when it begins to collapse. This means
the reverse-voltage produced by the coil will be lower and so the
capacitor will take less time to charge to its maximum value. Thus
the transistor will be turned on sooner and so the frequency of the
circuit increases.
The flux produced by the coil is electromagnetic radiation identical
to radio waves of the same frequency. If we place a radio near the
coil and tune it to a harmonic, the two frequencies
will "beat" together and produce a "quiet spot" on the radio.
When a piece of metal enters the field of the coil, the frequency
changes slightly and a low-frequency tone is emitted from the speaker.
A shift in frequency of as little as a few hertz will be clearly heard
and this is why the circuit is so effective.
The sensitivity of the coil depends on making the circuit change frequency
at the slightest insertion of a metal object. This requires operating
the transistor at an amplitude that is not overdriving it, so that
the slightest injection of a piece of metal into the field will alter
the frequency.
It is important to note that the AMPLITUDE of the waveform is also
reduced when a piece of metal is introduced but the radio is not set
up to detect this. Other metal detectors detect the drop in amplitude and
later you will see how the two circuits compare.
1. Glide your "mouseover" the boxes
above and study each frame. 2. Hold mouse on box for "description." 3.Mouseover:
for animation.
There
are many ways to explain how the circuit works and all of them are
technically correct.
Here's an animated way to describe the cycle. The transistor is only
turned on when the voltage across the capacitor is negative on the
bottom plate. This is when the voltage on the capacitor is added to the
voltage of the supply and passed through the 1n capacitor across the
transistor to reduce the voltage on the emitter. The transistor turns
ON and delivers a short burst of energy to the TUNED CIRCUIT.
The 4n7 on the emitter charges slightly during this action and the
voltage on the emitter rises to turn the transistor OFF.
The charge on the capacitor is passed to the coil and it produces
expanding magnetic flux. The capacitor runs out of charge and the coil
collapses. The collapsing magnetic flux produces a voltage in the
opposite direction and this is passed to the capacitor.
During this part of the cycle the voltage on the capacitor is not of
the correct polarity to turn the transistor on and it remains
OFF.
This is the part of the cycle when very little load is placed on the
tuned circuit and the voltage produced by the coil can be higher than
the applied voltage. The capacitor then delivers its charge to the coil
and the cycle repeats.
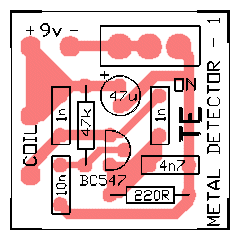
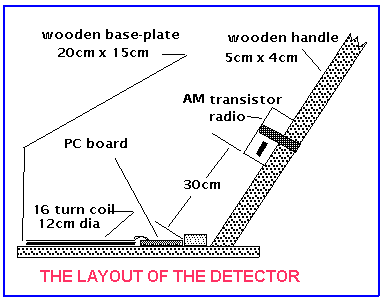
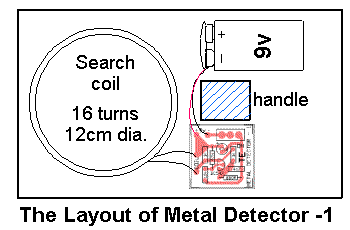
CONSTRUCTION
All the parts fit on a small PC board with two wires from the coil and two from the battery.
| PARTS LIST 1 - 220R (red-red-brown-gold) 1 - 47k (yellow-purple-orange-gold) 2 - 1n greencaps (102) 1 - 4n7 greencap (472) 1 - 10n greencap (103) 1 - 47u electrolytic 1 - BC 547 transistor 1 - slide switch 1 - 9v battery snap 1 - 9v battery 6.5m winding wire (gauge not critical) METAL DETECTOR-1 PC board |
|
The search coil is made by winding 16 turns around a circular object
12cm diameter. This can be a juice bottle or even a square object
as the coil can be made circular afterwards. Use 4 pieces of sticky
tape or electricians tape around the turns to keep them in place and
glue the coil to the base board with silicon sealant.
The base-board has a wooden handle screwed to it at an angle of 60°.
You will also need a small transistor radio taped to the handle near
the base so that it can pick up the field from the coil and detect
when the frequency of the oscillator changes. The diagram below shows
the best layout.
TRYING IT OUT
Connect the battery and turn the transistor radio on. Tune across
the dial and you get a number of spots where the radio will produce
a whistle as a result of its local oscillator beating with the output of the coil of the detector.
We got the best result at about 1400kHz and this is where the tone
could be adjusted to a very low frequency.
When the detector was swept over a 20¢ coin at about 10cm, the change
in the tone could easily be detected.
The frequency of the oscillator of the metal detector will change slightly as the battery voltage falls and as the temperature of the
circuit increases on a hot day.
This can be compensated by adjusting the frequency of the radio so
that the tone is kept as low as possible.
You are now ready to go out and try your luck.
IF IT DOESN'T WORK
If you don't get a squeal from your radio after tuning the entire
band, the fault will lie in the oscillator.
This could be due to the transistor not having sufficient gain to
produce oscillation or some of the parts not soldered correctly.
Try switching the circuit on and off quickly to spark it into action.
If this doesn't work, check the wiring and make sure there are no
shorts between the tracks.
If you have taken too long to solder the transistor or used a very
hot iron, it may be overheated and its gain will be reduced. This
will prevent the oscillator starting up. Replace the transistor and take more care with soldering.
The winding wire for the search coil is insulated with enamel to prevent
the turns shorting against each other. But if you damage this coating
by scraping or kinking the wire you may get two turns where the copper
is touching each other. This will create a shorted turn and prevent
the oscillator working. You must prevent any damaged sections touching
each other.
Do not wind tinned copper wire around the coil to hold the turns
in place as this will create a shorted-turn and prevent the circuit
from oscillating.
It's best not to have any metal items near the coil as they will reduce
its effectiveness. This includes nails and screws in the base-board.
Metal objects that are away from the centre of the field are ok as
they will have no effect.
CONCLUSION
We have found the circuit to be extremely reliable and self-starting.
If you are experiencing any difficulties, it's best to put another
kit together kit as you may have damaged a capacitor or the transistor
and these are extremely difficult to diagnose.
We haven't found any valuable items with our detector but I hope you
do.