P4
Hee Haw Sound
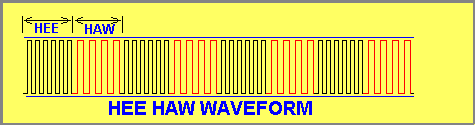
This experiment creates a Hee Haw sound for an alarm. The diagram shows the number of cycles for the HEE and the time taken for each cycle, equates to a certain length of time. The frequency of the HAW is lower and the number of cycles must be worked out so that the time for the HAW is equal to the time for the HEE.
This is simple when writing the program. The values loaded into the two files for the HEE are reversed for the HAW.
The routine consists of two sections: HEE and HAW. Each section has two nested loops. The inner loop creates the length of time for the HIGH and LOW to produce a single cycle and the outer loop creates the number of cycles.
|
||||||
EXPERIMENT 8
A to D
Conversion
This experiment shows 0-256 parts of a 10k potentiometer on the 8 LEDs. It is
not accurate, but shows the concept of A to D conversion.
Many microcontrollers have an input that can read any value of voltage from 0v
to 5v (and higher by using a voltage divider network). Normally there are 256 steps in this range to produce a resolution of
approx 20mV for 0-5v scale. This is called an A to D input (A to D converter - analogue
input) and is ideal for measuring voltages and other values that are
classified as ANALOGUE. A very simple external circuit can
be added to measure different parameters such as the change in resistance of a temperature
probe and other analogue devices.
The PIC16F84 does not have an internal A to D converter, however we can create an A to D
feature by using two lines and a sub-routine.
To create an analogue input, a capacitor
"C" is connected in series with an unknown resistor (R) and
charged via one of the lines of the microcontroller. The diagram below
shows how this is done.
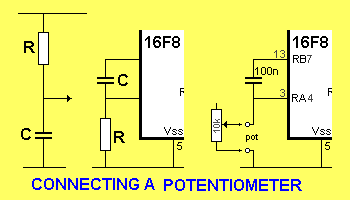
The first diagram shows a resistor
and capacitor connected in series. This is called a TIME DELAY circuit. The
capacitor is initially uncharged and the resistor charges the capacitor to
a specified value. The time taken to reach this value is called the Time
Delay.
The mid-point of the two components is called the "detection
point."
It does not matter if the resistor is above the capacitor or below. The same
Delay Time (or a similar time) will be produced.
In the second diagram the capacitor is above the resistor and if the
top line is taken HIGH, the voltage at the detection point will fall to
a specified value after a Delay Time.
If the value of the resistor is changed, the time taken for the voltage at the
detection point to reach a specified value will alter.
That's exactly what happens in the third circuit above.
The micro monitors the voltage on the detection point and when it reaches the
lower threshold for the input line, the program displays the
"count-value" on the 8 LEDs.
The other feature that has to be worked out is the time taken for the
capacitor to charge. In our circuit, the capacitor has charged before 255
loops have been executed (when the pot is at maximum resistance) and we cannot
same at a faster rate, so the maximum display-value is "DF." To
obtain a full reading, the capacitor will need to be increased in value.
|
||||||
EXPERIMENT 8a
Measuring Resistance
This experiment
measures resistance. You can get very low-cost digital multimeters to measure
resistance and display the value on a four digit display. We cannot compare with
cost and complexity of this type of display, but our circuit has other
features. It will activate a device when a particular value of resistance
is detected. This allows measurement of degrees of rotation of a potentiometer
or the conductivity of a liquid (via two probes), plus many other areas where
resistance values change.
Our demonstration program uses a potentiometer to detect resistance in the
range 0k to 10k however any other range can
be read, by changing the value of C. The accuracy of the circuit is determined
by
the tolerance of C (most capacitors are 10%). The time taken to produce a
low on the input is used as a jump value in a look-up table
and a display-value is obtained for the 7-segment display. For
simplicity, the values 0 to 9, plus "-" overflow, are displayed.
Further experiments show two and three-digit accuracy.
|
||||||
EXPERIMENT
9
Pulse
Detection with a coil
This experiment
uses a coil to detect pulses. A magnet is moved past a coil and this creates a
voltage in the turns of the coil.
This is ideal for picking up the rotation of a shaft. It is non-mechanical and
will have an infinite life.
Reed switches have a very short life when used rapidly to detect shaft rotation and
have a fairly low speed of operation.
The output voltage of a coil is fairly low and needs two stages of
amplification for the signal to be large enough to be detected by the input of a microcontroller.
The clever arrangement on the front end of the analogue amplifier of the PIC
LAB-1 board allows a microphone or coil to be fitted. The coil does not
require the resistor, (it is required by the electret microphone) however it does not affect the operation. This
demonstration program increments the 7-segment display.
This allows a count-of-ten however experiments on the web include a 2
and 3-digit readout from the 7-segment display and an RPM counter.
The advantage of a magnetic pickup is the lack of switch-noise. The
pulses from the pick-up are very clean but must be debounced for low-speed
detection. The 2-stage
amplifier increases the sinewave signal and over-amplifies it to produce a
rail-to-rail signal commonly called a square-wave or digital signal.
|
||||||
EXPERIMENT 10
Temperature
Detection
There are many
expensive devices
to detect temperature (thermal probes) but the cheapest is an ordinary
diode.
The voltage across a diode decreases 2mV for each °C rise in temperature.
Providing a sensitive circuit is connected to the diode, a temperate change
can be detected.
There is a problem with temperature-detecting circuits. The
transistors in the circuit also have semiconductor junctions and the voltage
across them changes at the same rate as the diode. This will upset the
detecting process if the circuit and the detector are increasing in
temperature at the same time and if some form of compensation is not included.
The amplifying circuit must be protected from a temperature-rise or some form
of thermal cancelling must be included, if you want an accurate readout.
For simplicity, we have not provided any stabilizing circuit in this
project. We are assuming the interfacing circuitry is not subject to
temperature variations. On the PIC LAB-1 PC board, the base-bias circuit
for the amplifying stage (for the "temp probe") has a fixed reference voltage
produced by
the natural characteristic of 2.1v across a green LED, making a total
reference voltage of 4.2v.
This goes part-way to the design of a stable amplifying stage.
The display shows in binary on the 8 LEDs. This gives a readout of 255
divisions and the circuit is so stable that the display will remain
static.
The first thing you can do is fit the 10k pot to the "Temp Probe"
input and rotate the shaft.
You will need to turn the shaft very slowly until you see the display begin to
change. As the resistance of the pot is reduced, the display will start
to fill up and at FF, it will be full. If the resistance is reduced further,
the counter-file 0C will fill for the second time and produce a false reading.
This is something that has to be prevented in a final version.
The pot has only a very small range where it is effective as it is simulating
the voltage across a forward-biased diode and our tests showed this to be
500mV at room temperature. Remove the pot and fit the diode. A readout of approx mid-range
will be produced.
The readout on the display increases as the temperature increases since the
program INCrements the count-file 0C. By DECrementing the counter-file 0C, the
display will decrease as the temperature rises.
The diode is so sensitive that a slight amount of warm air over to it will alter the
display.
If you touch one leg of the diode, the heat of your finger will also alter
the display.
Try not to touch both leads at the same time as the resistance of your
fingers will upset the reading. Bring a hot soldering iron near the diode
will cause the display will change - proving the diode is very sensitive to
temperature change.
The display is not graduated and this is something we will provide in a future
experiment. There are two parts of the program that will
need to be worked on, to produce a display. One part determines the
temperature and the other determines the resolution - in other words the
number of increments (or divisions) for each degree C or F.
The results are then placed in a table.
|
||||||
EXPERIMENT 11
Sound Detection
There is an enormous
range of possibilities with this application. You may want to detect a
low-frequency sound, a specific frequency, a length of
tone or a combination of audio signals.
All these applications are possible with a microcontroller as the program does
all the "sorting out" and you can display the result on a LED or a
piezo.
Sometimes the design of the amplifying stages can assist in detecting a
particular frequency or amplitude. More details are provided on the website.
To see the display respond to sounds picked up by the microphone, load the
program for Experiment 9 and fit the microphone to the "mic/coil"
input. The 7-segment display will increment rapidly when HIGH's and LOW's are
being detected.
Experiment 11 is an improvement on Experiment 9.
A LED is turned on for 1mS each time a HIGH is detected.
Any noise picked up by the microphone is amplified by two transistor stages
and converted to a digital signal. The signal is OVER-AMPLIFIED (to a point of
distortion - but this does not matter as we are not listening to it as an
audio signal) so
that the amplitude is guaranteed to pass the upper and lower thresholds of the
input.
The program detects a rise and fall in amplitude of the signal to identify a
complete cycle. The program actually detects NOISE and further programs on the
web detect frequency (such as a whistle) to produce a result.
|
||||||
EXPERIMENT 11a
Sound-to-Frequency
This experiment
converts Sound (such as a whistle) to Frequency. The row of 8 LEDs show
the frequency as a binary value. The scale is not calibrated. The program
shows the application of the internal timer (TMR0). It is set to count in the
background (with a pre-scaler). The pre-scaler divides the clock frequency by
256 in our case and when the timer rolls over from FF to 00, the timer
overflow flag (T0IF) is SET. This flag is checked in the program for a
"time-up" signal.
|
||||||
To Top
Next Page