TALKING ELECTRONICS
Interactive
Discussion-3
1
2
3
4
5
6
7
8
9
10
11
12
13
14
15
The place to start in electronics is "construction."
The first thing to do is get the feeling of handling components and try your hand at soldering.
Even if you don't know the function of any of the components, the greatest sense of achievement is to put something together and see it work.
This is the heart of our "reverse" method of instruction. It mirrors ever-day life.
That's why we suggest you build something and work your way back to understanding how it works.
It's always nice to have an "end product" so you can see what you are working towards.
This approach can work equally-well at school or at home.
These pages are ideal study-material for an electronics class. Inform your electronics teacher of the site and I am sure it will form part of your curriculum. Although the approach is entirely revolutionary, the outcome will be surprising.
It has been structured to work in exactly the same way as your employment as an apprentice. You will be asked to take up a challenge (carry out a task) and then you will have to work your way back to understanding the elements of the task.
To help you in this, all our projects include a "circuit description" and "How the circuit works." Each component is identified in our Library of Symbols and nearly every project has a section: "If it doesn't work."
This is the first time a project has the section: "If it doesn't work."
Everyone expects a project to work the first time it is turned on, but this is not reality. You may have missed a solder joint, or placed a component in the wrong place, or over-heated a semiconductor. This is the time when you will need some assistance.
In fact, this is the time when you will start to LEARN. That's why fault-finding is the most important part of electronics. It's the time when you really get to understand the concepts. Our aim is to make sure everything you put together, works perfectly.
Once you get it working and find out a little about the operation of the circuit you can carry out some simple experiments.
By taking a resistor (the same value as one of them on the project), and connecting it across the same value on the board, you will be able to see the effect of halving the value. Repeat this with each value on the project and see what happens. Almost any circuit will work with a reduced value of resistance, but you cannot try any value across any resistor as this may cause the circuit to mal-function.
By doing the same thing with each of the capacitors, you will be able to see the effect of doubling the value.
This will produce quite interesting results and you will get some idea of what each component is doing. You can solder the components on the underside of the board and introduce two components at the same time. This is exactly what we do when designing a circuit, to make sure the values are the most suitable for each location.
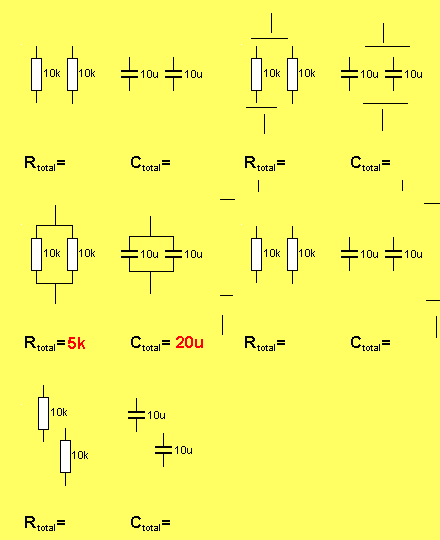
The animation below shows the effect of connecting two resistors or two capacitors in parallel or series.
Although this looks like a simple example, it forms one of the most important concepts in electronics.
When you are placing a resistor across another resistor, it is important to know the combined resistance is decreasing. It is also important to know if the capacitance is increasing or decreasing when you place two capacitors across each other.
The following animation shows how the values change:

Capacitors and resistors
in parallel and series
The next step is to investigate the function / operation of each
component.
One of the first "active" components to investigate is the transistor.
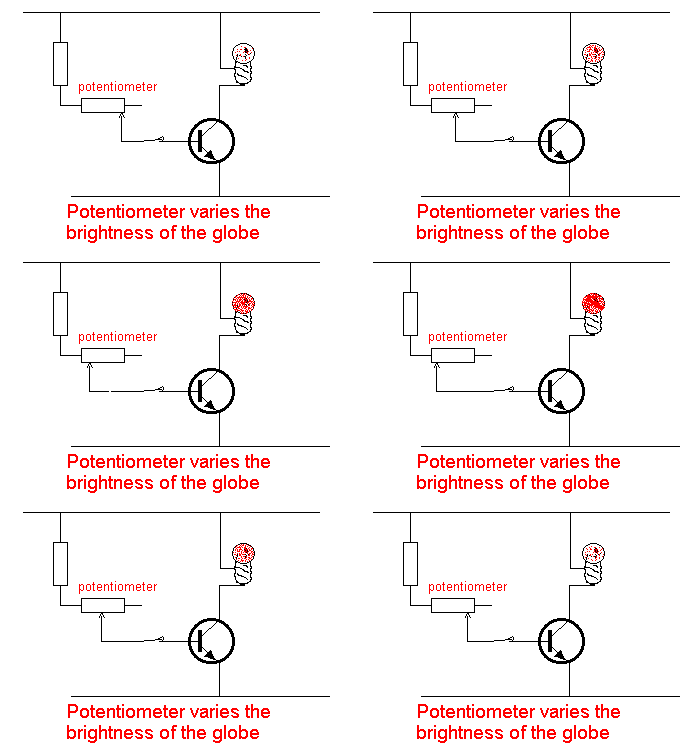
Here is a very simple explanation of how an NPN transistor works:

As the current into
the base is increased, the current through the collector-emitter
junction increases and this illuminates the globe. More simple
explanations like this are presented in our Basic Electronics Course.
This course is in the subscription section of this site and
the first 3 pages are available via the index on the left. This will give
you some idea of the layout. It includes animated circuit
diagrams and links to other parts of the course.
These are features that a text book cannot offer and we are using the
web to present information in an entirely new way.
If you already have an understanding of basic electronics, you will want
to go to our section on Microcontrollers.
This is covered in the next Discussion.