 |
See also
INDUCTANCE
where you will learn about how much energy an inductor holds, called
INDUCTANCE. And some of the amazing things an inductor can do when an
alternating voltage is applied.
| An inductor can be a single turn of wire: | |
 |
|
| or many turns: | |
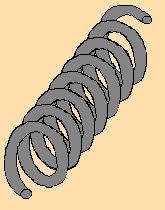 |
It can be wound on a plastic former (plastic spool)
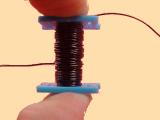
. . . on a metal core, or an air core:
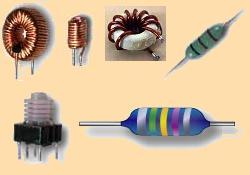
An inductor can be almost any size or shape and is
the most complex component in electronics.
Even winding a toroid is an amazing process. Here is a diagram of a toroid
winding machine:
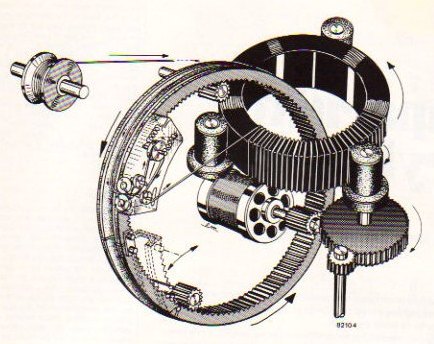
The theory of an inductor is so complex, it could fill a book. And the theory is very
complex. That's why we will only
cover the basics. We will not go into magnetic fields or North or South
poles or Left or Right-hand rules as these do not involve us when we
talk about a coil of wire in an electrical or electronic circuit. The most important thing is the
MAGIC of an inductor. It produces a large voltage of opposite polarity when
operating under certain conditions. Here are some inductors and their value:
Here are some more inductors:
The 6 inductors above give you some idea of the number of turns needed to
produce a particular value of inductance. This is only a guide as you are
not shown the size of the inductors or the core material. In fact the same
value of inductance can be produced with more turns or less turns on a
different core material and a different core-shape - such as a bobbin.
There are 3 main symbols for an inductor:
![]()
Inductance is measured in Henries.
One Henry is a large unit.
An inductor of 1 Henry would be a few cm in diameter and a few cm long
and have many turns of wire on a ferrite core.
An inductance of one Henry (or any value of inductance) does not tell you
anything about the size of the device, its current capability (the amount of
current that can flow through the winding without the device overheating) or
any of the other features we need to know about it. That's why you need to know the PRACTICAL side of selecting an
inductor.
In electronics, we normally use smaller units: mH ÁH and nH
(m = milli Á = micro n = nano)
Surface mount inductors are measured in nH - nanoHenries and "ÁH" - microHenries.
See the table below for the very important way chip inductors are
identified. Take special note of the letter "R" in the 3-digit code, for a
100nH or 1,000nH device. Do not get confused with a chip resistor as the two
devices look almost identical and a resistor of "1R0" is one ohm.
1,000mH = 1H
1,000,000ÁH = 1H
1,000,000,000nH = 1H
thus:
1,000ÁH = 1mH
1,000nH = 1ÁH
Here are some typical values:
1nH = 0.001ÁH = 1N0 on a surface-mount component
10nH = 0.01ÁH = 10N "
" "
"
100nH = 0.1ÁH = R10 "
" "
"
1,000nH = 1ÁH = 1R0 "
" "
"
10,000nH = 10ÁH = 100 "
" "
"
100,000nH = 100ÁH = 101 "
" "
"
1,000,000nH = 1,000ÁH = 1mH = 102
10,000,000nH = 10,000ÁH = 10mH = 103
100,000,000nH = 100,000ÁH = 100mH = 0.1H = 104
1,000,000,000nH = 1,000,000ÁH = 1,000mH = 1H = 105
3.3nH = 0.0033ÁH = 3N3 on a surface-mount component
33nH = 0.033ÁH = 33N "
" "
"
330nH = 0.33ÁH = R33 "
" "
"
3,300nH = 3.3ÁH = 3R3 "
" "
"
33,000nH = 33ÁH = 0.033mH = 330
330,00nH = 330ÁH = 0.33mH = 331
3,300,00nH = 3,300ÁH = 3.3mH = 332
33,000,00nH = 33,0000ÁH = 33mH = 333
Note: 102, is the 3-digit identification on a surface-mount inductor.
It means the figure "ten" and "two zero's" = 10 0 0 = 1,000ÁH =
1mH
Surface mount inductors are measured in nH - nanoHenries and
"ÁH" - microHenries.
((All surface mount capacitors are measured in "p" - picofarads))
Note: 102 is not 102 102 is 10
to the power "2" or "ten squared."
102 or 103 or 105 is "ten" then the third digit gives the number
of "zeros."
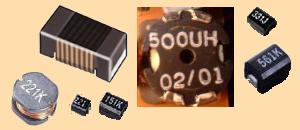
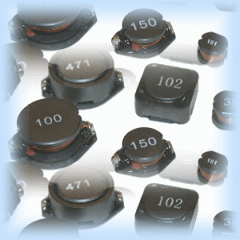
150 = 15uH (15 and no zero's)
471 = 470uH (47 and 1 zero)
100 = 10uH (10 and no zeros)
102 = 1,000uH = (10 and two zeros) = 1mH 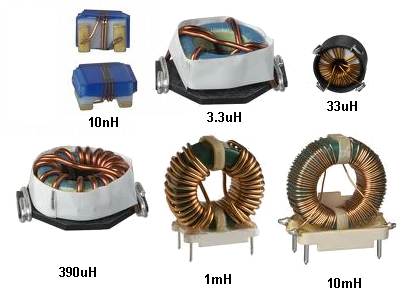
In addition, the thickness of the wire has very little effect on the
inductance and is only used to allow a high current to flow.
The value of an inductor cannot be determined by the way it looks. The value
depends on a number of things including the core material, number of turns and the type of magnetic path. The best type of
magnetic path is a closed loop such as the toroid (doughnut) shown in
the photos at the top of the article or other type of closed magnetic path
such as a pot-core. If the magnetic path contains an air
gap, a lot of the magnetic flux will be lost when it "crosses the air gap" and the value of
inductance will be reduced. For a simple inductor, a rod will be ok.
Inductors can have lead termination (called fly-leads), wire termination for through-hole
mounting or as a "chip" for surface-mounting on a PC board.
The inductors above are identified in microHenry
(ÁH), but the value marked on a surface-mount "chip inductor" can be nH -
nanoHenries or "ÁH" - microHenries and you need to refer to the
table above for the complete range of values as the letters N and R are also
used to assist with the decade ranges (from 1nH to 9,999nH).
An inductor can be called a "coil." There is no particular difference
between a "coil" and an "inductor" and it mainly depends
on where and how it is used. A coil generally refers to turns of wire on
a former with an air core. When the core is metal (such as ferrite or soft
iron or simply "iron"), it becomes an INDUCTOR.
In certain applications an inductor is called a CHOKE.
The term choke is used when the inductor is designed to prevent a
signal passing through the winding or when the coil is designed to reduce a
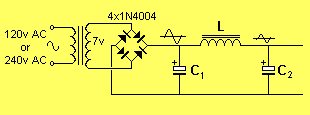
particular waveform - such as ripple. The following circuit shows a choke in
operation. The circuit is called an L-C filter (or more-accurately a pi
filter). The waveform on the left of
the inductor (L) contains ripple as shown by the sinewave. The voltage
emerging from the inductor has a smaller value of ripple. This is partially
due to the filtering provided by C1 and C2 and also the effect of the choke.
The voltage entering the choke is mainly DC and this passes through the
winding without any alteration. Any ripple contained within the DC creates
an increasing magnetic flux and this cuts the turns of the winding to
produce a reverse voltage. This acts against the ripple and effectively
reduces it. The result is a lower value of ripple emerging from the
inductor.
A resistor could be used in place of the inductor. The inductor has two
advantages. It will produce a lower output ripple and a smaller voltage will
be "lost" across the inductor.
An inductor is not the preferred choice for modern designs as a voltage
regulator such as 7805, will provide the same results at a lower cost
and will take up less board space.
We have used the inductor as an example, to show one of its characteristics.
It has fallen out of favor with the introduction of the "3-terminal
regulator" (we are talking about 50Hz power supplies).
A choke can also be used to prevent an AC
signal entering a component. In other words, the signal can be passed to
another part of the circuit while the choke provides a low-resistance path
for DC.
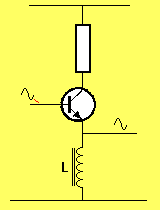
In the following circuit, the signal emerges from the transistor and is
prevented from flowing to earth by the "choke." The inductor provides a low
resistance path for the biasing of the transistor while preventing the
signal flowing to the 0v rail.
If the choke is replaced by a resistor, some of the signal will be lost in
the resistor (we say "across the resistor") and the voltage dropped across the resistor will be higher than
a choke.
If a winding on a coil or
"former" is designed to pull a metal rod into the centre of the coil
when a current flows, it is called a SOLENOID.
If the coil is wound on a metal core and attracts metal objects (such as the
contacts of a relay, picking up scrap metal in a junk-yard, or to make a bell ring), it is
called an ELECTROMAGNET.
The following diagram shows the operation of the electromagnet in a bell:
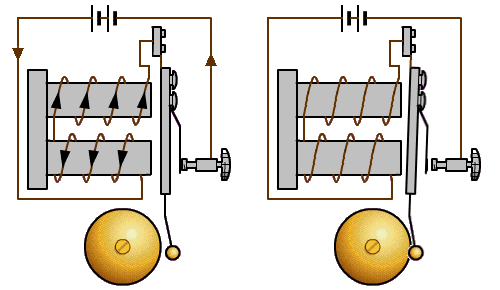 |
HOW A BELL WORKS When the contacts are closed, current flows through the two windings (this is called a horseshoe electromagnet) and creates magnetic flux that pulls the arm (called the clapper) towards the electromagnet. This makes the hammer hit the bell and at the same time the contacts are opened. This causes the current to stop flowing and the magnetic flux ceases (collapses). The arm is returned (via a small piece of springy wire at the pivot-point) to a position where the contacts are closed and the current flows again to repeat the action. |
There is one important thing you need to know when you see an inductor in a
circuit - even a one-turn inductor!
When it is operating (when an increasing voltage is applied), it produces a voltage in the opposite direction to
the applied voltage (actually due to the increasing current) and the size of this voltage makes the inductor do
amazing things.
This voltage is called a back-voltage or back-EMF. Its size depends on how the inductor is
manufactured and its value in Henries (or millihenries, microhenries or
nanohenries) and how it is activated in the circuit.
When an inductor is used in electronic circuit, the ratio of the
back-voltage to the applied voltage is called the "Q-factor."
This voltage can also be detected as the "spark" between the contacts of the
bell above and it can be felt as a "kick-back" between your fingers when you
remove an inductor from the supply voltage.
This voltage can be used to produce a very high voltage and is sometimes
called a "fly-back" voltage.
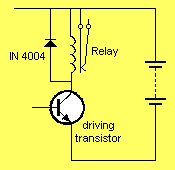
This voltage is not wanted in some circuits and must be suppressed. The
voltage produced by the coil of a relay (when it is de-energised) can damage
the driving transistor and must be "snubbed" (removed) by placing a
reverse-biased diode across the coil as shown in the diagram below:
So, there we have it.
In many instances an inductor will produce a high "reverse-voltage" when
it is de-activated. The size of this voltage depends on the way the
inductor is manufactured and many other things.
You cannot work out the size of the voltage from any formulae, so
experimentation is the only way.
At last we can put aside mathematics and get out the soldering iron.
There are basically two ways to use an inductor.
1. Pass a magnet over one end and detect (read) the voltage. A
voltage is only produced when the magnet is moving. This is the basis of a
GENERATOR.
2. Apply a voltage to the coil. This voltage can be a
steady voltage (called DC) or a varying voltage (called AC). Different
results will be produced in each case. This is the basis of a MOTOR.
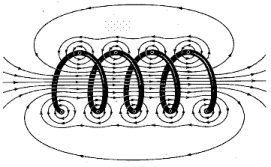
If the voltage is steady (DC) the coil will produce STEADY magnetic flux and
create an ELECTROMAGNET. We draw this flux as concentric lines around each
conductor. They pass through the centre of the coil an emerge at one end.
The emerging lines are said to create the NORTH pole of the electromagnet.
The "magnetism" (the magnetic lines) are strongest in the centre of each
turn of the coil and if the coil has air in the centre, only a small number
of lines can be present before the air is SATURATED. If a metal such as iron
(called soft iron) or ferrite (they are basically the same thing - with
ferrite suitable for high frequency inductors) is placed in the centre, the
magnetic lines can become more concentrated (1,000 - 2,500 times or more)
before the core is saturated.
If the driving voltage is AC (such as a sinewave) an electromagnet will
be produced but the magnetism of the electromagnet will increase and
decrease as the voltage varies.
Hundreds of different
results can be produced from the examples above, by creating inductors with a
different number of turns, different shape, different core material,
different speed of movement of the magnet and different frequencies for the
AC voltage.
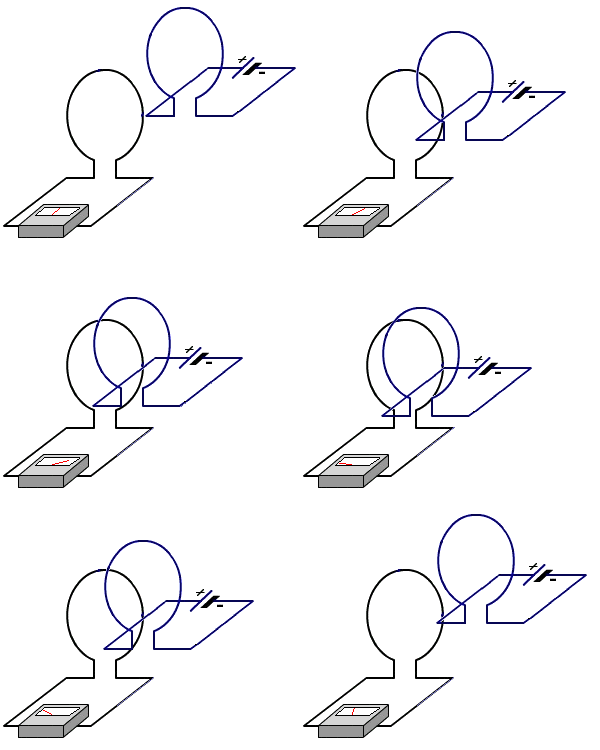
Watch the needle on the meter when the loop changes
from a "forward" direction to a "reverse" direction. This
is when the flux changes direction.
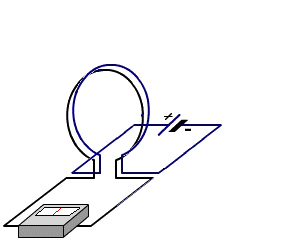
When the two coils are stationary, the
"centre-reading"
meter indicates "zero." This is because the magnetic
flux in not increasing or decreasing.