A DISCUSSION ON FM
TRANSMITTERS
There is a lot more to designing an FM transmitter, than meets the eye.
Here is a typical FM transmitter circuit. It consists of 3 stages. An audio
amplifier, RF Oscillator and RF output.
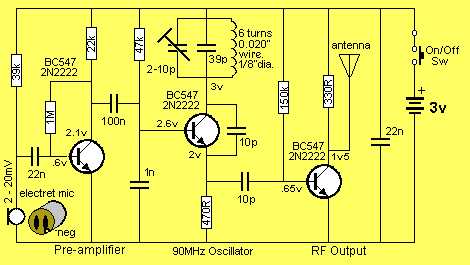
TYPICAL FM TRANSMITTER
The most critical component is the oscillator transistor. The requirements are
very difficult to describe. We obviously want it to produce the highest
waveform and create a stable circuit, but the actual suitability of a
transistor cannot be obtained from a specification-sheet. It's something in the
way the transistor is manufactured. The only way to find
out is to put one in a circuit.
Most of the transistors we have used are classified as general-purpose AF
devices and this means they normally work to about 20kHz in audio stages or
about 1MHz in radio stages.
But in our case we require them to operate at about 100MHz (100Meg Hertz -
100,000,000 cycles per second) and this is at the extreme-end of their
capability.
It is absolutely amazing that a simple low-cost device can operate at this
frequency, but many of them perform very successfully.
Unfortunately some do not perform very well at all and although they
have the same part-number as the type we are using, Philip's transistors for
example, do not work at all or operate very poorly.
It's the poor performers that will get you confused. The output is low and the
frequency drifts when the board, antenna or battery is
touched. Some transmitters even drift when you place your hand NEAR the
battery. Some STOP operating when you get NEAR them. This can be
due to the oscillator transistor, poor layout or an incorrect component.
Unless you have a correctly-operating project, you will not be aware of any of
the problem.
You have to start with a "reference point." This is called the
"control" and gives you some idea of how well the device will operate.
That's why it is best to get a kit from us. This way you will have a
"starting-point"
and know exactly how well a circuit will perform.
We get many constructors ringing to say a circuit is not working
correctly. The first thing we ask is "did you buy a kit from us?"
The answer is invariably "No."
We construct our projects, 20 at a time and they all work perfectly. That's how
we know the components are all suitable.
The capacitors are NPO types.
This stands for Negative-Positive-Zero. In other words, the capacitance does
not alter as the temperature rises or falls (a small amount).
Thirdly, the design of the PC board is very important. If you build the project
on matrix board or "breadboard," the parts will be spaced-out and the "Q"
of the oscillator circuit will be reduced. It can be so low that the circuit
will not start.
These are all things you should be aware of. We are going to describe some of
the best FM transmitters available to hobbyists and unless you follow our
suggestions, you will not get the optimum performance.
This also applies to the electret microphone. We actually call it an "insert"
as an electret microphone is a hand-held device.
Our inserts are so sensitive that the load resistor must not be lower than
about 33k for a 3v supply. If the value is less, the microphone will be
over-driven and background noise will be generated. It sounds like "bacon-and-egg"
frying.
Some circuits in other magazines use 4k7. This is because they have used very
poor quality electret inserts. With our devices you can hear a pin drop at 6
feet.
You will also lean why a transmitter powered by a 1.5v cell has almost no
range and a coil wound on a ferrite slug does not provide greater stability.
All this information is covered in the projects.
For the moment, we will go over some of the main features of the circuits and
give you a broad picture of this topic.
TRANSMITTING DISTANCE
The first thing you will be asking is "what is the transmitting range?"
Some of the transmitters have been designed for long-range while others have
been designed for stability, so they can be held and moved.
Basically you cannot combine both features into a single circuit, using
simple designs. The only way to get both features is to
use a crystal-locked oscillator. This will be covered in the next release of
designs.
The distance (or range) of a transmitter depends on a number of things.
Obviously, a higher-power transmitter will achieve a greater range. But our aim
is to achieve the greatest distance with the least power.
One of the first distance records for a transmitter was 380 miles with a 380
microwatt transmitter. This equates to a million miles for a 1 watt
transmitter.
This is going to be hard to achieve with our designs, but it is certainly a
goal we can aim for.
An
FM signal will pass almost unhindered through glass, wood, brick and tiles.
But it will not pass though sheet-metal, no matter how thin the sheet. This
means it is very difficult to get an appreciable distance when transmitting
from a car.
There is one other medium that hinders the signal. It's the human body.
If you carry an FM transmitter in your pocket, for example, and place the
antenna against your body, almost all the signal will be absorbed by the body
and the range will be very small.
It's exactly the same principle as the microwave oven.
The signal get absorbed when it vibrates the water molecules in your body.
And there is one other surprising restriction. It is the steel reinforcing mesh
in concrete floors and walls. The signal finds it very difficult to pass
through mesh.
Basically the signal travels in a straight line. Not only is the signal about
10 ft long for each cycle, but it is also has an amplitude or height.
When this signal hits the wire mesh in concrete, it cannot "squeeze" through
the 6in x 6in holes.
Another limiting factor is a
hill. The signal will not pass over the hill and down the other side. You will
only get a very small amount of the signal following the "curve."
On the other hand, if the transmitter is placed on the top of a hill or
mountain, the range will be 10 times more than we have given in each of the
projects, when measured in a straight-line direction.
This means these little transmitters are very powerful in reaching a broad area,
when the conditions are right
and must be treated with respect.
The output power of a transmitter is determined by the OUTPUT STAGE. The
antenna is seen as a very low impedance (resistance) by the output stage.
The secret in designing an good output stage is to get the transistor to
deliver its waveform to the antenna. This is a very difficult thing to do. In
the projects you will see a number of different ways to deliver this energy.
TESTING THE OUTPUT
Measuring the output of a mini transmitter is a very difficult thing to do. The
output is never more than about 50% of the energy taken by the output stage.
But rather than try to measure the output in milliwatts, the object of the
exercise is to "peak" the output to get the maximum radiation.
The only way to know if you are improving a design is to have a "reference."
This is the purpose of the
Field Strength Meter project. It lets you know the effective radiation
of a particular design.
The transmitter must be set up on a high ledge with the antenna hanging down.
The first thing to do is trim the antenna. Make the antenna 2 metres (6ft)
long. Turn the transmitter on and hold the Field Strength Meter near the
antenna. Move away until the needle shows 50% deflection. Now cut a few inches
off the antenna and see if the deflection increases.
The perfect length will be obtained when the deflection increases to a maximum.
It will then
decreases as the length is shortened. You will find that 2inches will make a
considerable difference. This is called "trimming the antenna."
You now have a starting-point for modifying and working on the circuit.
By comparing the distance obtained (for a half-scale reading on the Field
Strength Meter), you will be able to work out if a modification has increased
the output energy. This will save carrying out a field test as these tests
often involve traveling miles in the car!
Our most recent modification to a transmitter consisted of an antenna
transformer. The range doubled without any increase in current. This equated to
an increase of about 400% in output energy.
This will be discussed in a future project and it shows how efficiencies can be
improved, simply by improving the coupling between the output transistor and
the antenna.
At the moment we are covering output circuits with resistive and RFC loads and
this is where our experimentation will lie.
VOLTAGE
The supply voltage on some of the stages of an FM transmitter is not important.
The electret microphone can operate perfectly on a supply voltage as low as
0.5v. Providing the load resistor has been selected for optimum performance,
the voltage can be raised or lowered 50% without noticeable effect.
For the audio amplifier stages, the ideal voltage is 3v. Any voltage above 3v
is simply wasted in the load resistor. Each audio amplifier stage only needs to
deliver a 100mV waveform to the following stage and a 3v supply is adequate to
provide this amplitude. The supply-rail can be as low as 1.5v, providing a
stage has been designed for this voltage. In other words, the collector should
be sitting at half-rail voltage.
A 1v5 supply does not give the circuit much allowance for a reduction in supply
voltage. The output voltage of many cells (such as "dry cells") drop to 1.1v
during a large percentage of their life and this causes the gain of the stage
to fall about 20- 50%. If the supply is 3v, the end-voltage will be 2v2 and the
decrease in performance will not be as noticeable.
The RF oscillator circuit operates perfectly on a 3v supply. It does not need a
higher voltage and a voltage below 3v, will cause the frequency to shift quite
noticeably as the supply voltage decreases. This is because the frequency of
the circuit is determined by the voltage. It is called a Voltage Controlled
Oscillator.
The secret in delivering a signal to the antenna (or to an RF amplifier stage) is to
pick off energy from the oscillator circuit without upsetting the operation of the oscillator.
The only stage that will benefit from an increase in supply voltage is the
output stage or RF amplifier stage.
Depending on the transistor you have selected, you have two situations.
If the transistor is designed to pass a small current (about 15mA -20mA), the
waveform on the collector is fairly limited with a 3v supply. However, there are 3 ways to connect the collector to the supply rail.
1. Via a resistor.
2. Via an inductor
3. Use a transformer.
The resistive coupling provides a minimal result. The waveform on the collector cannot be
greater than the supply and some of the energy will be lost in the load-resistor.
The rest of the energy will be delivered into the antenna. The antenna is seen
as a very low impedance - resistance (about 50 ohms) and it is very difficult
for the transistor to deliver its energy into a low impedance such as this. The
actual transfer will be small and this reflects the low output of the design.
An inductor has the effect of producing a larger waveform than the supply
voltage and this voltage allows more energy to be delivered to the antenna.
An antenna transformer allows a "turns-ratio" to be applied to the equation so
that a lower voltage, with a higher current, can be applied to the antenna. The
result is an increase of more than 100% in the distance obtained from the
transmitter without an increase in supply current. This represents about 4
times more energy being passed into the antenna and we will be covering these
features in future projects.
Another way to increase the output of a transmitter is to increase the supply
voltage. When the supply voltage is increased, the waveform on the collector of the RF
amplifier stage will increase, without increasing the current through the
transistor (the bias resistor must be increased so that the quiescent current
does not increase).
If you are using a high-current transistor (above 50mA), many of them will not operate
properly on a supply rail below 6v and thus a supply of 12v is needed.
THE ANTENNA
The length of the antenna is very important. Even 10cm (6in) longer or shorter
than the suggested length will decrease the output appreciably.
The best antenna is a straight length of hook-up flex 39 inches long for a frequency of
88MHz. Coiling it or placing it near a metal object will reduce its
effectiveness. Let it hang down and place the transmitter as high as possible
to achieve the greatest range.
If you lay the antenna horizontally, the receiving antenna must be in the same
plane - it must also be horizontal.
LAYOUT
The layout of the components is very important and this includes the placement
of the batteries. Do not put them on long leads or use a power supply as this
will change the impedance of the power rails and reduce the performance. The
length of the tracks on the PC board, around the oscillator is also very
important. This means the placement of the coil and capacitor should be as
close as possible. These two components make up a circuit called a "tank
circuit" or "tuned circuit" and the "efficiency" of this circuit is called the
"Q," or "Quality factor."
As you will learn, the value of the capacitor in the oscillator circuit can be
increased and the number of turns on the coil decreased, to achieve the same
frequency. But there is an optimum for these values, to
produce the highest "Q." The projects will discus this further.
Some of the projects have three separate stages, audio, RF oscillator and RF
amplifier. The projects show you how to design, test and modify these stages.
IF IT DOESN'T WORK
Many of the projects have a section "If it doesn't work."
We go over the fault-finding of the circuit and analyse where the fault may be
located.
We build many of the projects "20 at a time" for customers who want
the item ready-built, and have a 100% success rate. This means
nearly all the faults will be due to poor construction.
It's a simple matter to get a
soldering station and make sure the temperature
of the tip is not too hot. The use of fine solder will also improve the quality
of the soldering 100%. All our kits contain fine solder. Once you use fine
solder, you will NEVER go back to thick solder!
The most common mistake in construction is swapping two resistors or transistors or failing to
remove the enamel from the coil. A little bit of care will save a lot of
searching.
We don't mind a fault to be present because this is the time when you will start
to learn about trouble-shooting.
The
Field Strength Meter is the first piece of equipment to use. It will
let you know if the circuit is producing RF (a carrier). The carrier may be just below the
FM band and this will lead you to believe the bug is not working.
Once you know a carrier is being produced, you can check the output stage for
amplification.
Each project has a lot more detail on fault-finding and this is where
you get a lot of assistance.
Our projects are not "built and forget it."
We expect you to experiment and work on the design to see what each component
is doing.
These FM transmission projects are a very important part of the overall course
and they will be combined with microcontroller projects to allow remote sensors
to communicate to a central unit.
BUYING A KIT
It's up to you.
If you want a guaranteed result, a smart and compact finish and the best output
from a particular design, you will need to buy a kit. The cost of a kit is less than buying the components separately
and the PC board is cheaper than making it yourself. It has an overlay,
solder-mask and tinned lands.
Many of the components have been imported by us and it's very difficult to get
the same performance from average "hobby" parts.
It's up to you to build something that will perform to its maximum, so you know
how well it should perform. Unless you know this, you will never be able to
carry out experiments to increase the output etc.
Success is a whole lot of little things that combine together to produce
amazing results. A kit is the best way to go.
Our FM TRANSMITTER projects: (more to come)
|