|
The |
The circuit is much more
complex than one transistor turning ON and the other turning OFF.
It has hidden secrets that no-one has explained.
I am going into a lot of
detail with this FLIP FLOP circuit to show there is a lot to learn about
how a circuit works and its main feature is the secret to it being so
reliable and capable.
The
most difficult electronic component to understand is the transistor.
That's because it has so many modes of operation and it reacts differently
when it is passing a small current and then a high current. And when a
capacitor is placed in a circuit and not being connected to either power
rail, it can create a mystifying effect.
We are going to cover one of the cleverest circuits. It has features
that guarantee its operation and it has NEVER been described fully in
any text book or lecture. It is called the FLIP FLOP or MULTIVIBRATOR or
SQUARE-WAVE OSCILLATOR or ASTABLE MULTIVIBRATOR or ASTABLE OSCILLATOR - or constantly
operating oscillator.
Although the circuit is very simple, its operation is very complex and
two terms have to be introduced to describe its operation. These two
terms have never been mentioned before.
That's because no-one has dealt into the depths of its operation.
The two transistors are just amplifiers. But because they are
cross-coupled, one amplifier is controlled by the other and then the
second amplifier is controlled by the first.
But when one stage turns ON, the other stage does not just turn it ON FULLY, but turns it on EVEN HARDER
than it needs to and this allows it to pass a very
high current and makes the transistor a very good conductor. This extra
"turn-on" is called SUPER-SATURATION. and allows loads such as globes
and motors to be connected as loads, as they require up to 6 times more
current to start to turn ON.
The other feature of the circuit is called REGENERATION.
One transistor starts to turn ON the other, and this effect is
passed back to the first transistor and allows it to turn on the second EVEN MORE. This
"runs around the circuit" very quickly 1,000 times
or more and in the end, one
transistor is turned on VERY HARD with more base current than it needs
and it becomes SUPER SATURATED. The other transistor is fully turned
off.
Because the transistors do not work within the parameters of any data
sheet, we do not need any mathematics to explain how the circuit works.
Just an understanding of the
brilliance of the inventor of the circuit.
This was not the first flip-flop circuit to be invented. The others
were very complex and were a complete failure. As the voltage of the supply
dropped, they stopped working and they did not supersaturate the
transistors.
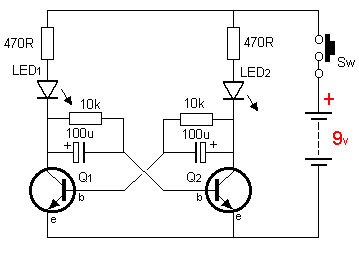
The two wires in the middle of the circuit
do not touch. That's why we say the circuit is "cross coupled."
One side is connected to the other and the second stage is connected to
the first.
The animation only shows
part of the action. But it does show the base of the transistor seeing a
negative voltage from the electrolytic that can be about 6v below the 0v
rail.
What makes the circuit change state?
REGENERATION
We will cover
the concept of REGENERATION again.
2.
Does the transistor turn ON more when the capacitor (electrolytic) is
charged or uncharged?
3. For a 9v supply, what will be the approximate initial base
current?
4. If a transistor (in
the circuit above) is
capable of passing (delivering) more than 1 amp, why doesn't the LED
receive the 1 amp and get damaged?
Answer: Super Saturation and Regeneration.
14. Will this circuit work?
15. Will this circuit work?
16. Name a benefit of the circuit: ONE LED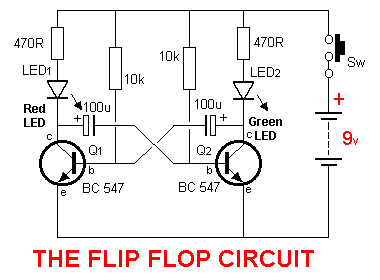
All the components and the transistors will have slightly different
values and one transistor will start to turn ON when the switch is
closed.
Suppose the second transistor starts to turn ON via the 10k base resistor and the voltage on
the collector drops a small amount. This drop will be transferred
through the 100u electrolytic so that when the positive lead of the
electro drops a very small amount, the negative lead will fall the same
amount.
The negative lead is connected to the base of the first transistor and
it will work against the effect of the 10k resistor connected to its
base. The 10k was having a slight effect on trying to turn the
transistor ON but now the 100u is reducing this effect.
This means the first transistor will be starting to be turned OFF and the
voltage on the collector of the transistor will start to rise.
The 470R resistor and the LED will pull the positive lead of the first 100u
towards the positive rail and the negative lead will follow. But the
negative lead cannot rise more than 0.6v and so, when the positive lead
is pulled towards the positive rail, the effect is to charge the 100u.
This charging current flows through the base-emitter junction of
transistor 2 to turn it ON more.
Transistor 2 turns ON more and the voltage on the base of transistor 1
becomes so small that transistor 1 is not turned ON at all and now the
first 100u electro gets charged by the 470u and LED 1. This current is
much more than the second transistor needs to illuminate LED2 but if we had put
a high current device in place of LED2, it would also have
operated.
The transistor is being turned ON so hard that anything you put in the
collector circuit will work. That's why we say the transistor is
SUPERSATURATED.
To get to this super-saturated condition the two transistors "feed" each
other with the "turning-ON" effect, with hundreds and hundreds of cycles
we call REGENERATION and eventually the effect produces SUPERSATURATION.
Normally regeneration does not have this enormous effect but in this
circuit it makes the circuit very reliable and almost any transistor
will drive almost any load.
The circuit is not just one transistor turning on the other. The TWO
transistors operate in a cyclic or feedback way with POSITIVE FEEDBACK,
to create a very fast switching action that is a SQUARE WAVE with very
fast rise and fall time.
One transistor feeds back to the other to turn it OFF more and more and
now the components in the circuit take over to supply current to turn one transistor ON
FULLY. It is now the components that turn the transistor ON fully and
the other transistor does NOTHING. This is quite a surprise. Show me
anywhere, where a text book or instructor has even hinted at this during
part of the cycle!!!
We have the state where the first transistor is OFF and the second
transistor is fully ON.
You can see this action in the following animation: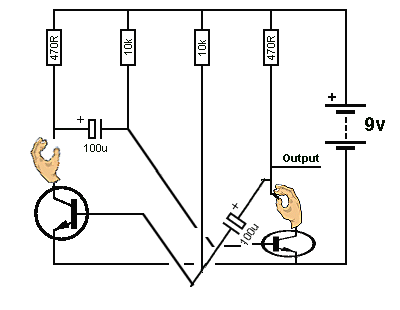
FLIP FLOP ANIMATION
The first transistor has no voltage on the base because the small
voltage across the second 100u has made the negative lead put a negative
voltage on the base of the first transistor.
The circuit would stay in this state but two things are happening that
make the circuit change states.
The 10k resistor on the base of the first transistor is beginning to
charge the second 100u and the voltage on the base of the first
transistor is starting to rise. When it gets to 0.55v, the transistor
starts to turn ON.
When it turns ON a small amount, the voltage on the collector drops a
very small amount. This means the voltage on the positive lead of the
first 100u reduces slightly and this effect is passed through the 100u
to make the negative lead drop by the same amount. Another hidden secret
has also occurred in the circuit. The first 100u has charged
considerably during this time and the current being passed to the base
of the second transistor has been reduced considerably but the
transistor is still fully turned ON. But not turned on "Extra Hard."
This means that when the current into the second transistor is
reduced, it will start to turn OFF. And that is what happens. The first
transistor starts to turn ON and the current through the first 100u
has reduced considerably because the capacitor is in a charged state and
when the voltage on the positive lead is reduced, this effect is passed
to the base of the second transistor to start and turn it off.
The voltage on the collector of the second transistor rises and the
second 100u starts to charge via the base-emitter junction of the first
transistor and the two transistor form a loop of POSITIVE FEEDBACK
called REGENERATION and the end result is a change of state where the
other transistor becomes FULLY SATURATED.
It is no wonder this complexity has never been described before but when
you build the circuit and add car globes and find it does not work, you
need the knowledge of SUPERSATURATION to use transistors that allow a high
current to be delivered to the load AND the power supply must be able to
deliver the high current. Car globes take 6 times more current when they
are starting to illuminate and if the transistors and power supply
cannot provide the current, the circuit FREEZES.
It is the hidden secrets of how a circuit works, that you need to know.
But these have never been covered in any text book.
For instance, just before the circuit
changes state, the transistor that has been turned ON "with great
force," has now had this "force" reduced considerably
because the capacitor creating the "great force" is in a charged state
and the current flowing through it is considerably reduced, to a point were
the second transistor is turned ON but not excessively. Any slight
movement in the down direction of the first 100u will reduce the voltage
on the base of the second transistor and remove the "turn ON" effect.
If the first 100u was still turning on the second transistor "with
great force," a slight reduction in its ability to deliver a reduced
voltage would simply change the state of the second transistor from
SUPERSATURATED to FULLY TURNED ON and the circuit would not start to
change state.
One thing you have to understand is the interspersal of voltage and
current. The transistor actually works on current but when you deliver a
higher voltage via parts of the circuit, this translates to a higher
current and the transistor reacts.
You have to forget what you have read, seen and been told as none of it
related to understanding how the circuit actually works. It's a mystery
that no-one has exposed. You only find out these things when you
experiment and find that everything you have learnt has not solved the
problem.

Regeneration is basically POSITIVE FEEDBACK and when the feedback is
provided by another transistor or other components, this feedback can be 100 times stronger
than needed.
In general, feedback occurs until the transistor is fully turned ON by
another part of the circuit and at this
stage, this part of the circuit cannot do anything more. This is when another
part of the circuit "reduces its feedback power" and during this time,
the cycle generates either the High or LOW part of the cycle. In other
words, half the duration of the cycle is generated.
There are two sections of the circuit and they take turns in being
turned ON or OFF and when the circuit decides to change from one state
to the other, the
change takes place very quickly.
This is why the output is a square-wave with steep sides.
But more important, this action is very reliable and has a very strong
ability to change states and is impossible to stop the action.
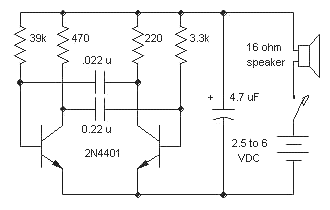
Going to the circuit above, we start with the second transistor turning ON. It turns ON via the low resistance of the LOAD of the
first transistor and the uncharged 100u electrolytic. This supplies a
high current to the second transistor and it turns ON and the current
can be 10 times more than is necessary. This pulls the
second 100u down and it puts a zero voltage and a slightly negative
voltage on the base of the first transistor to turn it OFF.
The first 100u keeps charging and as it charges, the current into the
base of the second transistor reduces. It reduces to a very small amount
and the second transistor cannot keep fully saturated. The collector
voltage rises a small amount and the second 100u rises. At the same time
the second 100u is being discharged via the 10k resistor and the voltage
on the base of the first
transistor is rising.
When it reaches 0.65v, the first transistor starts to turn ON and pulls the
first 100u down.
This turns OFF the second transistor and makes the second 100u rise even
more and it rises very quickly.
This produces the effect of both transistors changing state very quickly
to repeat the cycle.
No external pulse is needed for the circuit to "cycle" and produce a
square-wave.
QUESTIONS
1. Which transistor turns ON first?
Answer: It mainly depends on the gain of each transistor and the
state of charge of the two 100u electrolytics.
Answer: The
transistor is turned ON the
most when the capacitor (electrolytic) is starting to charge as the
voltage across it is the highest.
When it is nearly charged, the current into the transistor is so small
that the transistor does not turn on as much as this is when the circuit
starts to change states.
Answer: We take the
characteristic voltage of 1.8v for a red LED from the supply voltage and
the base-emitter voltage of 0.7v to get an effective charging voltage of
6.5v This voltage appears across the 470R resistor to get a
current of about 13mA The transistor will have a gain of 100
or more and will theoretically be able to deliver a current 1,300mA and
that's why a high current device can be used in the LOAD. Obviously the
LED only requires 10mA and the circuit will not deliver any more than
about 13mA, so nothing will be damaged.
Answer: The resistor
(in series with the LED) is called a CURRENT LIMITING RESISTOR
and its job is to limit the current to about 10mA to 15mA so the LED is
not blown up. The resistor uses Ohm's Law to limit this current.
5. What are the two new terms you have learnt in this discussion?
6. What does Super Saturation mean?
Answer: Super Saturation means the transistor is turned ON with a higher base current
than needed to make sure the transistor will turn ON fully.
7. What does Regeneration mean?
Answer: Regeneration means a signal is passed from the output of a stage to the input to
increase the amplitude of the signal.
8. Is Regeneration a Negative or Positive feedback signal?
Answer: Regeneration is a Positive feedback signal. A positive
signal makes things: "worse and worse." In other words it turns on
the circuit: "more and more."
9. Why is this circuit so reliable?
Answer: It revolves around the fact that each transistor is turned ON fully and
this is classified as a DIGITAL condition or a POSITIVE or DEFINED STATE
or ACCURATE STATE or GUARANTEED STATE.
10. How is this Digital State produced?
Answer: The Digital State is produced by Regeneration producing
many feedback cycles that result in the transistor being more than fully
turned ON. And this process occurs very quickly.
11. Will this Digital State damage the transistor?
Answer: No. The surrounding components will limit the maximum base
current to an acceptable level. . . . even though the level is 10 times higher
than needed.
12. What determines the duration of each cycle?
Answer: The 100u electrolytics and 10k base resistors.
13. If a 100u is replaced with 47u, what happens?
Answer: One half of the cycle will be much shorter than the other
(in duration - in timing) In other words one LED
will flash for a shorter time than the other. This is called an
"imbalance." You can also connect a single LED and get a
flashing LED "road sign."
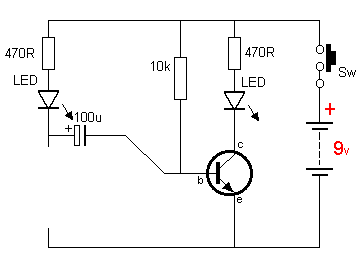
Answer: Yes. The circuit above will work. The circuit is so
tolerant and so reliable that it will work with almost any value
components and the LEDs can be placed in the emitter circuit.
This will change the timing when the transistor turns ON, but this
will not be noticed in the flashing of the LEDs. The LOAD is normally
placed in the collector-circuit.

Answer:
The circuit will not work because a transistor cannot be turned
ON during part of the cycle.
Firstly, the circuit has to
be redrawn so we can see the fault.
In our circuit, and from the animation above, you can see the left
transistor has the negative voltage on the base removed by the 10k
resistor and when the base is zero, the 10k starts to charge the 100u in
the opposite direction, so that when the base voltage reaches 0.65v, the
left transistor starts to turn ON. 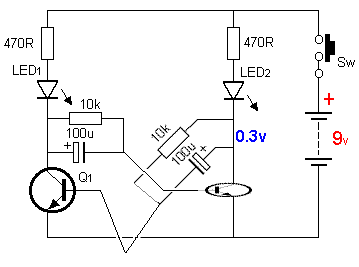
In the circuit above, the 10k resistor discharges the 100u, but it
cannot increase the base voltage above 0.3v as the right-hand transistor
is fully turned ON and it has 0.3v on the collector..
This means the left transistor will not be turned ON and cycle will
stop.
15a. Do you understand the concept that the 100u electrolytics are
rising and falling in the circuit by an amount equal to approximately
the value of the supply voltage.
This is the basis of seeing how the circuit is operating.
Answer: It will illuminate globes and motors as they need a very high
current (up to 6 times more) to start the illumination or revolving of
the armature.
17. How is a
transistor turned on more than "normal" in this circuit?
Answer: The current
delivered to the base is very high when the 100u is uncharged and
supplied via a 470R resistor and the LED.
18. Does this circuit start every time?
Answer: Yes. It may start with both
transistors turning ON at the same time but very soon one transistor will
turn ON more and prevents the other from turning ON any more and the
circuit will generate the FLIP FLOP action.
The Flip Flop circuit shows the effect of a capacitor (electrolytic) when placed in a circuit
and is not connected to either power rail. In this arrangement it connects two sections of a circuit when charging, but when fully
charged it provides SEPARATION.
The circuit is able to provide a high current to a LOAD component, but a
LED does not require this feature. It only needs a few milliamp.
You can connect a single LED to the circuit, but that is a waste of
energy as half the energy is lost in the dummy LOAD.
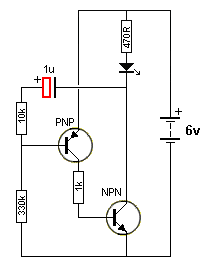
A single output version of the FLIP FLOP uses a different arrangement of
parts and is called a FEEDBACK OSCILLATOR.
Here is the circuit:
You can
add a LED in series with a 470R current limiting resistor to produce a very bright
flash for a "road-works" sign.
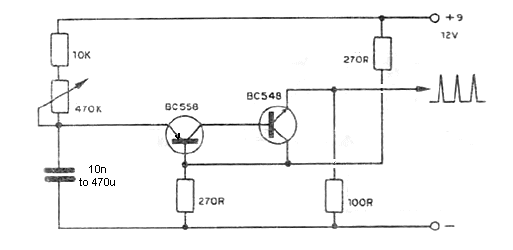
Here is the circuit we will study:
The circuit starts in the OFF state and the
capacitor charges via the 10k and 330k.
We are going to study more on the effect of a capacitor in a circuit.
This is a very important feature that has never been covered in any text
books.
The circuit we will be studying is called a FEEDBACK OSCILLATOR and is
basically a HIGH GAIN AMPLIFIER that is turned ON and OFF by the effect
of a capacitor charging and when it is charged, it does not have any
effect of keeping the circuit fully conducting and so the circuit starts
to turn OFF and it makes the capacitor turn the circuit OFF more and
more. It does this by making the charge in the capacitor "turn the
circuit OFF". Eventually the charge in the capacitor becomes zero and a
resistor in the circuit starts to turn the amplifier ON for the next
cycle. 
This takes a long time and produces the long OFF time.
When the base of the PNP transistor sees a voltage about 0.6v
below rail voltage, it turns ON and this action turns on the NPN
transistor. This pulls the positive lead of the 1u electrolytic
down and the small voltage it contains is delivered to the PNP
transistor to turn it ON harder. The right lead of the capacitor
is now pulled down to almost 0v via the NPN transistor and now
the capacitor starts to charge via the 10k resistor and the
base-emitter junction of the PNP transistor. Eventually the
capacitor is fully charged and the current through the PNP
transistor base reduces to a point where the transistor is not
turned ON as much and this starts to turn OFF the NPN
transistor. The voltage on the collector of NPN rises and raises
the 1u and this completely turns OFF the PNP transistor. The
voltage on the base of the PNP is actually higher than rail
voltage and the 1u is gradually discharged via the 10k and 330k
to repeat the cycle. Because this circuit has such a fast change
from one state to the other it is classified as a flyback
arrangement or flyback circuit.
But we mainly want to explain how the capacitor works . .
the electrolytic
HOW THE CAPACITOR WORKS
At
the start, the 1u is charged via the 1k, 10k and 330k. As soon
as the PNP transistor sees a voltage on the base that is 0.6v
lower than the supply of 6v, it starts to turn ON. This action
will turn on the NPN transistor.
The 1u electrolytic will be pulled down by
the NPN transistor, and cause it to be charged at a higher
current via the collector-base junction of the PNP transistor
and 10k resistor. This higher current makes the
PNP turn ON more. Eventually the 1u will be fully charged and
the PNP will turn off a small amount and this action will turn
off the NPN transistor.
The fully charged capacitor will rise high in the circuit and
produce a voltage on the base of the PNP transistor that is
higher than rail voltage.
At this point the two transistors are "out of circuit" and the
components will discharge the capacitor to produce the "OFF
time."
When the cap fully discharges it begins to charge in the
reverse direction to start the cycle again.

Feedback Oscillator Animation
You need to view the animation a number of time
to get the full concept of what is happening. The voltage
on the base of the PNP transistor will be higher than rail
voltage for part of the cycle. This is only obvious when you
start to measure the voltages or see the circuit working with a
Digital Oscilloscope.
One way to "see" what is going on in a circuit is to add a
speaker.
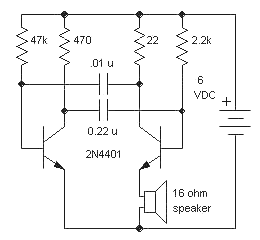
Here is a circuit. Each half of the circuit has different timing
components and you can change these to see the effect it has on
the sound.

These circuits show how the driver transistor turns ON with a
high
"current capability" that it is able to illuminate a globe.
When the two transistor are directly connected together, as
shown in the circuit below, they
form a single transistor (called a Uni-Junction
Transistor) and this circuit simulates a UJT. The output is a
very short duration spike and has a very low current drain.
We are not going into UJT designs as this is a
different area to study and the capacitor in this circuit is
simply a storage device and not one that "jumps up and down.".
There are many ways to produce an oscillator. You will be able
to recognise some of the ways and one of the ways is to
understand the action of a
capacitor that is not connected to a power rail.
CONCLUSION
Page-1 Common-Emitter stage Go to
Talking Electronics
website
More circuits using this feature are covered here:
The Transistor is a
POTENTIOMETER.
and
this link
The "how and why" of
a capacitor works in a circuit has never been discussed in any text book
or University demonstration and that's why we have covered it in detail.
You have to understand a capacitor "jumps up and down in a circuit"
and sometimes connects two parts of a circuit and then separates two
parts when it is charged. And it can produce a negative voltage or a
voltage higher than the supply.
Unless you can "see" a circuit working in your mind, you cannot design or
repair ANYTHING. It will just be a mystery.
A capacitor is simply a
rechargeable battery.
Understanding the operation of a capacitor is very basic but very
complex. If you
don't understand the principles of electronics, it is pointless
proceeding to higher levels.
It's like learning to repair a car and not learning how to unscrew a
nut.
Page1A. more on the stages
Page-2 emitter-follower - common collector stage
Page-2A common base stage
Page 3 Coupling stages
Page 4 More on Coupling Stages
Page-6 All the "YouTube" mistakes
The REAL
Transistor Amplifier
12/4/2024